

Hardware Optimization
This page will cover getting the most out of your hardware and measures to optimize performance.
There is a plethora of knowledgeable online resources and advice on hardware setup and optimization – just to name a few:
The above will bring you up to speed regarding PC building considerations and practical aspects, as well as frequently offer up to date build recommendations and guides for both budget and high-end systems. Below the page will cover some general topics and recommendations.
CPU
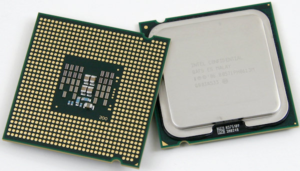
PlanetSide 2 is an MMO game released in 2012, with potentially hundreds of players in a battle. As a consequence, PlanetSide 2 puts more load on CPU than most games. Originally built on DirectX 9 in 2012, the engine was updated and in 2019 and currently uses DirectX 11. Although this optimization improved performance overall, the game is still CPU heavy and reliant on good frequency and per-core performance, potentially more so than number of cores and multi-threading.
Overclocking
It is possible to squeeze out some extra CPU performance by overclocking. Most motherboards offer this advanced feature in the UEFI/BIOS and many CPU manufacturers nowadays provide easy overclocking solutions with their own desktop software. It is important to emphasize that overclocking is an advanced process and constitutes risks inducing damage to the CPU and system if performed wrong or too aggressively. Note that overclocking typically also involves voiding guarantees. Therefore, inform yourself sufficiently on the options, the procedure, and ensure that you provide sufficient cooling to the PC and especially CPU.
Overclocking a CPU involves increasing its clock frequency:
Clock Frequency = Base Clock Frequency (BCLK) * Multiplier
There are two ways of overclocking to reach a higher Clock Frequency: by increasing BCLK and Multiplier.
Pretty much any CPU can be overclocked by raising BCLK. However, this also raises the operating frequency of other PC components, which can lead to irreparable damage. Instead, overclocking by multiplier is safer and yields better results, since it only changes the CPU frequency. However, not every CPU and Motherboard support it. Overclocking by multiplier requires:
- A motherboard with a fitting chipset. Ryzen CPUs can be overclocked by multiplier on both cheap B-series chipsets, and premium X-series. Intel CPUs require a premium Z-series chipset, such as Z370.
- The CPU itself must have an unlocked multiplier, which means any Ryzen CPU, or an Intel CPU with a “K” index at the end of its name.
Most CPUs have a dynamic multiplier. Windows will automatically change current multiplier within certain bounds depending on current load and Power Settings. The gist of overclocking by multiplier is to increase the maximum multiplier. If you have fitting hardware, overclocking a CPU by multiplier is as easy as going into UEFI or BIOS and increasing maximum multiplier. For example, Intel Turbo Boost is just that – a temporary increase of maximum multiplier. An automatic overclock, basically.
There is a catch: increasing the Clock Frequency beyond a certain point will make the system unstable, and the PC can potentially crash and reset. To increase the system stability, it is often necessary to increase CPU’s voltage. Doing so can potentially damage the PC, and it will reduce system’s longevity, and increase power consumption and heat emissions. This is why overclocking is typically performed incrementally and with a system stability or stress test.
The general goal of overclocking is to achieve the highest clock frequency with lowest increase in voltage while keeping the system stable under load.
RAM
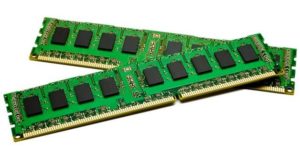
How much RAM PlanetSide 2 requires?
Although the minimum requirements stat 6GB, 8 GB should be regarded as the bare minimum. RAM usage of the game tends to increase over longer sessions which entails that you will see it start to cause, and the game will become more choppy and performance issues may become progressively worse. A simple re-start of the game is enough to solve this. Re-starting the game in regular intervals of 1-2 hours is highly recommended for a smooth performance!
16 GB RAM is not necessary at first, but will allow you to keep the game at its best performance for longer and is generally good to have for gaming or running multiple applications. Usually, gaming performance does not depend on RAM performance too much, but that is because most games put most of the load on the graphics card. PlanetSide 2 performance, more often than not, is limited by CPU, and in these cases RAM performance can be important.
“RAM speed, including the CPU-to-RAM interconnect speed, makes a large difference in performance of deferred rendering graphics engines, such as Forgelight.” – SWG_Tatwi
RAM performance is determined by Frequency and Timings. Both of these parameters determine how fast can the PC get the data in and out of RAM. Higher Frequency is better, and lower Timings are better. However, the higher the Frequency, the harder it gets to get short Timings.
The recommendation is to first settle on capacity and frequency, and then get the RAM with shortest timings your money can buy. Your RAM frequency depends on what kind of frequency your Motherboard supports, and obviously on the RAM itself.
Overclocking RAM. It is usually possible to manually change RAM’s frequency and timings, but it will not necessarily work.
For reliable results, it is better to buy RAM that underwent factory testing and have been confirmed to perform in a stable manner with certain Frequency and Timings. These parameters are usually written into RAM as XMP (Intel Extreme Profiles), and “overclocking” RAM is as simple as choosing/enabling a certain XMP Profile setting in BIOS/UEFI.
Simple tips regarding RAM:
- In case you are getting new RAM, pay attention to the Frequency (higher is better), and low Timings
- Check which RAM speeds your motherboard supports, getting RAM with speed above that would be a waste of money
- When using multiple RAM sticks, using the same model and manufacturer is highly recommended
- Pay attention to the slot order in which your RAM should be placed in (check your MOBO manual) in order to benefit from dual channel modes
- With 16GB or more getting multiple smaller sticks of RAM (e.g. 2x 8GB) is better than using single ones with larger capacity
- Enable XMP profile settings for you RAM in the UEFI/BIOS if your motherboard and RAM support it to ensure that they run at the maximum speed.
For those of you with 8GB RAM: ‘Debloating’ Windows
If you are worried about their RAM usage this can come in handy. Skip down to the GPU section if you’re not interested in potentially sketchy stuff. Play it safe!
BEFORE YOU TRY ANYTHING MENTIONED BELOW – create a restore point in Windows first. This will give you a safe state you can reset your PC to at any time in the case you mess something up or disable something you don’t want completely removed.
Seriously create a restore point before you try anything here! Play it safe!
There’s a few scripts here that can be used to reduce the amount of bloatware Windows carries with it. Using all of these is NOT recommended since some will leave your PC vulnerable.
Update to the latest version of Windows 10 to start off. These scripts are designed for Windows 10 and are unlikely to work on older OSes. Also, download the Scripts off of the linked Github repository.
Unzip them and open the folder in File Explorer. In File Explorer, click on File > Open Windows PowerShell > Open Windows PowerShell as Administrator.
Then use the following command lines to let you actually run the scripts:
Set-ExecutionPolicy Unrestricted
ls -Recurse *.ps1 | Unblock-File
ls -Recurse *.psm1 | Unblock-File
And these will let you run the scripts with .\[FileName+extension]. A word of warning: do not to run the disable-windows-defender one, and certainly do not touch any of the others you’re not certain of yourself. Better safe than sorry after all.
If all of the above goes well, you should see a lowered background RAM usage. I dropped about 500mb background utilisation of RAM personally, but your mileage will vary.
~u/uzzi38
Graphics Card
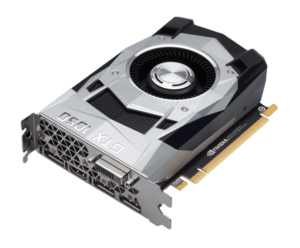
For the time of its release, PlanetSide 2 featured stunningly beautiful graphics, but due to outstanding performance issues, a lot of the eye candy has been removed or reduced over time as a consequence of game optimizations.
If your intention is to use “competitive” settings, it is often better to disable certain graphical features, as they may interfere with visibility. As a consequence, any entry-level gaming graphics card should suffice for PS2.
In case you own a Graphics Card with superfluous power, you can consider to slightly improve visual quality by using Supersample Anti Aliasing.
Overclocking a GPU
Most gaming GPUs can be overclocked by increasing its Clock Frequency and its Memory Frequency. Again, consult detailed guides online and ensure that you have sufficient cooling and power. As with CPUs, an increase in Voltage may be necessary to keep the system stable, and overclocking will increase power consumption and heat emissions. For best results, you should search for a guide on how to overclock your specific Graphics Card.
In practice the most widely used application to perform GPU overclocking and fan control customization is MSI Afterburner.
MSI Afterburner provides relatively straightforward options for fan control customization and GPU overclocking for a wide range of GPUs, even if many of them are not MSI models (i.e. the program is more universally applicable). There are also plenty of guides on how to perform this and evaluate using various GPU benchmarks. An added benefit of MSI Afterburner is the RivaTuner Statistics HUD overlay, a component of MSI afterburner that allows to monitor various hardware component parameters in real time while playing, e.g. CPU or GPU loads, temperature, RAM usage etc.
nVidia SLI Configuration
Credit: /u/octiceps, link to post
With the right driver settings, SLI works well with PlanetSide 2: Sli OFF / Sli ON.
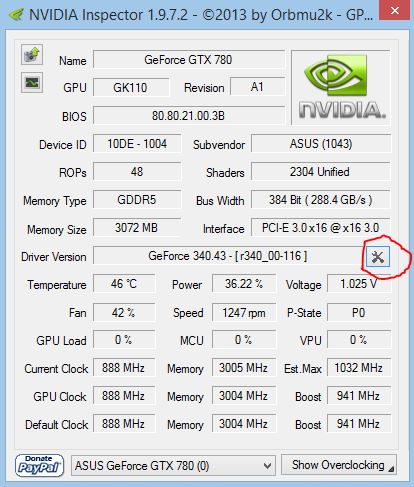
To configure these settings, you will have to download and install this version of nVidia Inspector. Launch the nVidia Inspector and click on the wrench and screwdriver button.
A large window with a lot of stuff will open. Find a drop down list at the top and select PlanetSIde 2. Set the driver settings for SLI and click “Apply Changes” at the top right to save.
If you break something, simply click on the nVidia logo button to restore default settings.
Just keep in mind that SLI provides good scaling only if you are GPU-bound, which is an uncommon scenario for PS2. You have to have a very good CPU, or two old and bad GPUs for SLI to be worth it.
Motherboard
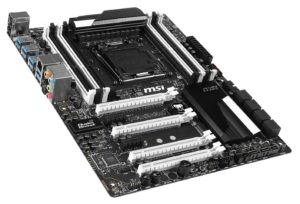
The motherboard connects all your components together and distributes power. Quality of Motherboard’s power system determines stability and longevity of CPU and RAM overclock, and Motherboard’s chipset determines what and how can you overclock at all.
To overclock an Intel CPU with unlocked multiplier, you normally need a Motherboard with Z index in its chipset name. Most modern “gaming” motherboards make it very easy to overclock components, and often even have a 1-button solution “make overclock for me”, like MSI’s OC Genie.
Motherboard also usually contains a built-in Sound Card and Network Adapter. Quality of both of them is important for comfortable gaming in PS2. Always use a cable network connection to play online games, wireless network is not stable enough. The motherboard also determines how many graphics cards can you install at once, though in case of PS2 it doesn’t make sense to use more than one.
Storage

Installing PlanetSide 2 on an SSD, if you can afford it, should improve loading times and potentially solve framerate drops / hitching after you first load into battle. Generally SSDs are recommended for installing games on.
Having Windows and Windows Pagefile installed on an SSD (or better M.2 NVMe slot using PCIe) should improve performance as well, especially loading times.
For Laptop Users
Originally posted on reddit by /u/HerrMyth, added information by /u/4wry_reddit from this post.
As you may know, PS2 is one of the most (CPU+GPU) demanding games on the market, and laptops are not well equipped to face it, not because of hardware limitations, but because of heating issues.
A lot of mid-range laptops only have one built-in fan, and their cooling system is basically made to handle either one of those two situations:
- High GPU usage and low to mid CPU usage: Usual “gaming” scenario.
- High CPU usage and low GPU usage/use of the chipset: Intensive CPU task, video editing, chrome with 50+ tabs open…etc
PS2 requires both high CPU and GPU usage, and your laptop cooling system may not be able to handle it, therefore the temp will rise to a point that your hardware will throttle (reduce operating frequency) for safety reasons. Furthermore, many laptops may be optimized or setup by default to run quietly, rather than efficiently.
Basically, if the GPU temperature rises quickly to 80°C+, and the GPU Clock is being throttled as a result.
In case you are experiencing performance declines due to rising temperatures (and/or are forced so play on potato settings) it may help to look into the following programs:
A note: MSI Afterburner can be used on Laptps to perform modest overclocks on the GPUs (you may have to identify and pick the corresponding chipset), but often fan control customization on laptops is locked on laptop motherboards.
Provoded your chipset is supported, NoteBookFanControl allows you customize fan control even on laptops. This can e.g. be used to increase fan speed to reduce or prevent GPU overheating.
Possible solutions:
- Clean your laptop fans, dust goes in and blocks the airflow, making the cooling system less efficient (refer to the laptop manual)
- Check that your cooling system is actually working at 100% while playing, i use this software Notebook Fan Control to push it to 100%, since Acer limits fan usage to 60%. This software DOES NOT GIVE ANY GUARANTEE, USE AT YOUR OWN RISK
- If the CPU Temp is the issue, you may consider reapplying some thermal paste, since the usual laptop manufacturers are stingy on it
- You might consider buying a cooling pad, which potentially may provide some benefit
- Many laptops come with a lot of pre-installed bloatware, often removing or preventing automatic startup of unnecessary programs will improve performance
- Also optimize the power setting in windows, may laptops have a custom power plan applied that often is designed to make them run silently or use less battery, rather than unleashing their full potential
- Never play on battery!
Undervolting
For those on laptops or other systems where your CPU is prone to thermally throttling itself, undervolting should help mitigate that. All CPUs are shipped with a stock voltage significantly higher than what is necessary for it to function – this is because all chips are different, so both Intel and AMD will set a higher voltage to ensure a greater number of processors will function.
Undervolting cannot, and will not damage your CPU, nor will it void your warranty, so if you have thermal issues it is definitely worth the time and effort you need to perform it.
This guide will cover CPU undervolting, but it is possible to undervolt a GPU as well.
Depending on your CPU, there are a few options on how to go about this:
- Intel-Based Systems:
- ThrottleStop
- Intel XTU
Unfortunately at this time there is no equivalent for AMD laptops. If you’re undervolting on a desktop, then Ryzen Master is what you’re looking for.
This is can be a bit of a confusing process so I’ll list a brief guide on how to go about this. In this guide I’ll be using ThrottleStop as I’ve found it to be more reliable than Intel XTU. First, take a moment to search on Google and see what other’s have achieved for their undervolts for the same processor as you. Take note of numbers that look like the following: -60mv. You can use this to gauge what kind of undervolt you might be able to achieve. Start up ThrottleStop and you’ll be greeted by the following:
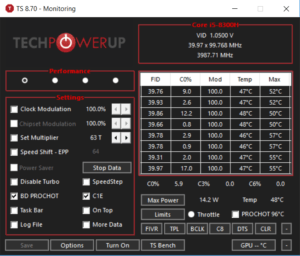
Ignore everything on there for the time being except the TS Bench button (keep a note of this – it’ll come in handy later) and click the FIVR button. This will open up a second window. We’re interested in this portion of the middle column:
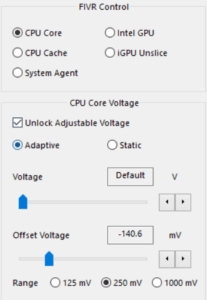
The biggest gains you’ll see are from undervolting the CPU Core and Cache – the rest will hardly affect anything. Start off with the core. Click the ‘Unlock Adjustable Voltage’ button, ensure it’s set to ‘Adaptive’ and then focus on the Offset Voltage.
Now reduce the ‘Offset Voltage’ value in very small amounts – no more than -10mv in one go. Every time you do so, use a CPU benchmark of some kind to test and see if your undervolt is stable. The TS Bench mentioned earlier works – have a play around with that and ensure you don’t get any BSOD crashes.
Don’t worry if you do – undervolting is completely harmless and should not cause any damage to the CPU itself. Just increase the offset voltage again (as in, bring the number closer to 0) to prevent crashing and you’re good to go. From here on its a bit of a cycle to see how low you can go whilst keeping your system stable.
HPET Bug
To properly function, any computer system must be able to accurately measure time. A typical Windows PC has several ways to do so, and using HPET – high precision event timer – is one of them.
HPET is most precise timer available to the system, but whole generations of CPUs are affected by what’s been called “HPET bug”: for them, accessing HPET takes ~7 times longer than it should. Similar to Meltdown and Spectre, this is a hardware issue, and cannot be fixed entirely.
Skylake X and Kaby Lake X have the worst of it, but it seems to also affect Threadripper, Coffee Lake, and Ryzen.
You can read all the technical details in these articles:
- Anandtech – explains where it all began and gives a thorough explanation of system timers
- Overclockers.at – has a shorter summary and a specialized benchmark to highlight the issue
By default, HPET is simply on the list of the available timers in Windows 8 and 10. Different timers will be used for different purposes, which is the best case scenario.
However, certain pieces of software, such as Ryzen Master and potentially anything related to overclocking, benchmarking or monitoring hardware, can force HPET to be the only timer used by the system. This may be necessary for the normal operation of that software, but on the systems that are affected by the HPET bug, it can lead to a decrease in performance, sometimes quite significant.
HPET Configuration
HPET can be configured in two places:
1) On some motherboards, HPET can be Enabled or Disabled in BIOS.
2) Windows Command Prompt can Force HPET to be always used as the only timer, or you can set Default Settings.
So there are four total combinations of these settings:
1) Enabled in BIOS, OS uses Default Settings: HPET will be used as necessary. This is the desired configuration.
2) Enabled in BIOS, Forced in OS: HPET is always used. If your system suffers from the HPET bug, this is where performance problems occur.
3) Disabled in BIOS, OS uses Default Settings: HPET is not available at all.
4) Disabled in BIOS, Forced in OS: HPET is not available at all and there could be a performance impact.
It is not recommended to keep HPET Disabled in BIOS, as it can cause stability issues. Additionally, if HPET is Forced in OS and Disabled in BIOS, it can result in skipped frames or otherwise impact your performance.
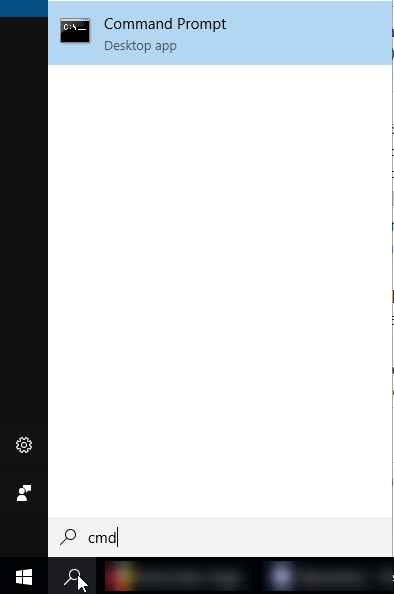
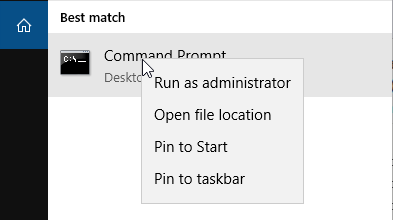
How to configure HPET through Windows Command Prompt:
- Windows Search for “CMD”
- Right Click the Command Prompt and click “Run as administrator”
- To Force HPET, type: bcdedit /set useplatformclock true
- To set Default Settings, type: bcdedit /deletevalue useplatformclock
- Reboot
If the command you entered has successfully changed something, you will get “operation successful” message. If the command was already active, then you will get an “error occurred” message.
For Intel
Use the Command Prompt to set HPET to Default Settings. If you get “operation successful” message – congratulations, you are likely to get increased performance. If not – too bad, not today.
For Ryzen
During Ryzen launch, there was a pronounced issue with HPET, and AMD gave an official recommendation to disable HPET in BIOS. However, those issues were supposedly resolved.
To find out whether your system benefits from completely disabling HPET:
- Update your BIOS to the latest version.
- Use the Command Prompt to set HPET to Default Setting. Restart your PC.
- Run the TimerBench at low resolution with HPET Enabled in BIOS.
- Do not click “Enable HPET” button in TimerBench, as it will force the system to always use only HPET, which is not desirable.
- Run TimerBench with HPET Disabled in BIOS.
- Compare results. If you see no difference, then keep HPET Enabled in BIOS and set to Default in OS.
A note on TimerBench: you can see a “Enable HPET” button, but it doesn’t actually enable HPET, it forces the system to always use HPET in all situations, which will cause a performance drop if your system is suffering from the HPET bug. This is the same as Forcing HPET through Command Prompt.
Similarly, the “Disable HPET” button in TimerBench does not actually disable the HPET. It does the same thing as setting Default Setting through Command Prompt. Only the BIOS setting can truly disable HPET.
HPET Benchmark Results
A contributer used a Core i5 7600k, overclocked to 4.4 GHz on MSI Z270 Gaming M3 motherboard. He ran two sets of benchmarks, one with TimerBench – a benchmark produced by Overclockers.at to specifically demonstrate the performance impact of the HPET Bug.
-

- BIOS enabled, OS default 640×480

-

- BIOS enabled, OS forced

-

- BIOS disabled, OS default

-

- BIOS disabled, OS forced

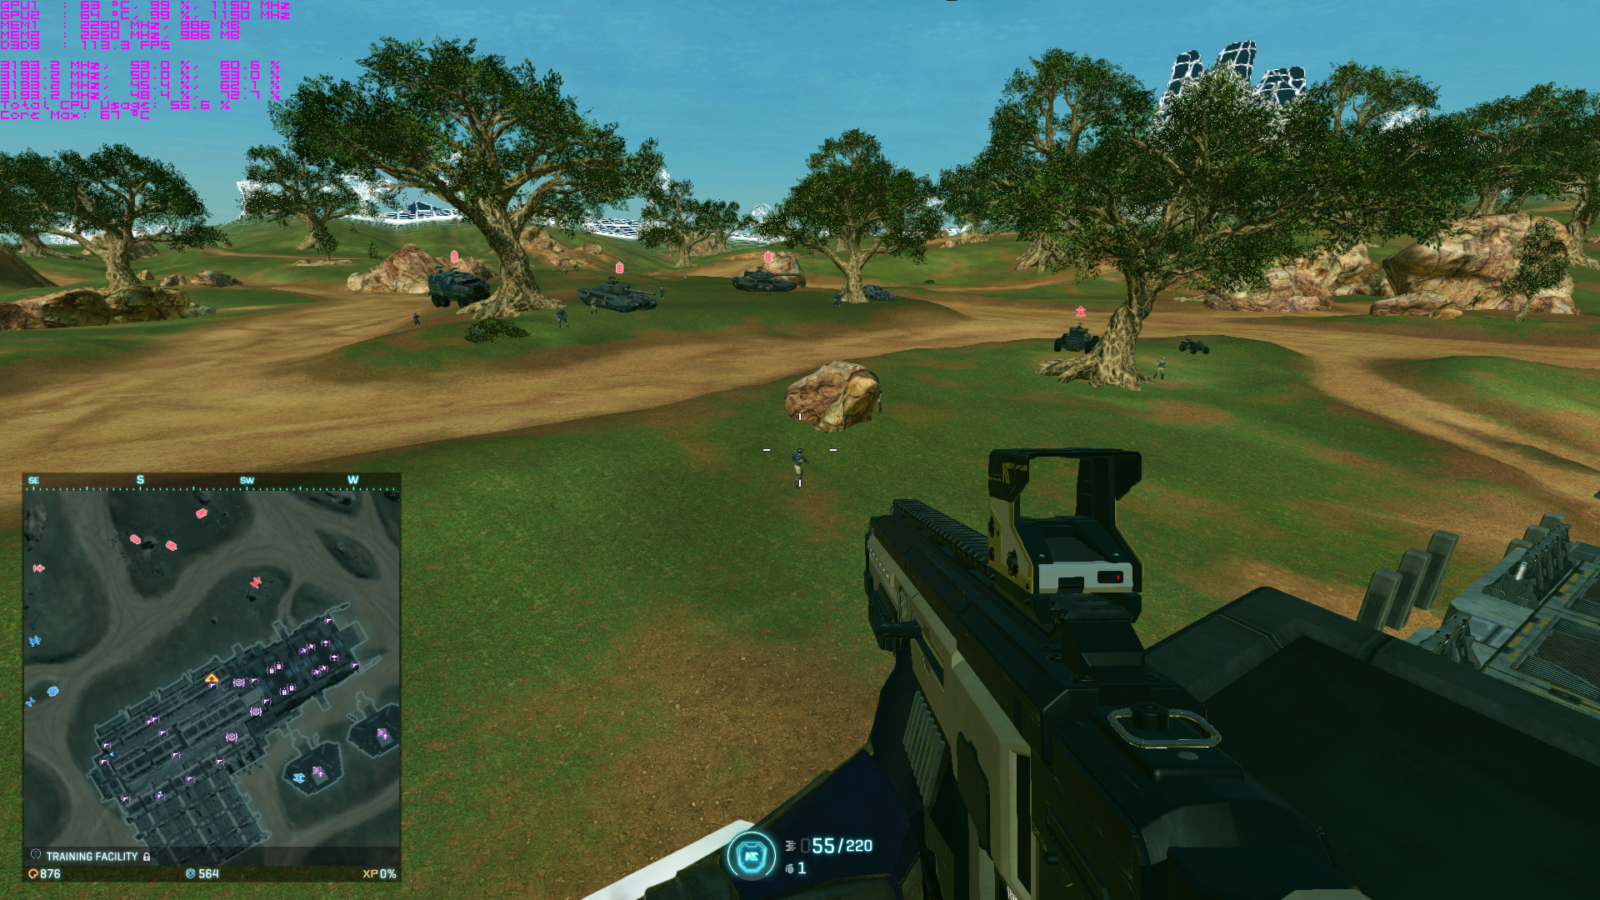
He also ran a primitive benchmark in PlanetSide 2 – just drove a Prowler near a tower in VR Training and fired HESH shells and Gatekeeper bursts for a minute, using FRAPS to record frametimes and these graphics settings.
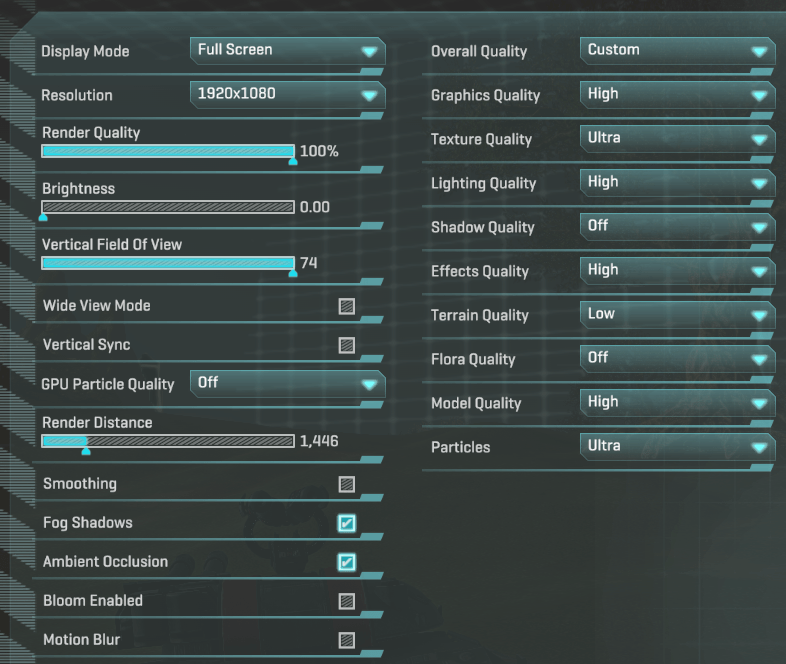
-

- BIOS enabled, OS default
-

- BIOS enabled, OS forced
-

- BIOS disabled, OS default
-

- BIOS disabled, OS forced
As you can see, on my machine the performance impact of the HPET bug is quite significant.
According to that article from Overclockers.at, how much your particular system is affected by HPET bug – if it all – will depend on your specific hardware and what kind of games you’re playing. The impact seems to be most noticeable when your game is CPU-bound – paired with an overly powerful Graphics Card, in other words. This is a fairly common situation for PS2.
References:/u/Oottzz for input on HPET bug and /u/DastardlyCoxcomb for input in the same thread.
Disclaimer
Disclaimer: This page gathers suggestions and tips from multiple sources but is not liable for any potential damages that may result from applying any of the information in practice.
You perform any procedures or modifications to hardware or software at your own personal risk. Thus if you are uncertain seek out advice from multiple sources and inform yourself in advance.