

Mouse Configuration
General infantry and mouse settings guide
Halosupd’s infantry and Setup guide will cover most of the settings (ini), infantry basics etc. but also contains a highly-recommended section specifically focusing on mouse settings for Planetside 2.
Mouse Setup Guide
Credits for this section: MattiAce, ItZMuRdA.
1) Get a mouse with a good sensor
There’s a great in-depth guide here, which will tell you what makes a good gaming mouse, along with a few examples.
And there’s another, very technical and comprehensive guide here.
If you need a simpler “just tell me what to buy” approach, there’s a great guide at Tom’s Hardware. They also have one for mouse pads.
2) Set up your mouse
Nawyria has a great guide on setting up your mouse sensitivity here.
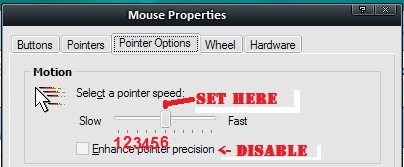
The most reliable way to make sure everything works right is to go to Windows Control Panel -> Mouse, and set mouse sensitivity to sixth notch. This means that per one “dot” your mouse moves, your pointer will move by 1 pixel. Also disable “Enhance Pointer Precision”, as it can mess up your aiming.
In PlanetSide 2 settings, disable Mouse Acceleration and disable Use Raw Mouse Input.
- Allegedly, Raw Input can cause *issues* in *some games*. I do not know if PS2 has these issues, but one can never be too careful.
- Mouse Acceleration increases the distance mouse pointer travels if you move your mouse fast. This makes working out muscle memory for twitch aiming incredibly hard.
3) DPI Settings
- It is said that PS2 can’t handle DPI higher than 1600, so it’s better to keep DPI within that boundary, and adjust in-game sensitivity slider instead.
- Generally, it’s better to have high DPI and low in-game sensitivity than vice versa.
4) Find the right sensitivity
PlanetSide 2 has three sensitivity sliders:
- “Mouse sensitivity” – a general sensitivity slider. Applies to aiming from the hip.
- “Aimed sensitivity” – for aiming down sights with iron sights, 1x and 2x scopes.
- “Scoped sensitivity” – for aiming down sights with 3.4x and 4x scopes, and 6x – 12x sniper scopes.
Go to VR Training, and run around, taking aim at different targets. Try to do this in one fast mouse swipe (twitch aiming). Check out this video if you have a hard time figuring out what I mean.
- If you constantly move your aim too far, then you need to lower your sensitivity.
- If you feel like you need to move your hand too much, then increase it.
- This is the most important part. Just go with what feels right, and devote enough time to it.
- The “average” mouse sensitivity is 15-25 cm of moving the mouse per 360 degree turn in the game.
- High sensitivity is helpful for fast reaction turns in close quarters, and with lower sensitivity it’s more convenient to aim at enemies at range, especially when using low-magnification scopes.
Another exercise is to track moving targets with your mouse. It’s convenient to do on your allies. Again, if you constantly lose the target, lower the sensitivity, and if you have to move your hand around too much – increase it.
Adjusting to new sensitivity will be hard, and in the beginning you will often do worse than you would have done with the old sensitivity. Hopefully, the end result will be worth it.
5) Set ADS sensitivity : hip sensitivity ratio
In most FPSs with ADS mechanic, the ratio between ADS sensitivity and hip sensitivity is 0.5 : 1 or 0.66 : 1.
I.e., while ADSing your aim moves at half or 2/3rds of the speed compared to aiming from the hip.
However, PS2 has a bit different internal ratio. If you want to set up a specific ratio between hip aim sensitivity and ADS senstivity, check out this guide on reddit.
If you don’t want to get into details, it’s perfectly fine to just set Aimed sensitivity the same value as Mouse sensitivity.
Mouse Polling Rate
Mouse Polling Rate is basically how often your mouse sends updates on movement and clicks to your PC. Higher polling rate decreases mouse-based input delay and reduces impact from microstutter, and generally improves how quickly and accurate your cursor’s position updates to the position of your mouse.
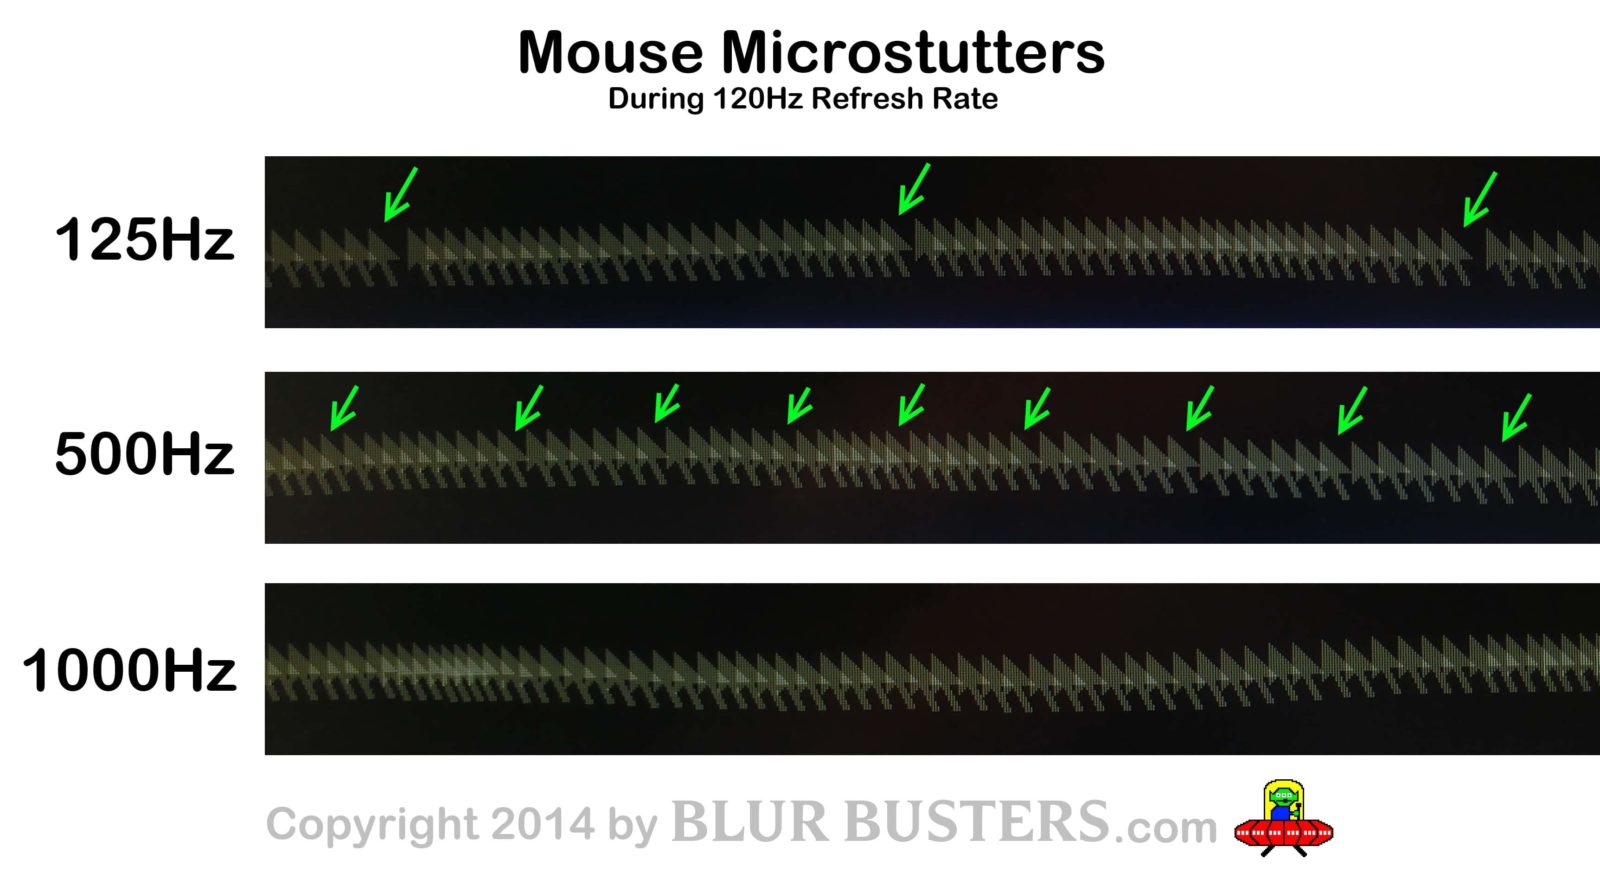
Most gaming mice allow you to change the polling rate between 125 and 1000, most cheap mice run on 125 and most other non-gaming mice run either 250 or 500. While it’s possible to change polling rate on mice without available software, I don’t recommend doing that, so what I’m about to say mostly pertains to people with gaming mice.
It’s a known fact that polling rate affects CPU usage by a fair amount. You can observe the effect of polling rate(through vigorous mouse shaking) on CPU usage here:

Now, my CPU is no 2700x or 8700k, but it’s no core2duo either. The graph is for all 8 threads, but per thread usage is similar, with one thread using slightly more than average and others using slightly less. On top of that, high polling rate and tremor don’t go well together. For the above reasons I use 500 Hz. It utilizes less resources than 1000Hz, has very little input lag and it may or may not smooth out some minor mouse shaking.
Oh and some shitty and/or old gaming mice have trouble achieving 1000Hz polling rate, but pretty much all gaming mice achieve 500 without issue. Keep in mind that this only pertains to some old mice, and high-quality brands(Logitech/Zowie) along with newer mice are all unaffected, so don’t base your decision around that.
This guide is written by Nawyria (Miller NC)
As the title suggests this is a guide for the mouse sensitivity settings for the FPS-MMO ‘Planetside 2’. It covers the factors affecting the movement of your crosshair, what overall sensitivity would benefit you, as well as how to set it, the effect of DPI on your settings and finally non-Infantry sensitivities.
Quick Link to Calculator
Alternative, more compact Calculator credit goes to Reddit user /u/mpchebe
Alternative alternative calculator by/u/rockNoob.
TL;DR
If you’re already bored of reading and haven’t previously thought about your settings, use one of these.
|
Setting 1
|
Setting 2
|
Would you like to know more? Read on. Everyone’s doing their part, are you? The war effort needs your effort. Service guarantees citizenship.
What affects your in-game movement?
The way your character handles in-game should be determined by just two variables, your mouse’s DPI (or CPI, if you want to be pedantic) and the in-game sensitivity sliders. To achieve this, enable the Use Raw Mouse Input setting and make sure Mouse Acceleration is turned off.
The former makes sure that any software mouse acceleration from your Operating System does not affect PS2 while the latter disables any acceleration from the game itself. Mouse acceleration increases your crosshair’s speed depending on the speed at which you move your mouse and it is almost universally considered best to play with this setting turned off, as it reduces your accuracy.
Lastly, OS mouse sensitivity settings do not affect the movement of your crosshair, neither do your PS2 Graphics settings such as your Field of View or Resolution (unless your settings are too high and your machine cannot maintain a stable, high FPS. If your CPU is bottlenecking performance, ticking ‘Reduce Input Lag’ can help alleviate control problems.).
However, note that graphics settings, especially FoV, can have a significant impact on how the game feels. The lower your FoV, the faster your camera seems to move around the world as you are effectively playing ‘zoomed in’ with only a smaller portion of the game world rendered on your monitor. You can play with this setting a bit to see what’s comfortable for you; a higher FoV gives more situational awareness, while a lower FoV makes it easier to see things in the distance.
Turn Distance / Overall Sensitivity
The handling of your character is measured by the distance you have to move your mouse to make a full turn of 360 degrees, a.k.a. Turn Distance. This is a useful number to know as you can use it to make sure your settings are the same across several games, allowing you to carry over muscle memory.
To find your Turn Distance, simply point your crosshair at a particular spot and move your mouse horizontally until you’ve made a complete turn and are looking at the same spot again. Then, using a ruler, measure the distance that your mouse has traveled.
Settings with a longer Turn Distance are referred to as having a low Overall Sensitivity while those with a shorter Turn Distance as having a High Overall Sensitivity.
For Planetside 2, the relationship between your DPI + Sensitivities and the Turn Distance is rather involved. Halving your DPI doubles your Turn Distance, but the Sensitivity has no easy relationship to the other two. For instance, at 400 DPI at a sensitivity of 1 corresponds to 1.85cm/360, while 400 DPI at 0.5 sensitivity corresponds to 7.9cm/360.
Fortunately there are calculators online that do this work for you. You can make a copy of a calculator I’ve created here that will do the math for you, or you can have a look at http://www.mouse-sensitivity.com/ where you can convert your settings to and from other games.
Note that the in-game sliders only allow you to configure sensitivities in steps of 0.004. You can set a much more precise sensitivity by opening UserOptions.ini in your Planetside 2 directory and manually inputting values.
They can be found under the [General] header and here you may enter any number between 0.000000 and 1.000000 for any sensitivity you like, as long as the number has exactly six decimal places. This is especially useful if you use a high DPI as you need a lower sensitivity to compensate.
What is a good Turn Distance to use?
Among veteran players it is generally accepted that a high Turn Distance is desirable. As such, values around 20cm/360 are common, but many players will use a setting closer to 30cm/360 (dedicated fps players may even use 50cm/360 or beyond). This allows a player to be much more precise, enabling them to score hits and headshots from much farther away than they normally would.
On the other hand, having a very large Turn Distance means the controls are more cumbersome, which is not good for your ability to respond to being attacked from behind. With Planetside’s emphasis on verticality and the fact you can be attacked from all sides, this is a bad thing – especially if you’re playing a mobile Light Assault or SMG Infiltrator.
The answer to the title of this section may disappoint, as there is no one good answer here. The perfect Distance/360 for you will depend on your playstyle, your habits, the size of your mouse mat, your mouse grip and a wealth of other factors. Trial and error is the only way to find what suits you. Still, here are a couple of pointers.
- Try to go up to at least 12cm/360, preferably 15cm/360. These are still considered to be on the high-sensitivity end, but are perfectly serviceable. Note that most games offer 5cm/360 to 8cm/360 by default so this might feel like quite a jump to you, but you’ll get used to it in no time if you stick with it. Do so, the benefits are worth it. You can consider going higher eventually, but this is not strictly necessary because of point 4 below.
. - If you use a Fingertip grip to hold your mouse you may find it harder to adjust to this Turn Distance or to move beyond it. Chances are that this is because the movement of your mouse is coming from your wrist and fingertips rather than your entire arm. If you do this, learning to use your arm to aim can help you. Though Palm and Claw grip users likely already do this, it’s worth restating that the movement of the mouse should come more from your arm the higher your Turn Distance.
. - For obvious reasons, it’s not a good idea to set your Turn Distance higher than the width of your mouse mat. A reasonable upper limit would be 90% of your mouse mat’s width. This ensures you can do a half-turn in either direction without having to lift your mouse. If you want to go higher, it’s advisable to get a bigger mat. Regardless of size, a good quality mouse mat is a good investment for any shooter.
. - It is possible to have a ‘best of both worlds’ scenario where you retain both the mobility afforded by a low Turn Distance and the accuracy of a high Turn Distance. Planetside 2 has different sliders for different purposes: “Mouse Sensitivity” affects Hipfire only, “Aimed Mouse Sensitivity” affects ADS (Aiming Down Sights) using Ironsights, x1 and x2 Reflex sights, as well as the IRNV scope, “Scoped Mouse Sensitivity” affects ADS for x3.4 scopes and above.
.
Note that the Turn Distance for any ADS mode is increased by a factor of 1.6 and then further multiplied by the magnification of the sight. Ironsights and x1 sights secretly have a x1.35 magnification built-in so, for the same ADS and Hipfire sensitivities, a x1 Reflex sight will have a Turn distance that is 1.6 x 1.35 = 2.16 times larger. All other sights have the magnification they claim to have, so a x2 Reflex will have a Turn Distance that is 1.6 x 2 = 3.2 times larger and so on. The Aimed and Scope Turn Distance in this guide refer to the x1 Reflex and x6 Scope (default sniper), but the calculator provided can do the math for any weapon optic in the game.
.
This means that you can retain your high-sensitivity hipfire Turn Distance of 15cm/360, but set higher values for the ADS modes. I personally use 15cm/360 for Hipfire, 30cm/360 for Aimed and 100cm/360 for Scoped. This gives me a nice balance between mobility and accuracy. I wouldn’t recommend setting your Aimed and Scoped Turn Distance at much higher than x2 and x6 your Hipfire Turn Distance respectively, as that makes it difficult to compensate for recoil on automatic weapons.
. - To get more mileage out of these values you can use a variable DPI option present on most modern gaming mice. I’ve a function called “DPI Shift” bound to a button that, when pressed, cuts my DPI in half so that I get 60cm/360 aiming and 200cm/360 scoped. This is really useful for counteracting scope sway on Sniper Rifles and for any kind of shooting beyond the 40 meter mark. If you plant to use this, ensure that your variable DPI does not go below 400, which will introduce inaccuracies.
The Effect of DPI
So far we’ve talked a lot about Turn Distance, but not too much about DPI. This is because, unless your mouse DPI is set exceedingly high, you will be able to find a sensitivity that gives you your desired Turn Distance. That is to say, for hipfire, 0.347074 sensitivity at 400 DPI gives you the same 15cm/360 as 0.078411 sensitivity at 2000 DPI. That said, the raw DPI of your mouse does play an important factor in the accuracy of your mouse movement. Many other, more qualified people have written at great length about this so I’ll keep this short.
Roughly speaking, a lower DPI at the same overall sensitivity will make your mouse movement less fine-grained and vice-versa. If you set your DPI too low you may experience pixel-skipping, which makes it more difficult to aim at things in the distance. Conversely, if you set your DPI too high even the slightest movements of your mouse will make the crosshair jitter across the screen, which decreases accuracy.
There will be several DPI values that avoid either extremes, depending on the specifications of your mouse. Setting your mouse to a non-native DPI will also cause inaccuracies and, if you’re not entirely sure of what your mouse is designed to handle, a DPI of 400 or 800 is a safe choice. For comparison, a Google Docs spreadsheet on GS:GO pro players’ settings reveals that DPI values between 400 and 1800 are common. If you would like to know more, there are a couple of links below. Understanding mouse settings is important, we can ill afford another Klendanthu.
- Demonstration of Pixel Skipping from this Reddit thread.
- High DPI isn’t always good linked to in the same thread.
- Comments on Native DPI and Polling Rate from the same thread.
- Check out the links in this blog’s Performance Guide for more technical guides on gaming mice.
A word on non-Infantry sensitivities
With the luxury we are afforded by having three separate sliders with distinct purposes for Infantry gameplay, it is unfortunate that the sensitivities are a bit of a mess when it comes to vehicles. I don’t have a lot of experience as either a driver or a pilot so I will refrain from giving any comments on what your settings should be, but I will remark the following.
Non-Infantry sensitivities are a lot less of a mess than they used to be. Recently Daybreak has created a new slider specifically for vehicle secondaries, which alleviates some of the issues we had before.
- Stationary turrets, such as Base turrets or Engineer MANA turrets will use your Hipfire sensitivity when firing normally, but your Aimed sensitivity when holding down the right mouse button. Base turrets have a built-in limit that restricts your turn rate, even if you set the sensitivity very high.
. - When in a Lightning or Main Battle Tank, the turn rate of your main gun is determined by your Vehicle sensitivity and, like base turrets, have an upper limit to the traverse speed of the gun. Unlike base turrets, however, the turn speed of your main gun is still determined by the Vehicle sensitivity when you use your optics (zoom/thermal/nightvision). This means that you need to choose between turn rate and accuracy for your main gun’s sensitivity.*
. - Secondary weapons both Ground and Air vehicles use the Vehicle Gunner sensitivity, whether using optics or not. The maximum turn rate of these mounted weapons is not restricted in any way.*
. - Aircraft use Flight Vehicle Sensitivity for everything else, even the optics on the front guns. Strangely, the roll and pitch rate for aircraft is directly affected by the sensitivity setting and can be massively increased by using a higher sensitivity. Go into VR Training, equip a Galaxy with High-G or Precision Drops Airframe and set your sensitivity to maximum and watch your skywhale dance like a ballerina. Try the same thing with your Empire-Specific Fighter of choice.
Obviously, a high sensitivity makes aircraft difficult to control and makes it neigh-on impossible to hit anything with front guns (if any). However, if you’re just looking to get from A to B and evade fire, a high Flight Vehicle Sensitivity may benefit you.
I’ve read in multiple places that dedicated tankers often use a mouse button to reduce their mouse’s DPI to improve long-range accuracy, especially with the Saron Laser Cannon on top of a Magrider or Harasser.