Hello!
I am DefensiveShades and if you’re reading this guide that means you want to learn about Squad Leading in a point hold situation and point-holding in general. Point holding is one of the hardest things to do in Planetside 2 with a steep learning curve.One of the challenges with being a point-holder is the immense amount of information you have to process and then act upon if it’s relevant in your battlespace. In addition, being the squad leader of a point-holding squad or listening to orders makes it even more complicated! Each and every experience will help you learn what’s good and bad and every mistake you make will help reinforce what a good decision and a bad decision. So if I can offer any good advice before we get into the meat of this guide is that if you’re serious about point-holding is to not give up and keep pushing! We’ll be going over MANY things in this guide and my job is to educate you without your brain exploding, so keep in mind that to get the most out of this guide is to watch the videos provided as they give you second-hand experience on what it’s like to do the stuff that point-holders do.
My Experience and About Me:
I’ve been doing point-holding for almost 5 years at this point and I can definitely tell many of you I’ve lost count of the hours. After being able to run 2 successful outfits in two different eras of Planetside 2 being [JOKE] (An Emerald Outfit) from 2015-2016 and BWAY/BWAE (Also an Emerald outfit) from 2018-Present. I believe, I have accumulated enough experience to be one of the first to make as much of a detailed guide as possible for new players and veterans reading on CyriousGaming website, Planetside Guide website, or the Bushido Way website on how to point hold!
Feel free to visit my outfit website to check out my youtube channel (FULL of point-holding videos) and learn a little bit about me and my experience!
https://bushidoway.weebly.com/shades.html
INTO THE HEART OF THE MATTER
When I talk about point-holding with a squad and being an effective point-holding squad leader; I am talking about taking a base with less than 12 people against double and maybe sometimes triple your numbers. Other Times it can be 24 players vs 48 or even more. The point is; you’re dealing with enemy overpop with your team of dudes that are generally half their size and need to make the best of your situation and also take the base!
However, I have been told that point holding does look something like this when you try to describe to a new player or someone new to the art of point-holding what it’s all about.
Sadly, it’s nowhere as cool as the pic I just showed you because all those New Conglomerate defenders defending that point-building in the picture would most like be fighting those TR players with combined arms support alone without air support and it’s also likely that Air support will be TR engaging those NC pointholders. Basically, it isn’t as cool and as pretty as people imagine it because point-holding; in reality, is gruesome, hard, and downright DIRTY. However, that doesn’t mean it can’t be a lot of fun!
Here’s a collaboration of pointholds I did in the Year 2018 with my outfit so you can get a nice idea about what we’re going to talk about here!
Contents:
A) Proper [Loadouts and Classes] |
B)Modes of Transportation |
C) Callouts and Setting up in a Building |
D) Holding Lanes and Doorways |
E) Rotating AKA Defeat in Detail |
F) Double Peeking |
G) Collapsing on Point |
H) Putting it all together! |
A) Proper [Loadouts and Classes]
When it comes to point-holding especially in the modern age of Planetside 2 it’s important to really discuss classes, load-outs, and implants. Having the proper load-outs can really make or break your point-holding squad.
For my outfit, my general rule for a squad of 12 is the following:
 5-6 Heavies
 4 Medics
 1-2 Engineers
 1 Infiltrator
The class setup presented here was created to give detailed information on how many enemies you will be dealing with, the firepower needed to take out enemy maxes and vehicles and to make sure your squad is topped off with ammo and utility. In addition, it is definitely critical to not compromise on the number of medics you have as they’re the most important asset to keeping a squad alive and making sure the rest of your squad has more up-time in combat holding off the enemy.
Next, we get into the load-outs which can be found here: https://docs.google.com/spreadsheets/d/1HwScpj0iJVffVrvekb63lfsjRVlii4NvXB6hWxt2lQk/edit?usp=sharing
The topic of load-outs is complicated so I will be providing a detailed video at the end of Section A encompassing everything that was written and for it to be explained in more detail.
So, let’s talk about the most important implants instead which are Safeguard and Athlete.
Safeguard
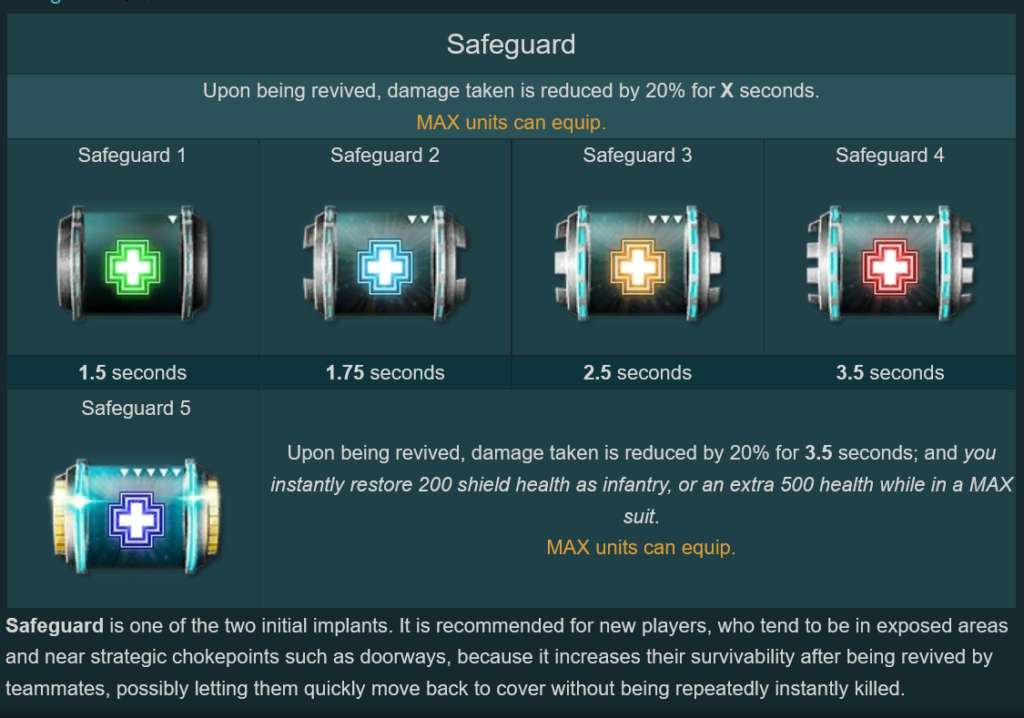
Safeguard is one of the most important implants for a point-holder because it allows for you to take more damage upon revive for 1.5-3.5 seconds depending on the level of safeguard you have. Basically, TLDR, when you get revived you come back stronger!
As a point-holder; you’re going to DIE a lot and it’s important that we give you a bit of a boost upon death.
Athlete
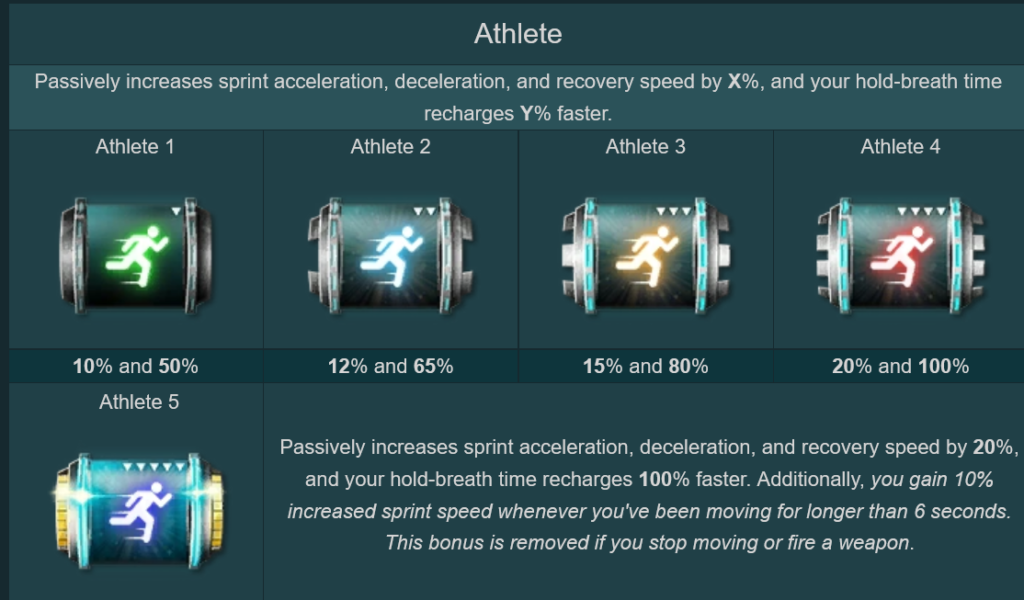
Athlete for some is interchangeable but for a point-holder, it’s critical when you’re in a brawl and for that NICE aim speed. In addition, when getting revived the stop animation from getting up is nullified and allows you to move to a different location upon revive making it harder to kill you upon revive if someone is shooting at you as you’re actively moving while getting up from death.
TLDR: your sprinting starting and stopping animations are faster and you can steady your aim more often and rank 5 bonus: you move faster after sprinting for 6 seconds and #MOVING ZOMBIE
An example of having the implant and not having it:
And finally a demonstration from the only Planetside 2 player with a PH.D Dr. Atherum using Safeguard and Athlete!
To finish up section A and not blow your brains out because we have only been covering the most IMPORTANT stuff on paper is to end it by talking about C4.
C4 is critical when fighting over-pop and combined arms as 12 folks sometimes aren’t enough to stop a coordinated push. C4 is an extreme force multipliers for heavies and medics . C4 will allow you to clear multiple enemies from doorways, kill maxes with ease, and prevent large blobs of enemies from stacking up and wiping you and your small squad out. A good demonstration of C4 usage from my outfit.
https://clips.twitch.tv/PoliteTubularClintPJSugar
Gotta love that Pizza!
And as promised; an entire youtube video from me explaining the class load-outs and why each one is important.
B)Modes of Transportation
After many many years of transporting my folks and I have found two ways to really keep your squad together which is to beacon drop or to fly a galaxy.
Backcapping Beacon Drops
Step 1: Have your squad hold the point you’re currently defending in order to be ready to backcap the next base down the lane (Back Capping is the art of ticking an enemy timer while defending the previous base)
Step 2: Send one player with an ejection seat ESF to fly over to the next base as fly as possible
Step 3: Tell that ejection seat ESF player to drop a beacon for your squad
Step 4: Have your squad drop on the beacon
An example of a point-hold from start to finish from [SUIT] (Emerald Outfit) on how to do this + a point-hold video.
Galaxys
Using a Galaxy is pretty self-explanatory. It can fit 12 people, it’s the tankiest flying machine available, and your squad can help defend your transport with the guns available on the galaxy.
I don’t want to spend an absurd amount of time on how to use it and how to transport folks so here’s a convenient BWAE guide on flying a galaxy from one of my coaches adstellar!
C) Callouts and Comms
There are many types of callouts available for any outfit using public resources such as this famous [SUIT] Guide : https://imgur.com/a/EPq2Y
The infographic I linked provides a basic understanding of how callouts work at a squad level and how to operate with teammates. However, there are other public resources as well that I will link throughout Section C. The main basis for using callouts is to PROVIDE information to your team-mates to stop enemy pushes and to avoid your squad getting wiped. If your callouts are not used to kill enemies efficiently or to save the life of your squadmate; you’re most likely wasting time cluttering your squad comms.
Here is an example from my outfit use of callouts and comms in an efficient manner.
However, keep in mind that most outfits including mine won’t demonstrate this level of high communication consistently. This takes practice with your squadmates and having an extreme amount of trust with each other.
Now that we have laid the groundwork to what callouts are… here is an entire BWAE slide set on many of the callouts you’ll use in a variety of buildings and I will provide a training video to boot so there is additional reference material you can use.
BWAE CALLOUTS: https://docs.google.com/presentation/d/1Q8-GS-ojI619LD_mVvx-858fWaYQuQLguFH_suror_0/edit?usp=sharing
BWAE CALLOUTS in 2D: https://docs.google.com/presentation/d/1o86YXWRvgZojRRlHmH1M4g3KgE35ufbqmd0MrtWmBOo/edit?usp=sharing
BWAE Training Video on Callouts:
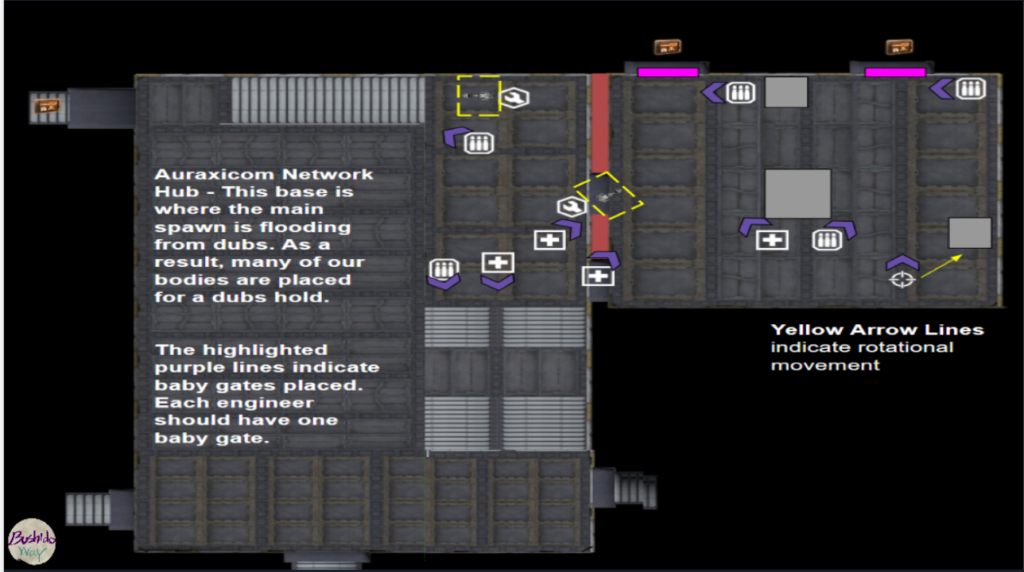
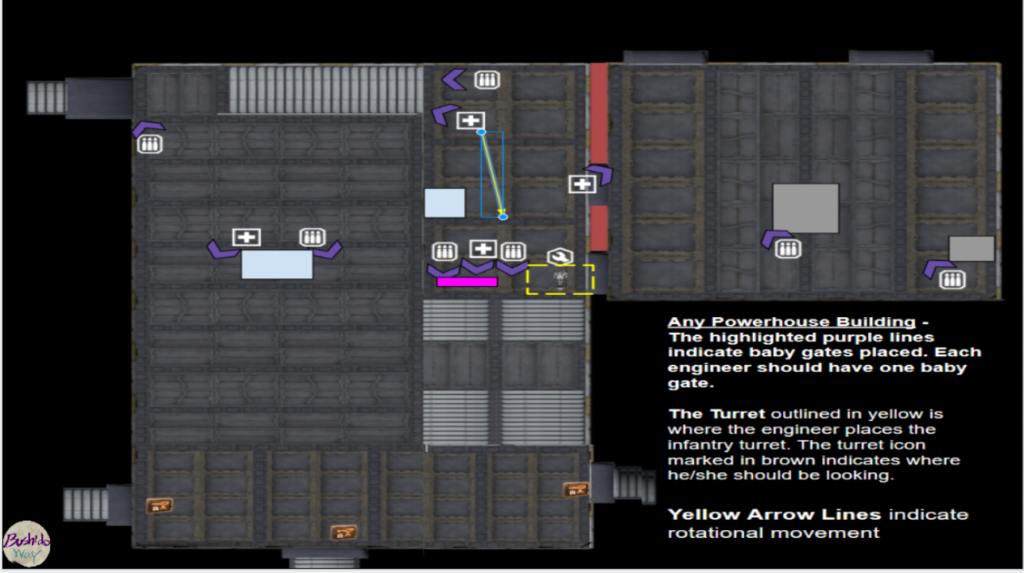
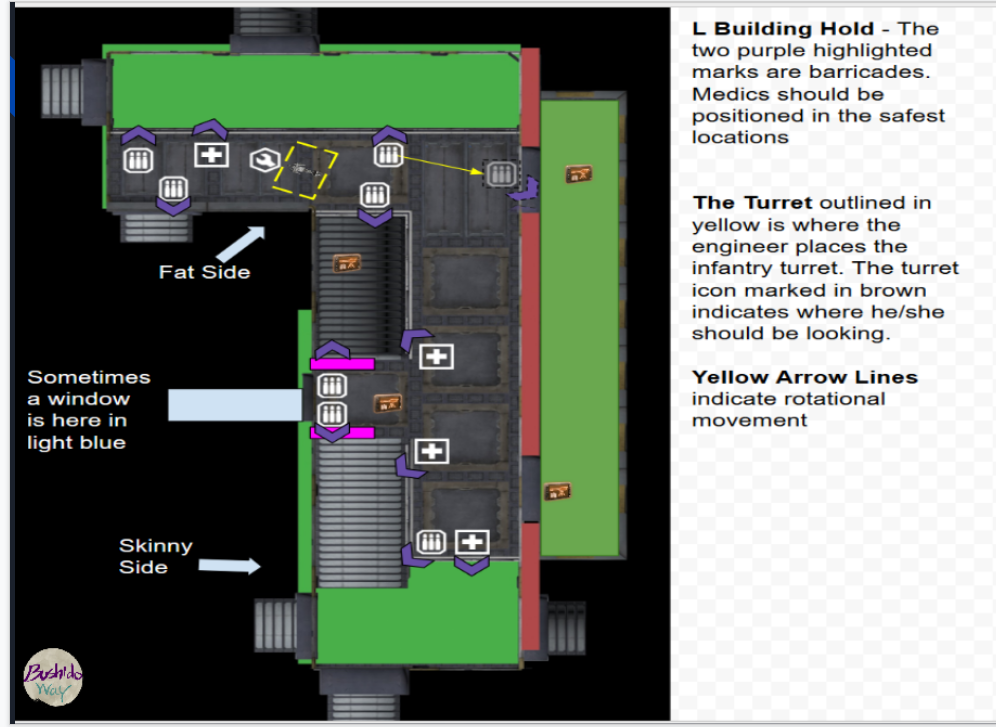
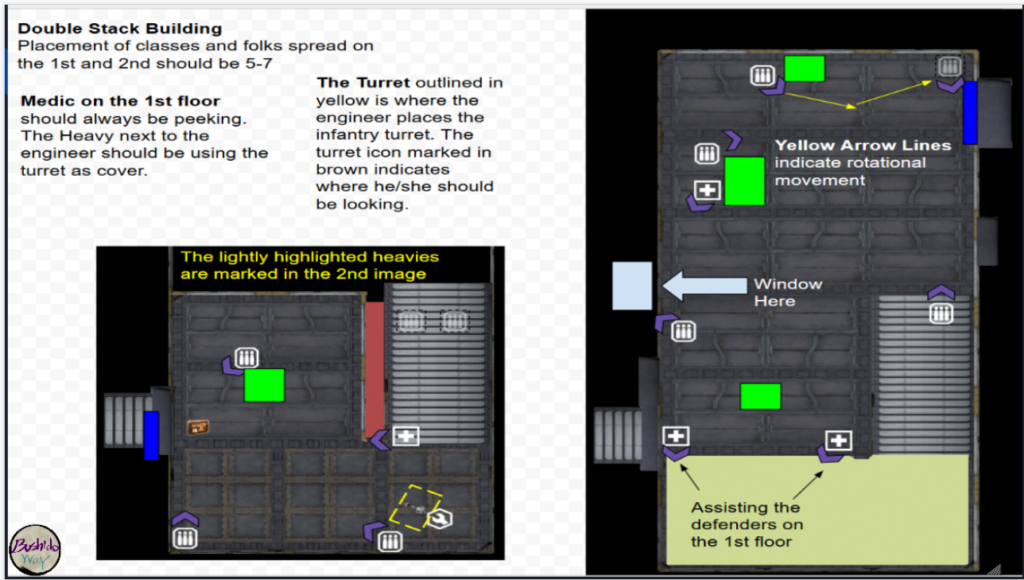
D) Holding Lanes and Doorways
Alright, now that we’re done discussing callouts; let’s talk about setups inside a building and how they work. First, let’s follow some general rules!
Step 1: Each doorway that needs cover should have at least 2 people per door.
Step 2: If there are more than 6 doors that need to be covered; your strongest player should cover that extra door but most buildings won’t have more entrances than 6-7. If they do; do your best to turtle around the point and don’t spread yourself too thin either.
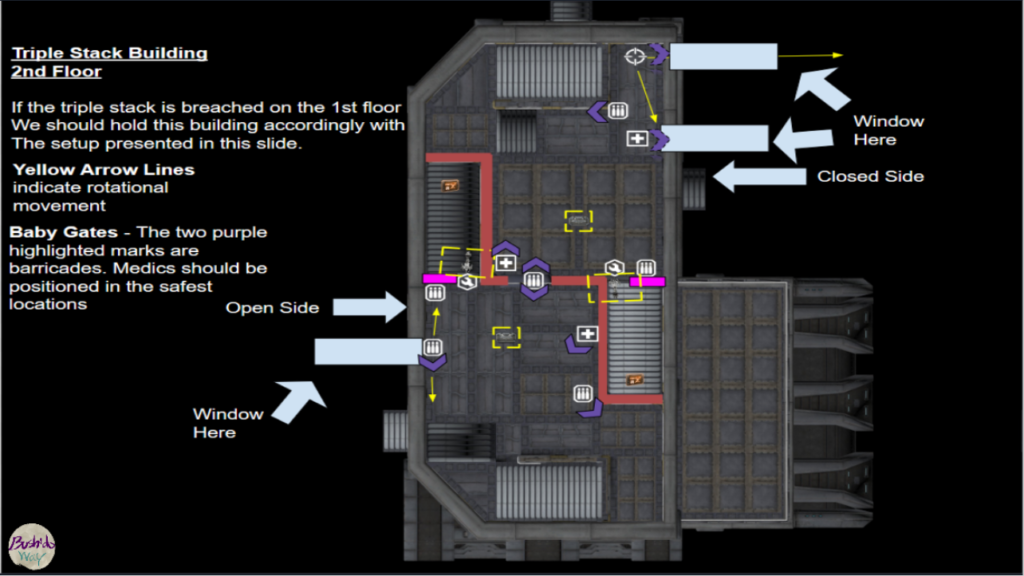
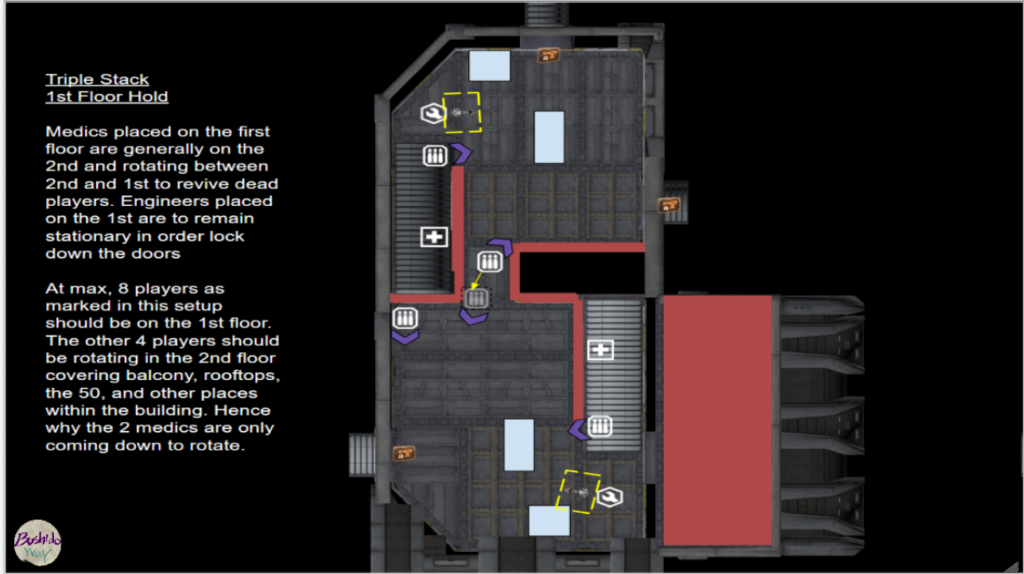
Step 3: You should set up multiple crossfires for doorways enemies will come from and prep utility setup like shields, mines, and bubble shields before the enemy arrives. In addition; all squad members should be at their assigned door that the squad leader picked or squad member picked and hold it for the duration of the point-hold unless a rotation is needed. Examples here provided by me on what some common building setups look like!
E) Rotating AKA Defeat in detail
The trick in defeat in detail is getting the enemy to split forces. Then you have to move faster than them to get the local superiority.
Rotating AKA Defeat in detail means sending a lot of people in your local hex (AKA the SQUAD) to use a lot of people in that one doorway to overpower the enemy and then get back to business.
Section E covers rotating which can be a tough topic. Properly rotating generally involves leaving doorways unattended more times than in a squad of 12 and committing an absurd amount of people to deal with a threat. Sometimes commitment to local over pop in a small area is needed to stop a huge push and sometimes this can be an overcommitment which leads to a squad getting wiped because flankers and other enemies take advantage of an unguarded doorway or a weak door covered by fewer people iit should have had. It’s important when rotating to send the appropriate amount of people to deal with a threat.Such as, if you have two players watching a door or lane but are not enough to deal with the threat, you may want to send an extra person or two to assistHere’s an example of extremely poor rotations from my outfit. I recommend starting at the 6 minute mark of this 10-minute video I recorded and watching the poor rotations at this tech plant with my outfit until we’re wiped.
As displayed in the video, my squadmates and I were trying to hold the balcony, the jump pads, and the grinders in this techplant were being overwhelmed at all fronts and our outfit struggled to send the appropriate amount of people to deal with the oncoming threats.. There were instances in the video where I was standing in an area which really didn’t need my help (jumpad X for reference; I wasn’t needed) and places where I should have been earlier like (Grinder X) before I escaped and jump down the staircase knowing that I was going to get blasted by too many players. In that instance where I should have rotated to (Grinder X) earlier; I was too late and my outfit lost the base. Pointholds are fast and always evolving; enemy squad leaders and platoon leaders will always try to find a way to outsmart you and it’s important as a point-holding squad to adapt to their tempo and outplay them in the right moments since every mistake in a point-holding squad will cost you critical time and even allies.
Now, here’s another video from my outfit doing extreme rotations but in a more realistic setting being a squad size dealing with lots of enemy maxes.
As you saw in the short video; we had to rotate frequently between the 2 doors with our 12 people due to constant threats from enemy maxes and extremely aggressive vanu players. In some instances, we over-committed on our rotations and had more people flood in then needed but when maxes came along; it was much easier taking them out with half a dozen players. If we were to have only 2-3 players fighting a max, it would be much more difficult. There are times when rotating works perfectly and other times when it’s just not worth it. It’ll be up to your squad leader and you as players to determine when rotating is the right call. I have been doing this for a long time and can personally tell you that rotating is still a major pain in the ass in my outfit and I try to avoid doing it when necessary since it is always a huge risk every time you do it.
F) Double Peeking
So double peeking as a concept is quite simple. You peek with your teammate at a lane or a doorway and you shoot enemies together. You create 2v1 situations, 3v2 situations, and try to get the edge on multiple enemies by focusing fire on one target before moving onto the next one. Peeking together allows you to down enemies faster then they can down you and your teammate. It’s a fairly simple thing to talk about but hard to practice and master as it requires an immense amount of trust, coordination, and communication between you and your teammate. Here is a demonstration from my outfit double peeking and triple peeking some doorways and a staircase together to quell enemy players.
G) Collapsing on Point
When the enemy army is banging at your door and they’re going to flood you with everything they got; that’s when you rally your squadmates and BRACE for impact. Collapsing on point means getting your entire squad to turtle around the point and fight. You will need every single man you can get because you want to make it so that you have more bodies then the enemy does before the timer goes down. Generally, this should be done within the last 20-40seconds in a point hold and you feel like all hope for taking the base is dwindling unless you get your entire squad together with you. Collapsing on the point may give that last boost of needed cohesion and is one of the ultimate forms of teamwork in point-holding. The squad that does it right and effectively will always have a better chance against a larger uncoordinated force.
An example tutorial video from me about collapsing on point and other examples for section G.
Here is another interesting video where you just have a hunch that collapsing on point is needed. After you gain some massive experience and realize something is wrong on the map. I did it in this instance because I knew that the NC had a connection to this base as well and could drop on it to steal at any time that I told my squad members to collapse early.
H) Putting it all together!
So you made it this far eh! Honestly, I don’t really have too much to say at this point in a written form other than to JUST DO IT! but here’s a video example with my overview on putting everything we talked about together. The loadouts, the safeguard, C4, holding your lanes, rotating when needed, double peeking, and collapsing on point all in one little neat video from my outfit.
Conclusion and final thoughts
I hope I did at least a semi-ok job explaining the art of point-holding to the masses reading this guide. Pointholding is a hard play-style to get into but when you become an expert at it, it can be the most enjoyable part of the game. Fighting massive over pop, battling tons of maxes, trying to duke it out with your small cohesive force against a large coordinated or uncoordinated mass is all done for the most important part of the game: taking a base and putting your outfit name on it. I live for that when I play Planetside 2 and every time I log onto the game, I want to point-hold. I’m passionate about the playstyle and I feel like it’s necessary as a point-holder or even a point-holder in training to feel passion because as you guys saw. It’s hard to get into and most attempts are generally unsuccessful. In fact, you will fail more times then you will succeed as that is the nature of point-holding all around. You will be challenged almost every single time you do it and the hoard known as the “The Zerg” as people call it or the “Large Outfit” will be after you to protect their lanes if you harass them enough.
As demonstrated here:
Sometimes… wiping is inevitable and it’s part of the game. Your small group of 12 or your small platoon is prone to just getting massacred by a large force more times than not when it’s way too large for you and your folks to handle. However, keep your chin up! Keep pushing as the more you do it the better you get.
And look, I know a lot of these videos I’m posting for yall look organized as all hell cause BWAE has been doing it for a long time and I’ve been squad leading in that madness for a long time but we all start somewhere… So here’s an EXTREMELY EMBARRASSING video from 2015 with me point-holding with my original large outfit and friends. Unorganized, terrible shooting, an extreme amount of roamers outside the point (including me)- basically everything you shouldn’t do in a point-hold but we all start somewhere! (Oh and really annoying music lol!) Luckily, for the folks reading this guide; at least you guys have the head-start that I didn’t get haha.
The future of point holding in 2020 and beyond
I figure it would be easier to talk about this on video than to write about as it is complex and the developers are always changing our game. I like to apologize now to the folks watching the video for my mic. I don’t really do long/unscripted thoughts and play at the same time but was pressed for time with the launch of planetside guides website and wanted to get something out early for the new players joining PS2 for the update. Plus, I think doing a really complicated video like this guide has been a lot more work and just wanted to share my final thoughts. Again, sorry for the mic problems. I was breathing a bit too much at some parts but it is informative! I will be doing a PROPER revised version of this unscripted video within the next week or two. Expect it by the end of March 2020!
Want to contact me? Link to Bushido Way Discord here: https://discord.gg/jEQv56s
Credits to Fire63VS and umadman for EDITS
Share with:
Recent Comments