Before you proceed
- Configure your mouse
- Study Weapon Mechanics and Recoil. To use a weapon effectively, you must understand how it works, what are its strengths and weaknesses.
When you’re ready, this guide will explain how to apply that knowledge in your everyday game.
How to aim
Aiming process can be broken down into three Steps:
Step 1. You see *something*. Your eye-brain system spends a fraction of a second to recognize that *something* as an enemy.
This is Awareness. How much information do you receive from your surroundings, and how fast can your brain process it.
Awareness generally improves with experience, as long as you develop the habit to constantly analyze that stream of information.
But there is a hard cap to this skill – Human Reaction Time. No matter how hard you try, you can’t beat the time it takes for electrical signals to move around your brain and body.
Average Human Reaction Time is ~250 ms (quarter of a second), you can test yours here.
The best you can do is to bypass Human Reaction Time by predicting where enemy will be, and acting based on that prediction instead of reacting.
Step 2. You move the crosshair from its current position to the target.
This is mechanical execution speed. Hard muscle memory, acquired reflexes and trained hand-eye coordination. The more time you play on the same mouse sensitivity that is right for you, the faster and more correct it will be.
When training to aim, don’t try to be fast. Make slow and deliberate movements. If you train long enough, the muscle memory will kick in, and you will be fast and precise.
Step 3. You confirm the crosshair is on target.
Confirmation is only necessary to make sure you’re actually aiming where you wanted to. The better is your execution during Step 2, the less you will need Step 3. Best players throw away Step 3 entirely, performing what is known as drag shots.
If the target moves during all this, you will have to return to Step 2.
Aiming is an endless loop of predicting and compensating target movement, and confirming crosshair placement.
There are several techniques to help you acquire the target faster and fight your Human Reaction Time.
Pre-aiming and Crosshair Placement
(Movement Prediction)
If you know the general direction where the enemy will be coming from, or his general position, you can place your crosshair there in advance, so you will not need to move your aim so much to acquire the target. It doesn’t remove Human Reaction Time, but it helps reduce it by preparing you for the engagement.
- If you’re guarding a doorway, aim at the doorway in advance, so when the enemy comes, he will already be in your crosshair.
- If you know the enemy is behind a corner, aim around the corner as you move.
- Always place your crosshair where you know the enemy will be.
ReNz0r has a video guide about it (starts at 0:56):
This includes the mid-firefight crosshair placement correction. For example, if you can see a pattern in enemy’s ADADing, you can predict that his next move will be left, and aim left yourself. So when the enemy actually starts moving to the left, he will walk into your stream of bullets.
Pre-firing
As the extension of previous point, you can start firing before you actually see the enemy.
You start firing on a guess that an enemy will be in a certain place, and then correct the crosshair placement while firing, once the enemy appears on your screen.
The most obvious example is when you’re rounding a corner, and you know there’s an enemy behind it.
This may work against you if you predict incorrectly.
Twitch Aiming
It is the ability to fire accurately without confirmation of the crosshair being on target, just using extreme hand-eye coordination, effectively removing Step 3 from normal aiming sequence, by betting on eye-brain-hand system to flawlessly execute Step 2.
Your eye sees the enemy on your screen, sees how far is your crosshair from the target. Your brain can process that and tell your hand to make a fast swipe of your mouse that will instantly move your aim to the target and start firing, without spending time to confirm that you aimed correctly.
Similarly to pre-firing, you start firing on a guess, and correct aim while firing.
Basically, you’re trading accuracy for speed. Whether this ends up a good trade or not depends only on your personal skill of aiming properly without confirmation. This skill may take years to develop.
You may want to start with a slow-firing automatic weapon, like one of the 143 damage, 652 RoF weapons, as they’re punished the least for missing first few shots.
Drag Shots
A much more extreme version of the above. It requires lots of training and excellent muscle memory. For this to work, you must always play on the same mouse sensitivity, so make sure to configure it properly from the start.
This skill is especially useful for weapons that rely on few accurate shots in close quarters (shotguns, CQC sniping).
This is excellently demonstrated by Elusive1 in his CQC sniping videos:
Notice the Human Reaction Time in action. In Elusive’s video above, you can still see a tiny delay between seeing the enemy and actually shooting him. This is his Human Reaction Time, spent by the brain on recognizing the enemy and calculating how far he needs to move the mouse. But because he perfected that skill of calculating and moving, he doesn’t need to spend a second Human Reaction Time on confirming that his aim is correct.
Side tip: track your crosshair, not the enemy
People often lose “sight” of their crosshair. Practice concentrating on it while moving your aim.
It’s very easy to lose sight of the crosshair when someone is moving in front of you, as your vision naturally focuses on that moving mass. But your eyes should focus first on the reticule, and track the target with your peripheral vision.
People often naturally flop this focus to their detriment. So again, don’t focus on the target, but where your reticule is with respect to that target. Never take your eyes off of it as tracking your target with your peripheral vision is relatively easy.
You can practice this skill in VR or friendly moving targets as necessary.
This applies to both ADSing and hip firing.
Where to aim
Credit for this section: Demigan.
Approximate Hitbox
Aiming Points
Center mass
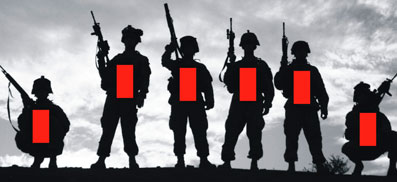
For beginners and average players it is advised to always aim for the center mass. This will ensure that most bullets are hitting and time-to-kill remains consistent, despite possible errors in aiming and recoil control.
Normally, headshots do double damage, but due to possible nanoweave, one headshot is actually worth 2.5 times more than one body shot.
However, as you can see on the picture above, head area is roughly 4-5 times smaller than the torso, which makes body shots equally 4 or 5 times easier to hit.
So while headshots worth 2.5 times more than bodyshots, they’re 5 times more costly in human resource that takes to acquire them. So going purely for body shots in majority of situations is not a bad thing.
Neck
Recommended aiming point for above average players in most situations. Some bullets will naturally hit the head due to recoil and cone of fire, yet you will ensure that most of your bullets are still hitting.
Head
This aiming point can potentially provide the shortest time to kill, but it’s hard to achieve at most distances, because head is a relatively small target, and due to recoil and cone of fire it will be hard to ensure most shots are hitting.
These aiming points are not the difference between low-skill and high-skill player. Skilled players will use all three aiming points, depending on the situation.
Here are some examples:
- In a general 1 v 1 within optimal range of your weapon, where you and the enemy start firing at roughly the same time, go for neck.
- Enemy caught you in a compromised position, where you can’t utilize your weapon’s full accuracy: you were sprinting, jumping, or you have just had to kill another enemy with a hip fire. The point is that your CoF right now is not as good as it could be. In this case you want to go for center mass, because you don’t have time to wait for your CoF to reset.
- You snuck up on an unsuspecting enemy. If you have a clear shot at the head, ADS and go for headshots to take him out quickly. Otherwise go for center mass.
- Distance to the target is also a deciding factor. The closer the target is, the less relevant recoil and CoF become. So if target is close, go for headshots. If target is a bit further, go for neck. If target is outside your weapon’s effective range, go for center mass.
Hip fire or aim down sights?
Credit for this section: Malaka.

Each gun has effective range – the range, within which you can reliably kill an enemy in a reasonable time, if not with full-auto, then at least with long bursts, without needing to reload.
This effective range can be split into two parts: the range where hip fire is possible, and the range that requires you to aim down sights. With most weapons, enemies outside effective range can still be engaged, just with a notably worse performance.
Naturally, the effective range and its components depend on the gun, its attachments and shooter’s skill:
- A Laser Sight would increase the range where hip fire is possible, but won’t do anything to overall effective range.
- A Forward Grip would increase the total effective range, but do nearly nothing to possible hip fire range.
- A Compensator would increase total effective range, but reduce the range where hip fire is possible.
- Large magazine makes inevitable misses much less punishing, thus increasing the possible hip fire range.
- And of course, none of it will matter if the shooter has hand-eye coordination of a two year old child, while a careful burster with trigger discipline and recoil control will be able to reach out much further than average.
The Grey Area

If the enemy is very close to you, there is no reason to ADS. So you’re free to hip fire and maybe even engage in melee.
If the enemy is way outside your possible hip fire range, you must ADS to engage the enemy effectively.
But between “very close” and “way outside” there is a grey area, where you will have to make the decision: hip fire or ADS.
What is the size of the grey area?
Grey area is mostly defined by hard weapon statistics: Hip Fire Cone of Fire and Hip Fire CoF Bloom.
Weapon Attachments that affect Hip Fire CoF (Laser Sight, Compensator) will have a corresponding effect on the size of the grey area.
Different weapons used by different players will have different grey areas, but you can use these rough estimates so you have an idea:
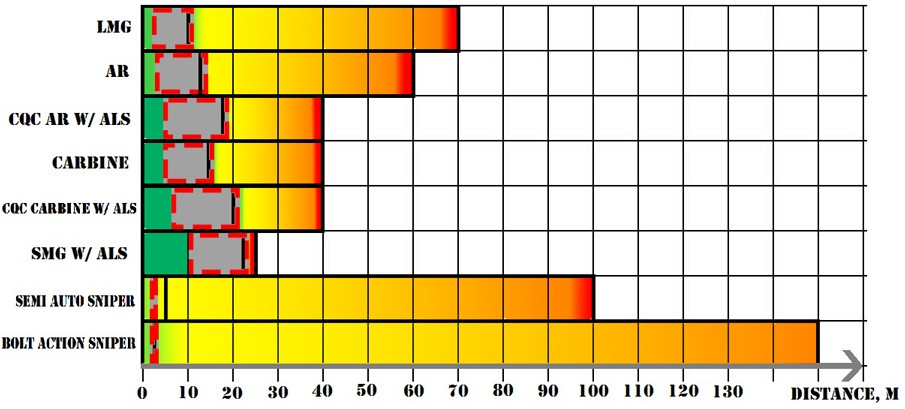 (click pic to enlarge)
- Yellow and orange represent the range where you always want to ADS.
- Green represents the range where you always want to hip fire.
- Grey square with red cross line represents grey area, where both hip fire and ADS are possible and you will have to decide based on situation.
- The vertical black line represents the border of possible hip fire range under normal circumstances. You can hip fire with careful bursts beyond this border, if situation absolutely demands hip firing.
- Whether to hip or aim down sights is something that needs to be decided separately for each engagement.
What are you choosing from?
Inside the grey area, where range to the target is relatively short, the difference between ADSing and Hip Firing can be simplified to this:
Hip Firing
Hip Firing provides you with a spray of bullets randomly distributed within your hip fire crosshair. A water hose that makes everything wet.
It’s easier to hit the enemy with at least some damage while hip firing, and you will be able to dodge more enemy shots due to fast movement*, but it will almost inevitably spend more ammo and provide longer Time-to-Kill due to misses.
* – how much that fast movement helps you under fire, depends on enemy accuracy.
If you’re in a 1 v 1 fight with an enemy, and you decide to hip fire to move faster and try to outlast the enemy, you’re betting on the enemy bad accuracy.
In general, it is safe to bet on the enemy having bad aim. Most players struggle to hit a moving target, especially if it changes direction rapidly (ADAD). But this will not work against high skill enemies. You will still be harder to hit for their ADS, but they will still get a better TTK than your hip firing TTK. You need to contest their good aim with a better aim on your part, or you will lose.
Tip: when Hip Firing, you will want to almost always aim for center mass, but if you’re close enough to reliably hit headshots, you can choose to do that.
Aiming Down Sights
ADSing will tighten your Cone of Fire, and – for most weapons – reduce your Cone of Fire Bloom. This will provide you with a tight stream of bullets, like a drill.
This stream of bullets can theoretically* provide fastest Time-to-Kill, and spend the least ammo, as long as you are actually hitting* all those shots.
* – how much increased accuracy will help you deal damage depends on your accuracy.
If you’re in a 1 v 1 fight with an enemy, and you decide to ADS to try to kill the enemy before he kills you, you’re betting on your good accuracy.
Enemy at close range can be harder to hit with a tight stream of bullets, because if the enemy takes just a couple of steps to the side, it will be enough to move him half a screen away from your crosshair.
ADSing has lots of other disadvantages:
- it takes time.
- it narrows your field of vision, depending on scope magnification.
- this will also amplify effects of screen shake from explosions and flinch from taking damage, as well as relative recoil.
- it obstructs your vision even more with the gun and scope models.
- it slows you down, depending on weapon’s ADS movement speed multiplier.
- if you already started hip firing, you must stop firing for a moment when starting to ADS, otherwise your Cone of Fire won’t even get smaller.
Tip: to avoid these many penalties, ADS only for the course of the engagement – to shoot an enemy or pre-aiming. You can see it well in Elusive’s video above – he aims downs sights only to shoot an enemy.
Tip: when ADSing, you will have to choose the aiming point according to guidelines in “Where to Aim” section above.
So you want to ADS only when it’s necessary. So the question “should I hip fire or ADS?” boils down to “is ADSing necessary?”. The section below will help you recognize this “necessary”.
Simple Answer
When enemy is inside grey area:
ADS when:
- You only have a small amount of ammo to kill the enemy.
- Understand that different enemies will require different amount of bullets to kill. A wounded stalker at close range is different from Heavy Assault with nanoweave and active overshields at long range.
- You absolutely must kill the enemy the fastest way possible, otherwise you die.
- For example, when an enemy attacks your from a superior position, and you have nowhere to run.
- The enemy is not moving or moving slowly.
- Enemy is partially hidden by cover.
Hip Fire when:
- You’re in danger and cannot afford to slow yourself down by ADSing.
- You can afford to waste a little ammo and take a bit longer to kill the enemy, in return getting faster movement and possibly taking less damage because of it.
Advanced Answer

“To ADS or not” is not a “yes or no” question. Imagine scales, with hip firing on one cup, and ADSing on another. Different factors during the engagement will contribute to different cups. And in the end, you will want to choose the cup that weighs the most.
Here are these factors:
(all of them assume the enemy is within the grey area mentioned earlier)
1. Your accuracy and enemy accuracy.
As mentioned before, how useful is hip firing to avoid fire depends on enemy accuracy, and how useful is ADSing to kill the enemy faster depends on your accuracy.
Most of the time you don’t know the enemy skill level, but faster movement will still help in the majority of situations. So unless you know the enemy is a very skilled player, you can bet on hip firing being useful.
But you always know your skill level. You can find out where you stand among other players on this site: ps2.fisu.pw/player, which uses own grading system. If you’re graded at least “A”, you can bet on your accuracy most of the time.
So if you’re a bad shot, you may prefer to spray the enemy from the hip, and hope the enemy won’t hit you as much.
And if you’re a good shot, you can rely on your accuracy to carry you, and kill the enemy faster than he kills you.
Example: in my showmatch with CuteBeaver, starting at 1:36.
We are both using Hunter Crossbows and engage each other at 1:48. I fire first, from the hip, and miss. She fires second, and hits.
She’s at full health + shields and loading her next shot.
I’m at half health and no shields, and I have a shot ready.
My options are:
- Try to score 2 body shots from the hip, while trying to dodge her shot. Too dangerous, CuteBeaver is a very skilled player and I cannot bet on her missing.
- Throw an EMP grenade to drain her shields, and try to finish her with crossbow or a knife. Too dangerous for same reasons.
- Hip fire body shot while running at her, and then knife her. Too dangerous, she can knife me herself, or kill me with her shot before I connect my combo.
- ADS and try to score a headshot, which would instantly kill her and end the fight right then and there.
I chose the 4th option, as I consider myself to be a skilled player as well, so I can bet on my aim, and it paid off.
2. Target status – how much damage you need to do to get a kill.
What is the enemy’s class?
Mostly, you are interested in whether it is a Heavy Assault or no. Assume by default that Heavy Assaults are harder to kill. If his overshields are not currently active, this point goes down a bit, but unless you’re using a weapon with super short time to kill, HA probably will have time to activate overshields.
How much health and shields the enemy has?
The closer the enemy to death, the less you have to worry about accuracy and time to kill, and the more freely you can hip fire.
- Shields will throw white sparks around the body when they are fully depleted.
- Shields will briefly coat whole enemy’s body with a white light when they start regenerating.
- Video demonstration.
- Enemy hit by an EMP grenade will have his shields fully drained.
- If you heard the enemy engage somebody else, it’s possible he took some damage during the engagement.
- If you didn’t see the enemy taking damage, but now you see him using a med kit, or he’s a Combat Medic, using his Nano Regen Device to heal himself.
- It means the enemy took damage beyond his shields, and took some health damage, and now he’s restoring his health, but his shields have not yet started regenerating.
- If enemy lost his shields to damage, it’s reasonable to expect he will not have full health either, unless you see him restore his health.
Examples:
Iridar, the Red Baron. At 2:07 I see the enemy get fully hit by an EMP grenade, his shields flashing and evaporating, so I hip fired and got a kill, even though enemy was massively outside possible hip fire range, even for a Baron with laser sight.
Newborn #1. Voiced commentary provided (and subtitles).
Smoke Ninja 2 montage. I see an unaware Heavy Assault at some distance, and first I hesitate to engage, but then I see his shields flashing, which means there’s a high probability he will die from one crossbow bolt, so I shoot right away and kill him.
3. Target position and cover – how precise you must be to do damage effectively.
- If only a small part of the enemy silhoutte is exposed to you, you want to ADS.
- If enemy is completely exposed out in the open, you can conveniently spray him from the hip.
4. Target movement – how easy it is for you to hold aim on the target.
If target is rapidly moving, it will be harder to hit, and ADSing will only harm you. It will be much easier and more reliable to spray from the hip.
This includes unaware enemies sprinting away, and enemies actively engaging you in close quarters, while ADADing and firing from the hip or ADSing with 75% ADS movement speed weapon.
And vice versa, if the enemy is standing, completely unaware, or slowly strafing with a 50% ADS movement speed weapon, you can get good hits by aiming down sights.
5. How much ammo do you have in current magazine – how many misses can you afford.
Self-explanatory. If you barely have enough ammo to kill the enemy, you need to aim perfectly, so you should ADS and concentrate on getting good hits.
This is counterbalanced by point 2 above – “target status”. If target is nearly dead, you don’t care how much ammo your weapon has.
Example: Newborn #1. At 5:00, I engage two enemies at once, and I choose to engage the second enemy with ADS, because I wasn’t comfortable hip firing with the amount of ammo I had left after killing the first enemy.
6. Your weapon statistics – which it favors more, hip firing or aiming down sights.
- High rate of fire favors hip firing, makes it more reliable – the more bullets you fire, the higher the chance at least one of them will hit the enemy and deal damage.
- High DPS favors hip firing, as making time to kill longer due to misses will not be so punishing.
- Hip fire Cones of Fire and hip fire CoF bloom
This point has an unusual interaction here. Normally, these stats just decide the size of the grey area. However, if the enemy is within range where your weapon can provide very accurate hip fire, for example, if you are using an SMG with Advanced Laser Sight, instead of hip firing for the center mass, you can choose to hip fire for headshots.
So in addition to two options “ADS at something” and “Hip Fire for center mass” you will have a third option “Hip Fire for headshots”. If the weapon has a high quality hip fire and the enemy is close enough, you can get all the benefits of ADSing without any downsides.
This is what makes SMGs a strong weapon in close quarters, and that is the main reason I recommend using almost all SMGs with ALS.
- 75% ADS movement speed multiplier favors ADSing, as you will be less penalized.
A 75% ADS weapon will help avoid more damage, but you will still have to decide if you actually need the accurate stream of bullets in current situation.
7. How much space do you have to maneuver – how much usefulness can you extract from movement speed.
If you don’t have any space to maneuver, like if you stand on the edge of a wall, you can’t do anything useful with freedom of movement hip firing would provide.
Not having enough space is a point against hip firing, but having space is not a point in favor of hip firing, it remains neutral.
Examples of full analysis
Example #1
Newborn #3, at 2:12 in the video. In the video I make a comment that “I must hip fire because I might get flanked and I don’t have time to ADS”, but it is merely one of the factors. Let’s follow the list:
MANDATORY QUESTION: Is enemy within “grey area”? Yes.
- Your accuracy and enemy accuracy. my accuracy: high, enemy accuracy: unknown. Favors ADSing.
- Target status: target is a medic (not a heavy assault) and recently from engagement, could be wounded. Favors hip firing.
- Target position and cover: target has no cover. Favors hip firing.
- Target movement: target is rapidly moving away, may be even sprinting. Favors hip firing.
- How much ammo do you have in current magazine: 40 rounds of 143 damage, a full high capacity mag. Favors hip firing.
- Your weapon statistics: TRAC 5 has high rate of fire and high DPS, but not 75% ADS. Favors hip firing.
- How much space do you have to maneuver: enough. No points against hip firing.
Verdict: hip fire.
How to fire Automatic Weapons
Refresh on Cone of Fire mechanics before proceeding.
After you choose an aiming point and decide on hip firing or ADSing, you’re all set to start firing. Now you have to manage Cone of Fire by firing in bursts, in order to minimize its randomness.
Burst length is different for each situation and depends on several factors. In an ideal world, burst length can be calculated, but it’s hard to do in practice.
In more close-to-the-real-world terms, it means “keep firing until you see that your bullets are missing”. As you accumulate more experience, you will develop “inner clock”, that innately knows approximate burst length for each situation.
Burst length
Burst length varies greatly depending on many things:
1) Your initial cone of fire, which depends on weapon and stance: whether you are moving or staying still, crouching or standing:
- Most weapons offer tightest CoF while being still, slightly larger CoF while crouch moving, and considerably larger CoF while moving standing.
- Weapons with 75% ADS multiplier and LMGs usually have particularly bad Moving CoF.
- SMGs have the same (bad) starting CoF for all stances.
Example:
- Gauss Rifle stand still ADS CoF: 0.03
- Gauss Rifle stand move ADS CoF: 0.3
- ADS Bloom per shot: 0.06
Essentially you get an accuracy boost for the first 5 shots you do while standing. In other words, your burst can be 5 rounds longer before you need to take a pause.
Generally, it’s not a great idea to stand still in PS2, but in some cases it can be done without much risk: shooting from a safe position, or when the enemy is unaware of you.
Additionally, due to tricky mechanics of Cone of Fire, after you fire those 5 shots, you no longer have to stand still. When you see an enemy, you can stop and aim down sights, fire off 5 rounds, and then start moving without any penalty in accuracy.
After five shots, your CoF will be 0.03 + 0.06 * 5 = 0.03 + 0.3 = 0.33. Gauss Rifle’s stand move ADS CoF is 0.3, so when you start moving after firing those 5 shots, your CoF will stay at 0.33 until your next shot.
2) Cone of Ffire Bloom.
Depends on the weapon. More info here.
3) Distance to the target. The further the target, the sooner your CoF will bloom to be bigger than target.
Example: firing Gauss Rifle while moving and ADSing.
Starting CoF: 0.3
CoF after 10 shots: 0.3 + 0.06 * 10 = 0.9
4) Stop firing if your crosshair is far from the target – if you’ve lost the target due to poor recoil control, poor crosshair placement or target moved away from the crosshair.
In this case, you have to reacquire the target anyway. You may as well allow CoF to reset while you’re at it. If you continue firing while trying to put the crosshair back on target, chances are it will be too late:
A. Your CoF will become too large. This is especially important for weapons with high rate of fire for their damage tier, as firing past the target even for a short amount of time will bloom the weapon shamelessly.
B. You will waste too much ammo. Especially important for weapons with low damage per magazine – if you miss too much, you may be unable to finish off the target. Becomes very apparent when firing at shielded Heavy Assaults at range.
5) If there are additional risks:
- Target is running towards cover, and it might get away before you reacquire and finish killing it.
- Target might kill you before you kill the target.
- You’re in danger, or about to be in danger from a third party. Examples of such threats are MAX footsteps from around the corner, enemy bullets buzzing near you, etc.
In these cases, it might be better to gamble the risk (2) of missing due to CoF and continue firing. Which risk to take is something that you have to decide each time, weighing in all of the variables.
Overall, it’s impossible to calculate all these factors in your head, just as it’s impossible to recommend “always fire in bursts of X rounds”.
Knowing when and how to burst is a knowledge and skill that comes with experience, and it’s something that you just do instinctively, without even having to think about, and even then it’s impossible to be perfect at it. You’re dealing with randomness either way.
How to fire semi-auto weapons
Generally, it’s better to fire semi-auto weapons in moderation. Weapons like semi-auto sniper rifles is the best example of that. The proper way to use a semi auto sniper rifle is to steady breath, aim at the head, fire, then wait for the crosshair to completely return to the head, and fire again, making a double-tap headshot.
This is something that is known as tap-firing in other shooters.
Stats like Recoil Decrease and Vertical Recoil affect the speed at which you can take follow-up shots.
However, there always can be situations when you can just spam your semi-auto weapon away. For example, when using pistols or shotguns at close range.
Firing semi-auto weapons faster
Semi auto weapons fire once per click. But, after a shot, while weapon chambers the next round, you can already queue the next shot.
Here’s how it works:
1. You press “fire” button.
2. Weapon fires.
3. You immediately release the “fire” button, then press it again and hold.
4. Weapon chambers the next round and fires as soon as it’s ready.
5. Immediately after the shot, you release the “fire” button, then press and hold it again.
6. Repeat steps 4 and 5 for as many shots as you need.
Basically, you hold the mouse button until you see a shot, then release and immediately hold down again, until the next shot.
It works for all semi-auto weapons and pump shotguns, but it’s relatively easy to pull off only with weapons that have low rate of fire, and I do mean low, like within 180 rounds per minute.
It also works with burst weapons, just treat each burst as a single shot in semi-auto: click, and as soon as weapons starts firing, release and click and hold again, until you see a new burst, repeat.
Wrel has an amazing video explaining this in detail:
How to move
Movement Speed
You move at 100% speed when moving forward, 75% speed while strafing or going backwards, 50% speed while crouching.
Aiming down sights while doing any of it multiplicatively slows you by 50%. For example, if you strafe while ADSing, you will have 0.75 * 0.5 = 0.375 or 37.5% speed.
Some weapons slow you only by 25% when ADSed.
You move at 162.5% speed while sprinting.
Comparative chart with datamined info:

“Heavy shield” refers to Heavy Assault’s ability.
Reloading
Try to reload in cover. Retreat to a safe position. Check the minimap and look around while reloading. If an enemy engages you while you are reloading, try to run away, or take out your sidearm. Remember that equipping a sidearm is always faster than reloading your primary.
High capacity weapons usually have long reload times. Don’t try to always reload your gun after engaging an enemy. This is a bad habit, called “reloaditus”. So don’t be in a hurry, if your gun still has enough rounds to effectively engage one enemy, look around and make sure you are safe before reloading.
Sprinting
It’s quite normal to sprint most of the time, but you have to remember that all weapons are subjected to sprint recovery – a 0.3s delay before you can fire after you have stopped sprinting. It’s essentially a third of a second’s advantage that you’re giving away for free if you sprint into waiting hands of a camper.
So if you have reason to suspect that there’s an enemy around the corner – don’t sprint.
Of course, you might try to sprint around the corner and bring out your gun as soon as you round the corner, but you take a risk that an enemy will move towards you, and meet you half way, catching you sprinting.
Example: you see me doing that successfully in that video at 4:14 to NC Infiltrator, but just a few seconds later an NC HA catches me sprinting when I tried to do the same thing again, and that’s what gotten me killed.
Parkour
You can learn how to do all these amazing things in CuteBeaver’s Parkour Guide.
Crouching
Moving within effective range
“…All of the gunplay in PlanetSide 2 has been compressed into a 300m engagement range (the normal effective range of an assault rifle in real life).
Because of this range compression effect, much of the game revolves around getting yourself into the “kill range” of the weapon you are using to be most effective.”
Just because you can clearly see the target, doesn’t mean you should try to kill it. If possible, get within effective range before opening fire. It is a big part of the game.
Some general pointers:
- Shotguns: 5m
- SMGs: 20m
- Carbines: 40m
- ARs: 60m
- LMGs: 80m
- Semi-Auto Sniper Rifles: 100m
- Bolt-Action Sniper Rifles 150-300m (depending on model).
Situational Awareness
The game is a constant stream of information. To have success, you must absorb that stream like a sponge, process and understand it, and make decisions based on it.
One sniper tracer, caught by your periferial vision, can be enough to help you find that camping enemy infiltrator. Voice of the enemy spotting someone with the same class as you can warn you about imminent attack. And so on.
Most weapons in PS2 sound different. At the very least you should be able to tell apart different weapon classes. Just hearing an enemy shoot can provide you with valuable information about his class.
Soldiers of different factions have different voices. Paying attention to their callouts, like “I require medical attention!” can give you info about their faction and status.
Knowing all these cues that give away information will help you conceal yourself. You will learn to spot only when it’s safe or absolutely necessary, and you will know that most of your actions provide enemy with information.
Good situational awareness is a very rare skill in PS2. But you can expect most high ranking players to have at least in partial form.
Account for all enemies
PlanetSide 2 can be very hectic. Unlike instanced matches of CS:GO or a similar game, number of players in PS2 isn’t strictly regulated. So you’re always dealing with unknown elements. You just have to focus on what you do know.
Keep a mental list of enemies that made themselves known to you.
You hear a VS rocket launcher shot when you play TR or NC: you know there’s a VS heavy in that direction. Keep that VS HA in mind until you kill him yourself or see his corpse.
You saw a sniper take a shot from that mountain: keep him in mind. Later on you might go and hunt him down or counter snipe.
You heard enemy infiltrator cloak and SMG shots – this tells you enemy SMG infiltrator in the area, and kill spam log in upper right corner will even tell you his name and weapon. SMG means he’s not using stalker cloak, which means he can only stay cloaked for about 15 seconds maximum, which means you can go and try hunting him down.
You sit in a building and guard a capture point. You hear carbine shots above you: enemy Light Assault on the roof.
And so on. Keep one eye on the minimap, and both ears at full attention.
Sometimes unknown elements can surprise you, and you will have to play on reaction and make split second decisions. This is another skill entirely.
In ideal world, you want to never play on reaction yourself, and force the enemy to play on reaction to you, without giving him any prior warnings of a coming attack.
Internet Delay
(also known as client-side hit detection or TTK vs Lag Compensation)
In PlanetSide 2, attacking and counter-attacking players have an advantage. Due to internet delay, you don’t see what people are doing at the moment, instead, you see what they were doing several hundred milliseconds before. And same with other players, they don’t see what you’re doing now, they see what you were doing ~200ms ago.
Let’s say there are two players near a building:
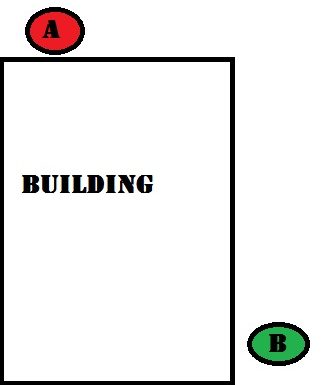
Both of them are moving towards the corner:
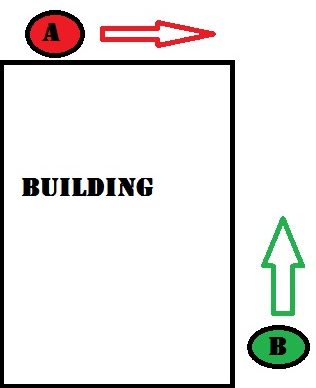
However, player A is the first one to reach and round the corner:
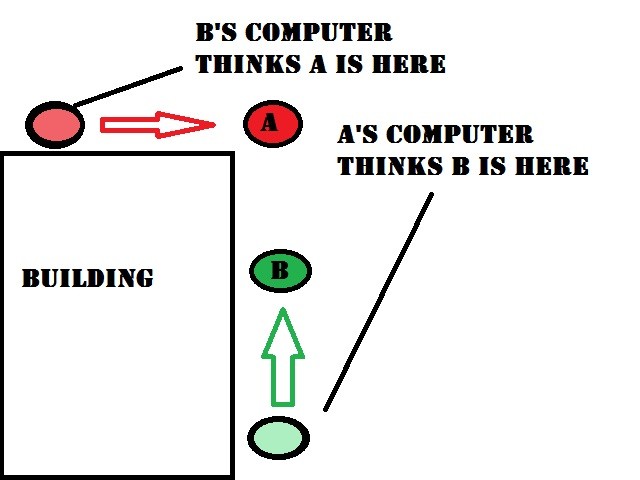
Now, player A has line of sight on B’s position as he was ~200ms ago. But player B’s computer thinks that player A is still around the corner, out of B’s line of sight.
Even though both players are subject to internet delay, Player A has an advantage, because he can see and shoot player B, while player B can not.
Another example in the video below:
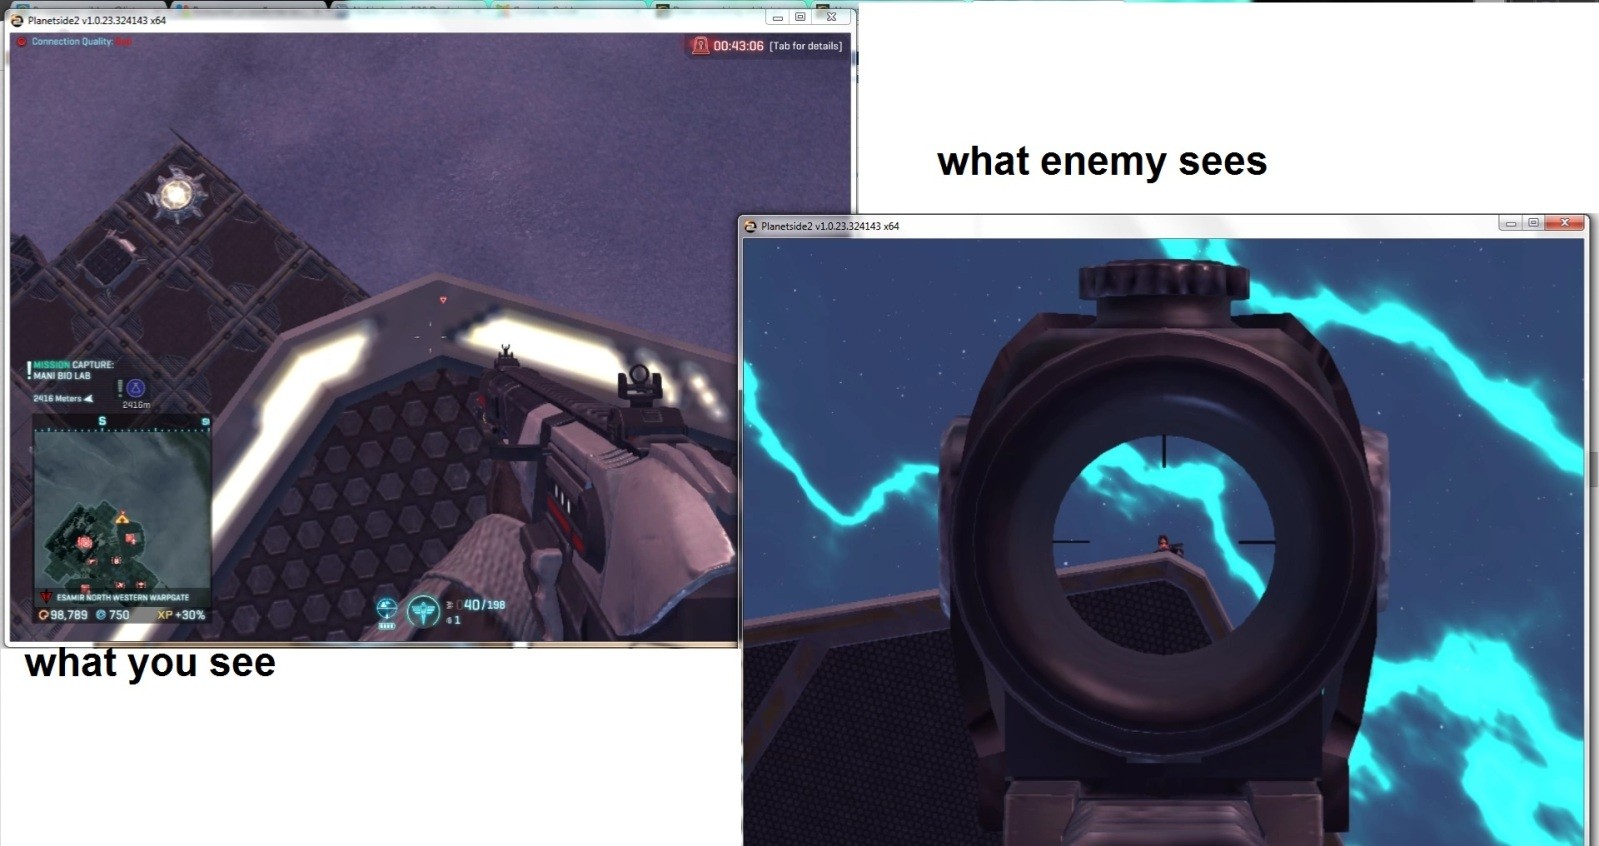
And another one. In the video below, I see a Heavy Assault looking through the doorway, and yet he doesn’t see me. The reason for this is I see him as he was checking the doorway 200ms ago, but 200ms ago I wasn’t in the doorway.
The hit detection in planetside 2 is client-based, meaning that if someone shoots you on his screen, you will get damaged, no matter what you are doing at the moment. That’s why sometimes you die even after running into cover, because your player model on the enemy’s screen didn’t make it to cover in time.
However, you can turn this to your advantage. When you storm into the room, you will see enemies inside the room, but those players will see you only after a short delay, so you have a head start on them.
A thing to consider: whatever you want your player model to do on enemy’s screen, you must start doing 200ms ago. If you want to dodge enemy fire, then start dodging in advance. If you know danger is coming, start moving before it comes. If you get under fire, get to cover right away. If you see an enemy, start dodging before you see him firing. And so on.
Watch the Wrel’s video on this topic:
It is human instinct to “address the threat”. When someone gets under fire, it is often his first reaction to look who’s firing at him. However, Internet Delay means that it will often end up in death.
When you get under fire you don’t have time to address the threat. Hit markers and radar signature on the minimap will provide basic information about enemy’s position; this should be enough to decide where you should run to take cover.
Using Counter-Intelligence implant may further help with that, as anyone firing at you with unsuppressed weapon will be spotted, and you’ll know precisely where they are and how you should proceed after getting under cover; continue running away, prepare an ambush or flank the enemy.
Clientside hit detection is often frowned upon. “I died 2 seconds after running in cover. Thanks, clientside!”. But clientside hit detection model isn’t bad on itself. It’s the connection issues that are at fault. For some reason, PlanetSide 2 servers have an unusually long process time. Read this post to learn more about the issue.
Player camera and Field of View
Your first person camera is located somewhere in chest area of your third person model:
This means that your actual head is higher than the point you’re looking from. So when you peek from behind cover, your head may well be sticking out, and presenting an easy target to an enemy you don’t even see on your screen:
Another important point: in computer games, players have much more limited field of view than in real life, where it’s close to 180 degrees with peripheral vision.
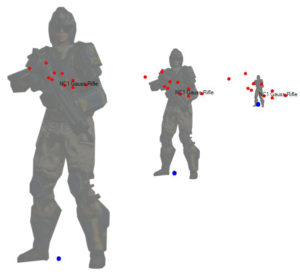
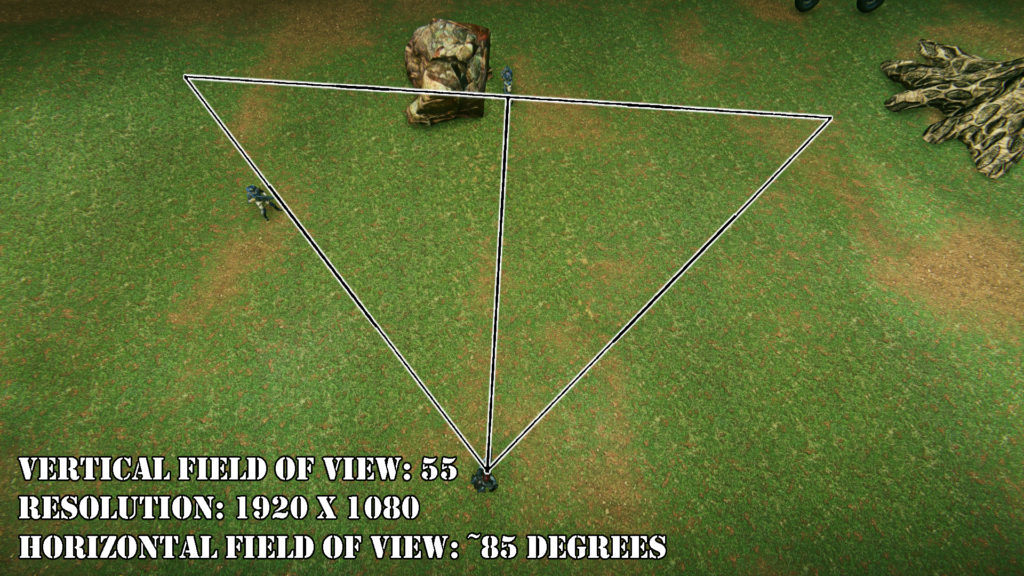
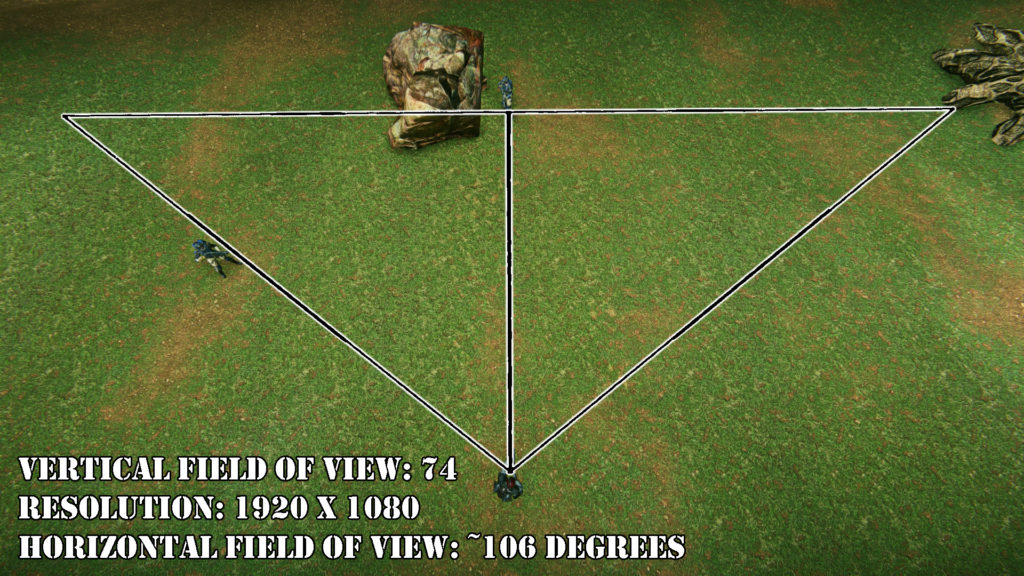
In PlanetSide 2, most common horizontal Field of View is somewhere between 85 and 106 degrees, achieved at 55 and 74 Vertical FoV respectively:
The TR soldier at the bottom looks at an NC soldier directly in front of him. He sees an edge of the weapon in hands of NC soldier to the left.
No ADS. There is no point in creating a visualization for ADS, because it significantly cuts down field of vision to the point that you can bet the enemy will not see you unless you run directly in front of him.
It’s also impossible to determine whether an enemy is ADSing at this moment, because the 3rd person ADS animation significantly lags behind; it will show the player is ADSing for a few seconds after he stopped ADSing.
That, and you shouldn’t rely on enemies ADSing for a prolonged period of time.
The 1920 x 1080 resolution with 55 or 74 degrees vertical FoV are the two most common setups, with 55 degrees being the old default setting and 74 degrees being the new default setting, and the maximum setting you can get without fiddling with UserOptions.ini, which most people don’t do, and it would lead to severe fishbowl effect anyway.
The most important thing to carry away from these pictures is that it’s safe to approach enemies directly from the side, and even slightly to the front. Well, unless they turn and see you.
Understanding your player model
What you see on your own screen doesn’t always correspond with what your player model is actually doing:
- When you look down, your player model bends forward, hiding your head from the back. This can be useful, when you try to run away from a sniper: look down to make it harder to headshot you, while moving in an erratic pattern to make yourself a harder target overall.
- When you sprint with a pistol, your arms will partially cover your head, so when you’re running towards a sniper, you might want to take out the pistol so your arms will protect you from a potential headshot.
- If you move while crouching behind cover, your player model will unbend a bit, and it’s possible that your head will sticking out.
- As a summary, your profile is lowest when you crouch, stop moving and look down.
- If you crouch while jumping or flying on the Jet Pack, your model will not crouch until you actually land on the ground. However, shooting while jumping and crouching will make your character lower his head a little.
- Crouching while flying on the Jet Pack will pull your head towards your legs on your screen. There will be no changes to your 3rd person model, but you will be able to squeeze through windows on your screen.
About enemy tracers
PlanetSide 2 uses clientside hit detection, meaning when the enemy deals damage to you, it is because he shot your character model on his screen. Your client will do its best to render enemy tracers and projectiles, but they actually have nothing to do with the damage you’re taking.
Sometimes, the enemy can miss your character model on his screen, but his tracer can hit you on your screen. It will appear for you as if you are getting hit, but you will take no damage.
Footsteps
In ideal conditions, crouchwalking footsteps are audible within ~20m. Sprinting footsteps, as well as landing sounds after a jump, can be heard from roughly 40m.
However, it’s nearly impossible to hear someone’s footsteps in the heat of battle, and it’s not something you should be worried about.
A few educational videos by Wrel on the topic of movement:
Additional Material
Renzor’s killstreak analysis:
General Philosophy of Gunplay
There are two big components to gunplay: positioning and reaction. The player that wins at positioning, forces his opponent to play on reaction. PlanetSide 2 is a shooter with comparatively long time to kill, so both components are important. In large number of situations, it’s totally possible to win on reaction.
You always want to force your opponent to fight on reaction, and to avoid having to play on reaction yourself.
If you win at positioning, you want to capitalize on it as hard as possible, so the enemy gets as little reaction time as possible. If you flanked an enemy and he’s stationary, you want to ADS and execute him with headshots, or at least start with multiple headshots. If the enemy is moving, you want to get close enough to make sure almost none of your shots miss, or wait out until the enemy stops moving.
If you lose at positioning, and the enemy shot at you first, you can attempt to salvage the situation trying to escape or kill the enemy before he kills you. Most often that would entail snap aim for headshots.
Depending on what kind of weapon the enemy is using, it can sometimes be worthwhile to just dance around the enemy while he wastes the remaining ammunition, and engaging only when he runs out.
General Philosophy of Firefights
First, let’s define what a Firefight is. Firefight is you shooting at a guy, and that guy shooting back at you. To win the firefight, you must kill the enemy before he kills you.
There are two approaches you can use to help you win firefights.
1) Increase your survivability, so you can live longer than your enemy:
- Use Nanoweave Armor, it will boost your effective HP by up to 25% against non-headshots.
-
- In a firefight, speed is life. The faster you move, the harder it is for the enemy to keep their crosshair on you. So the greater your effective hip fire range, the more will there be firefights where you can afford to move at full speed, dodging incoming fire.
- SMGs are a great example of a defensive weapon: they allow you to dish out respectable damage while being mobile.
- Heavy Assaults have overshields that boost their effective health by a large margin, so naturally Heavy Assaults win more firefights. Use this class if you feel the need for more breathing room in the firefight itself.
Use a weapon with good hip fire and/or 75% ADS speed.
2) Increase your firepower, so you can kill the enemy before he can kill you.
- Increase your own player accuracy.
- Make a conscious effort, don’t just spray in a general direction of the enemy. Learn to track the target, fire only when your crosshair is actually on the enemy. If you notice yourself firing past the target, stop firing. Let the CoF reset while you re-acquire the target.
- Learn to control weapon’s recoil. Train in VR. Just concentrate on pulling your mouse in the opposite direction to the recoil. Half an hour and a good music should do the trick.
- Go for headshots.
- Avoid starting a firefight with an enemy that is beyond weapon’s effective range.
Threat level
Threat level depends on many things:
Under fire or not:
- If you are already under fire, threat level is dramatically increased.
- If enemy is taking aim at you and you are about to be under fire, threat level is moderately increased.
- If you’re not likely to come under fire during the engagement, threat level is dramatically reduced.
Your cover and escape route:
- If you are in good cover, threat level is reduced.
- If you have a good escape route available, and you can safely disengage if things go south, threat level is reduced.
Who has the initiative:
- Enemy fired first, you were not aware of him before that: threat level is dramatically increased.
- You see the enemy, but he isn’t aware of you, and you can start the engagement at any time you want: threat level is dramatically reduced.
- You caught the enemy reloading: threat level dramatically reduced.
Enemy skill level relative to yours (if known):
- Enemy is worse than you: lower threat.
- Enemy is better than you: higher threat.
Enemy weapon’s effective range (if known):
- Enemy outside his effective range: lower threat.
- Enemy within his effective range: higher threat.
Threat also takes form of the risk of being engaged by other enemies:
- If there are other enemies in the area near your current target, threat level is increased.
- If you are standing in the way of advancing enemies, threat level is dramatically increased.
- If you have no reason to expect other enemies in the area, threat level is dramatically reduced.
If threat level is too high, you may want to disengage and run away, to restart the fight later on better terms.
If disengaging is not an option, and you have to engage the enemy at high threat level, the higher the threat level, the more you are compelled to ADS and try to get that faster time to kill.
Recent Comments