Attachments allow to customize weapons to serve better in a particular situation. Most attachments come with downsides, so sometimes it’s better to leave some attachment slots empty.
All weapons have five attachment slots: scope, barrel, rail, ammo and camouflage. Some weapons don’t have access to any attachment in a specific slot. For example, most starting weapons have no access to ammo attachments.
Normally, there can be only one attachment in a specific slot (e.g., you can’t equip 2 scopes at the same time), but there are exceptions: Auraxium Weapons come with unique predetermined set of attachments, and some of them have two rail attachments at the same time.
Datamined stats
Not all information about attachment effects is available in-game. Thankfully, this information is available in Census API, and can be pulled manually or using Weapon Analysis Toolbox.
Scopes
By default, most weapons use Iron Sights, which provide 1.35x magnification.
It’s better to upgrade to Reflex Sights, because Iron Sights obstruct a big portion of your view. Iron Sights also don’t always show where your weapon is shooting, because they wobble all around when you move or fire, while the center of Cone of Fire is always in the exact middle of the screen.
Reflex Sights’ crosshair always remains in the exact middle of the screen, which allows for greater accuracy.
HS/NV (IRNV) scope
This overlay scope offers 1.35x magnification and highlights infantry, turrets and vehicles with hot white saturation, even through smoke.
Cloaked objects, mines and other deployables are not highlighted. When you aim through this scope, it completely conceals the weapon model, which usually takes a big portion of the screen below the crosshair. You also shouldn’t see your own muzzle flash through HS/NV.
HS/NV scope has several drawbacks:
- Limited range, which depends on the graphic settings you’re playing at. At Medium or High Graphics Quality, HS/NV has about double the effective range of Low graphics, especially when you enable Fog Shadows.
- Compared to Iron Sights and low magnification Reflex sights, it takes at least 0.1 seconds longer for you to Aim Down Sights with HS/NV scope.
- Scope itself has a large model, and when moving around can obstruct your hip fire vision.
- Cloaked infiltrators are much harder to see through this scope.
Generally I don’t recommend using this scope, unless you have issues detecting enemies, or playing with a smoke loadout.
1x, 2x, 3.4x and 4x reflex scopes
Standard reflex scopes. Only difference is strength of the magnification and different crosshairs.
1x reflex scope provides 1.35x magnification and is unlocked by default for all starting weapons.
Note that you can change the reticle color via UserOptions.ini.
6x scope
This high magnification overlay scope is available to select few weapons intended for long range combat. Does not have scope sway.
6x – 12x sniper scopes
Overlay sniper scopes. They all have sway, which you can suppress by holding [Hold Breath] key – usually Left Shift.
Long range Semi Auto Sniper Rifles have a Ballistic Computer attachment that removes scope sway from all scopes.
“Close range” semi auto and bolt action sniper rifles do not have access to high magnification scopes, and instead have access to 1x through 4x reflex scopes without scope sway.
Which scope to use?
This often comes down to personal preference, but weapon choice also affects the decision.
For beginners it’s recommended to stick with with 2x Reflex scopes on automatic weapons, and 3.4x – 4x scopes on semi-auto weapons. Higher magnification scope helps to identify enemies at range.
But in general, it is better to use 1x reflex on most automatic weapons. Using a low magnification scope helps controlling vertical recoil, reduces the effects of screenshake from explosions and flinch from beng shot, provides wider field of vision and helps to conveniently aim even at very close distances. And with some practice and proper mouse sensitivity, it is equally potent in ranged shooting.
Weapons with high vertical recoil, like Gauss SAW, Pulsar C, AC-X11 are generally better used with 1x scopes, while weapons with mild vertical recoil, like NS-11A, can be conveniently used with 2x scopes.
That said, players at highest tier have proven that it’s possible to perform outstandingly with any scope from 1x to 4x (on automatics). So try everything and use what you like, without fear that you’re missing out on some secret OP technique, because there is none.
Barrel Attachments
![]()
Suppressor
Changes weapon’s firing sound, removes muzzle flash and prevents the user from appearing on enemy minimap when firing. Available to almost all primary weapons and sidearms.
Bonuses:
- You don’t appear on enemy minimap after shooting.
- Removes muzzle flash (doesn’t remove tracers).
- When you kill an enemy with a suppressed weapon, you don’t appear on his death map.
- You don’t get spotted when you wound or kill someone equipped with the Counter-Intelligence implant.
- Suppressor changes the sound of your gun, but in some cases that sound doesn’t get quieter, so nearby enemies may still hear your shots.
Penalties:
- Sidearm Suppressor Penalties are all over the place and can be found here.
- Decreases projectile speed by 15%.
Reduction to projectile speed increases bullet drop and makes hitting distant enemies slightly harder, especially if they are moving.
- Reduces Minimum Damage Range:
- by 10m for SMGs
- by 20m for other weapons
This causes the weapon to deal less damage at range, and sometimes it means needing an extra bullet to kill.
Penalties to Velocity and Minimum Damage Range can be counteracted by High Velocity Ammunition.
Some weapons have only one tier of damage drop off, and for them, the Suppressor’s penalty to Minimum Damage Range is much less relevant because they require an additional bullet to kill a target outside of maximum damage range anyway. Of course, bullets will still do reduced damage, which can be important in case of leg shot or shots at already wounded targets.
Weapons that go well with a Suppressor
- Weapons with low damage degradation; reduction in minimum range is less noticeable on them.
- Weapons with high rate of fire; requiring an additional bullet to kill due to reduced damage ranges is less noticeable on them.
- Weapons with high bullet velocity; as suppressor’s reduction in velocity is percentage-based.
- Weapons with “big enough” damage per magazine. For example, first generation SMGs will not have enough ammo to kill a shielded HA at range, even with good accuracy.
- An example of ideal Suppressed weapon is TORQ-9 assault rifle, which possesses all of the above qualities.
Flash Suppressor
![]()
Bonus: removes muzzle flash, making you harder to detect visually while shooting, especially at night.
Penalty: increases minimap detection range by 15m. By default, firing detection range is 50m for LMGs and 40m for other weapons. No other effects.
Analysis: increasing minimap detection range is comparatively small penalty. It will come as a disadvantage if you’re trying to remain undetected on a flanking position, a bit away from combat. Single dots often attract attention of attentive players, as usually it’s easy to flank a single enemy.
At night, muzzle flash is blindingly bright, and enemies will prioritize targets with muzzle flashes. Removing the muzzle flash will increase your stealth.
Flash Suppressor doesn’t hide your tracers, but unless the enemy can see you directly, tracers will only give away a general direction. And you can make yourself harder to see by using an appropriate camouflage and generally trying to stay hidden.
Also, tracers are less visible when fired at close range directly at you. It’s possible to kill people before they even realize you’re firing at them.
Flash Suppressor is worth using as a standard barrel attachment, unless you have a reason to use another barrel attachment, or trying to stay away from enemy minimap without using a suppressor.
Flash Suppressor will especially be great at night or with smoke loadouts.
An example of perfect use of a Flash Suppressor:
You sit in dark camouflage in front of equally dark wall or terrain. You see an enemy HA running past you, you open fire.
HA activates his overshield and turns towards you, but he can’t see you camouflaged, and there’s no muzzle flash. He’s confused; he knows that fire is coming from that direction, but he can’t see your exact position.
Even if he finally sees you, he lost too much time, and even if he opens fire and hits you, he can’t kill you before you finish killing him.
Check out this Wrel’s video about muzzle flashes
Compensator
![]()
Usually available to precision weapons meant for longer range engagements.
Bonus:
- Reduces Vertical Recoil by 15%. Exceptions: AC-X11 (20%), Reaper DMR and SABR-13 (25%).
Penalties:
- Increases Hip Fire Cones of Fire by 20%.
- Increases minimap detection range by 35m. By default, it is 50m for most LMGs and 40m for all other unsuppressed automatic weapons.
Reducing Vertical Recoil makes recoil easier to manage, and helps with burst or single shot firing:
- weapon accumulates less recoil, so crosshair will return to its original position sooner
- shots are grouped closer together because barrel is kicked less for each shot.
However, compensating vertical recoil during sustained fire is only a matter of how fast to pull your mouse in the opposite direction to recoil, so compensator doesn’t really help with that.
As you may have understood from Recoil Mechanics, vertical recoil is the most predictable and consistent recoil component. If you practice and make a conscious effort of controlling vertical recoil, you won’t need the compensator.
Compensator is great on weapons with low rate of fire, but strong vertical recoil per shot, such as Reaper DMR, AC-X11 and Gauss SAW.
Compensator is great for large, long-range fights, where you always amidst allies and you don’t care about concealment, and unlikely to encounter an enemy at close range.
Compensator can also be helpful to players with exceptional aiming and target acquisition skills, that go primarily for headshots, or at least start the fight with a burst of headshots.
In this case not only does the compensator makes the weapon more stable, but also reduces the effect of first shot recoil multiplier. Compensator can be used in this manner with any weapon that has access to it, even an SMG. But to take advantage of that you’d have to be in the top 1% of PS2 playerbase, so hold your horses.
Rail Attachments
Forward Grip / Advanced Forward Grip
Basic Forward Grip is available to most primary weapons, while Advanced Forward Grip is available to weapons specialized for long range fighting. Forward grip is used to make a weapon more effective at range by reducing the horizontal recoil.
Bonuses:
- Reduces Horizontal Recoil per shot by 25% (33% for Advanced Forward Grip)
- Reduces Horizontal Recoil Tolerance by 25% (33% for Advanced Forward Grip)
- Reduces Recoil Angle by 25% (33% for Advanced Forward Grip), if there is any.
- Reduces Vertical Recoil by 15% on semi auto sniper rifles.
Because this reduction is percentage-based, the absolute values of Recoil Angle Variance or Horizontal Recoil Variance are also reduced.
Penalty: increased Equip Time:
- by 20ms for shotguns
- by 50ms for SMGs
- by 100-150 ms for most other weapons.
Example
Let’s use GD-7F as an example. Note that I don’t actually recommend using Forward Grip with GD-7F, it is purely to explain how exactly FG works.
Default stats:
- Equip Time: 0.55s
- Horizontal Recoil: 0.225 / 0.3
- Horizontal Recoil Variance: 0.3 – 0.225 = 0.075
- Horizontal Recoil Tolerance: 0.625
- Recoil angle: -19 / -17.5.
- Recoil Angle Variance: 19 – 17.5 = 1.5 degrees.
Stats with Forward Grip:
- Equip Time: 0.8s
- Horizontal Recoil: 0.16875 / 0.225
- Horizontal Recoil Variance: 0.05625
- Horizontal Recoil Tolerance: 0.469
- Recoil angle: -14.25 / -13.125
- Recoil Angle Variance: 1.125 degrees.
As you can see, because reductions to horizontal recoil and recoil angle are percentage based, forward grip also reduces absolute variances, making the gun more stable. In other words, forward grip reduces the amplitude of randomness in weapon’s recoil pattern.
You could say that Forward Grip reduces the width of the recoil pattern.
Laser Sight / Advanced Laser Sight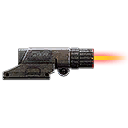
Basic Laser Sight is available to most primary weapons and sidearms, while Advanced Laser Sight is available to weapons specialized for close range fighting.
Bonuses:
- Reduces Hip Fire Cones of Fire for all stances except jumping by 33% (40% for Advanced Laser Sight).
Penalty:
- Can give away your position with laser sticking out of your gun.
The “laser sight” doesn’t actually create any red dot, the laser effect is purely cosmetic. It can be turned off (default keybind is “X”), and will still provide the benefit. Laser becomes visible to enemies only at close range, like 5-10m.
It’s possible that turned off laser sight can still be visible to some enemies, and it sticks through walls.
Overall, the “demasking” effect is very minor, and isn’t something you should be concerned with.
Laser sight is a very strong attachment for anyone who intends to hip fire. High hip fire accuracy can be viewed as a defensive trait, that will allow you to hip fire from greater range, and use your full speed to dodge enemy fire. It will also increase the range where you can reliably hip fire for headshots, if you possess that aiming skill.
Darklight Flashlight
Available to most primary weapons and sidearms. Primarily, used to to illuminate cloaked enemy infiltrators, as seen in this video:
Turned on flashlight gives away your position, so remember to turn off the flashlight at any time you’re not actively using it. Because of the demasking effect, flashlight is an ineffective way of combatting darkness. HS/NV scope is a better solution.
Tip: even if the wielder of the darklight flashlight is dead, the flashlight on his gun on his corpse will still produce the cone of light, and it will still illuminate cloaked infiltrators.
Tip: the player using the flashlight will see his cone of light differently from other players.
Here’s Wrel’s flashlight review (outdated, doesn’t cover the aspect of illuminating cloaked infiltrators):
Extended Magazine
Available to some LMGs, SMGs, Heavy Weapons and shotguns.
Bonuses:
- NSX Naginata: +45 rounds per mag (up from 90)
- Other LMGs, X2 Lasher, T7 MCG: doubles magazine size
- NC05 Jackhammer: +3 rounds per mag
- SMGs: +10 rounds per mag
- NSX Tomoe: +2 rounds per mag
- NSX Tanto: +6 rounds per mag
- NSX Tengu: +4 rounds per mag
- Shotguns: +2 rounds per mag
Penalties:
- No direct penalties. On weapons with tube magazines, increases maximum reload time, but not a strong downside, considering the reload process can be interrupted at any time after a small delay.
Ext. Mags work nicely together with Ammo Belt suit slot. For example, for NS-7 PDW SMG, each level of Ammo Belt will increase your ammo pool by 30 rounds, but if you use Ext. Mags, each level of Ammo Belt will give you +40 rounds.
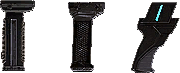
Underbarrel Attachments
![]()
Underbarrel Attachments are additional tools or weapons that can be attached to the Rail slot of some of the primary weapons.
Press [1] to switch to your Underbarrel Attachment with your weapon drawn. Press [1] again to switch back.
Ammunition for Underbarrel Attachments can be resupplied from Engineer’s Ammo Packs.
Availability
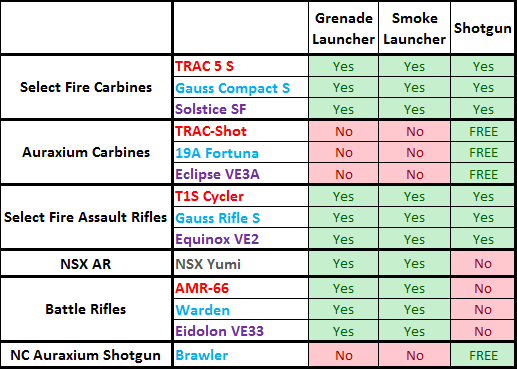
As you can see, Underbarrel Attachments are available on a number of weapons, most notable being Select Fire Assault Rifles and Carbines. However, these weapons have a distinct problem: they mostly have directly worse stats than other ARs and Carbines.
Underbarrel attachments already come with an opportunity cost of not being able to use another rail attachment, which is vital for increasing performance of the weapon.
Using underbarrel attachments on already subpar weapons double dips in that opportunity cost, and in the end you get a doubly “meh” weapon with a situational tool glued to it.
So underbarrel attachments make sense only on weapons that don’t benefit much from other rail attachments: Battle Rifles and NSX Yumi, or weapons that already come with a “free” underbarrel shotgun: Auraxium Carbines and NC Shotgun – The Brawler.
Exact stats of these attachments have been found in Census API:
Underbarrel Grenade Launcher (UBGL)
Careful: loud music.
[spoiler title=”Detailed stats”]
Switch Time: 0.8 sec

Direct Damage: 500
Indirect Damage: 700 @ 0.1m - 50 @ 5m
Splash damage to infantry is applied on direct hits, so direct hits with UBGL deal 1200 damage and can one-hit-kill most infantry targets.
On direct hits, UBGL deals moderate damage to MAXes and minor damage to vehicles:
- ~33.3% damage of default ESF’s health
- ~25% of default Harasser’s health
- ~14% of Lightning’s health from the side. 12.5% in front armor.
- 48.75% of MAX’s health (33.75% in full Ordnance Armor)
Headshot Damage Multiplier: 2x
Headshot Damage Multiplier of 2x gives UBGL an interesting application of one-shotting almost all infantry targets on a headshot at close range. Or you can combo a UBGL body shot with a quick knife swing.
Leg Shot Damage Multiplier: 1x
Reload Time: 3 seconds
Projectile Speed: 45 m/s
Projectile Gravity: 7
Projectile Lifespan: 3 seconds
Arming Distance: 10 meters
Due to this Arming Distance, grenades will not explode when fired at target closer than 10m, but direct damage is still applied to all targets. Since vehicles do not receive splash damage, it makes no difference whether you are outside Arming Distance or not.
Hip Accuracy: 1 / 2.5* / 1.5 / 2
* – it appears that UBGL is bugged, and is the most inaccurate while crouch moving.
(crouching still, crouch moving, standing still, standing moving)
Flying / Jumping: 7
Fire Detect Range: 50m
Ammunition Resupply Time: 5 seconds

API Link
Underbarrel Grenade Launcher increases weapon’s Equip Time by 0.15 seconds.
[/spoiler]
Launches a grenade that flies on a ballistic trajectory and detonates on impact. Comes with three grenades, including one in the barrel. Needs to be reloaded after each shot.
Direct hits will One-Hit-Kill most infantry targets, and deal minor damage to vehicles. Deals moderate splash damage to infantry near the explosion, but less than a frag grenade, and the damage quickly drops off with distance.
Due to heavy Projectile Drop and low velocity, UBGL is only effective within 100m or so. For best accuracy, you need to stop moving and crouch.
Overall, UBGL is the most versatile underbarrel attachment, but it’s also the hardest to use effectively. It is a great tool to have, and has a ton of utility, such as finishing off vehicles or infantry behind cover, damaging MAXes, or even going for a cheeky melee combo or close range one-shot headshot. Not even mentioning the obvious of “shooting into crowds of infantry”.
However, remember to fish for direct hits, and try to combine it with other sources of splash damage, such as a Frag Grenade, or stealing some kills assisting an allied tank.
Underbarrel Shotgun (UBS)
[spoiler title=”Detailed stats”]
 Switch Time: 0.55 sec

Damage: 130 @ 8m - 50 @ 18m x 10 pellets
Headshot Damage Multiplier: 1.5x
Leg Shot Damage Multiplier: 0.9x
Pellet Spread: 3.0 degrees
Approximate effective range:
- 6m if you stand still and ADS
- 3.5m if you hip fire while on the move
Reload Time: 2.5 seconds
Projectile Speed: 300 m/s
Hip Accuracy: 1 / 1.5 / 1.5 / 2
Flying / Jumping: 6
ADS Accuracy: 0.1 / 0.35 / 0.1 / 0.9
Fire Detect Range: 40m
 ADS Movespeed Modifier: 0.75x

API Link
[/spoiler]
Fires a load of buckshot, powerful enough to One Hit Kill most infantry targets at close range. Has to be reloaded after each shot, 4 shots total, including one loaded.
UB shotgun can be great in clutch CQC moments, if you can switch to it behind cover, and then step out and unload at the nearest enemy. It’s less effective in panic situations, since the time it takes to switch to the shotgun is comparable to TTK of most primary weapons.
The problem with UB shotgun is that it’s not very reliable in terms of One Hit Killing the target. As with all shotguns, its effectiveness heavily depends on luck, if target is wounded, if it’s moving, if it has nanoweave or overshilelds. Overall, like with any other shotgun, if you want consistency, you have to be standing right next to the target.
And if you fail to OHK your target, and you can’t run away, you are going to be at a disadvantage, since it will take time for you to switch to another weapon.
Underbarrel Smoke Grenade Launcher (UBSGL)
[spoiler title=”Detailed stats”]
Switch Time: 0.8 sec

Direct Damage: 250
Headshot Damage Multiplier: 2x
Leg Shot Damage Multiplier: 1x
Reload Time: 2.5 seconds
Projectile Speed: 45 m/s
Projectile Gravity: 7
Projectile Lifespan: 30 seconds
Arming Distance: 10 meters
Hip Accuracy: 1 / 2.5 / 1.5 / 2
(crouching still, crouch moving, standing still, standing moving)
Flying / Jumping: 7
Fire Detect Range: 50m
Ammunition Resupply Time: 5 seconds

API Link
[/spoiler]
Fires a grenade that flies on a ballistic trajectory and produces a thick cloud of smoke on impact. Smoke lasts ~9 seconds. Comes with three grenades, including one loaded. Direct hits will injure infantry, but not vehicles. Grenades will not produce smoke when fired within Arming Distance of 10m.
On a headshot, Smoke Launcher can be used to combo kill infantry with a knife strike.
Vented Power Core
Vented Power Core makes Long Reload as fast as Short Reload at the cost of increasing weapon’s Minimum and Maximum Recoil Angles by 5 degrees. Vented Power Core is available only to a few VS weapons:
Recoil Angle penalty is negligible, the real penalty for using Vented Power Core is the opportunity cost of not being able to use other Rail Attachments, such as Forward Grip and Laser Sight, which will have a much more profound effect on actual weapon performance than Long Reload penalty.
Overall, it’s impossible to recommend Vented Power Core to anyone for any reason, because to benefit from it, you need to dump your whole magazine, reload your weapon, and then engage an enemy in the time frame where a Short Reload would be over, but not Long Reload. It’s an impossible amount of stars to align.
Comfort Grip
 Comfort Grip is a rail attachment that:
- Reduces weapon’s Equip and Unequip Times by 30%.
- Reduces Horizontal Recoil and Horizontal Recoil Tolerance by 20%.
- Increases Hip Fire CoFs by 20%. Note that this penalty will stack with a similar penalty from Compensator.
Comfort Grip is a fairly rare attachment, available only for:
Comfort Grip is a somewhat contradictory attachment, since neither of these weapons really care about Horizontal Recoil. However, both Infiltrator and Engineer tend to switch between their equipment a lot, so Comfort Grip’s reduction to equip times is a good quality of life improvement, although it’s unlikely to matter in a life-or-death situation.
Penalty to Hip Fire CoFs is something to be reckoned with. While neither of the weapons are particularly hip-fire focused, they are occasionally fired from the hip, and since this is a rail attachment, it’s mutually exclusive with Laser Sight, so you can’t compensate the penalty that way.
Ammo
High Velocity Ammunition (HVA)
Bonuses:
- Increases bullet velocity by 10%.
- Extends minimum damage range by 20m.
Penalty:
- Decreases maximum damage range by 2m.
HVA is used to make the weapon more effective at range, and to counter Suppressor’s penalties.
HVA is useful to any weapon with more than 1 tier of damage degradation, such as most ARs and LMGs, and especially for carbines, as velocity and minimum damage range are usually their weakest stats.
Example
Let’s analyze HVA on the example of VS carbine Pulsar C.
Default stats:
- Damage model: 167 @ 10m – 125 @ 70m
- 6 shots to kill within 10m
- 7 shots to kill from 11m to 44m
- 8 shots to kill at 45m+
- Velocity: 515 m/s.
Stats with HVA:
- Damage model: 167 @ 8m – 125 @ 90m
- 6 shots to kill within 8m
- 7 shots to kill from 9m to 55m
- 8 shots to kill at 56m+
- Velocity: 566 m/s.
Increasing minimum damage range results in up to ~8% damage increase, depending on range to the target.
This minor damage boost will push back the intermediate bullets-to-kill threshold, reducing the number of shots to kill a full health target from 44m to 55m.
It will also come in handy when you’ll inevitably have to deal with wounded players or nanoweave armor.
Soft Point Ammo
SPA is usually available to close combat weapons and is used to increase their effectiveness within 10-20m.
Bonus:
- Extends maximum damage range by 5m.
Penalty:
- Reduces bullet velocity by 10%.
The main purpose of SPA is to push further away the range at which the weapon will need an extra bullet to kill a player. There is also a marginal increase to all damage within weapon’s damage ranges.
The velocity penalty will make it slightly harder to hit enemies at range, especially if they are moving. It’s not recommended to combine SPA with a Suppressor.
Slug Ammunition
Covered in the shotgun guide.
SPRW Ammunition
Increases Projectile Velocity at the cost of reducing Magazine Size. SPRW Ammo is available only to a few NC weapons:
- MGR-S1 Gladius: +25% Velocity, -4 Rounds per Magazine
- MGR-L1 Promise: +25% Velocity, -25 Rounds per Magazine
Unstable Ammunition
Increases projectile’s hitbox, making shots easier to hit. Reduces Headshot Damage Multiplier from 2x to 1.2x. Unstable Ammunition is available only to a few VS weapons:
- VE-S Canis
- VE-H Maw
In essence, Unstable Ammunition reduces weapon’s skill floor and skill ceiling at the same time. It makes it easier to hit enemies by firing in their general direction, but harder to concentrate your fire at a specific point, such as enemy’s head. It also makes projectiles more likely to hit cover.
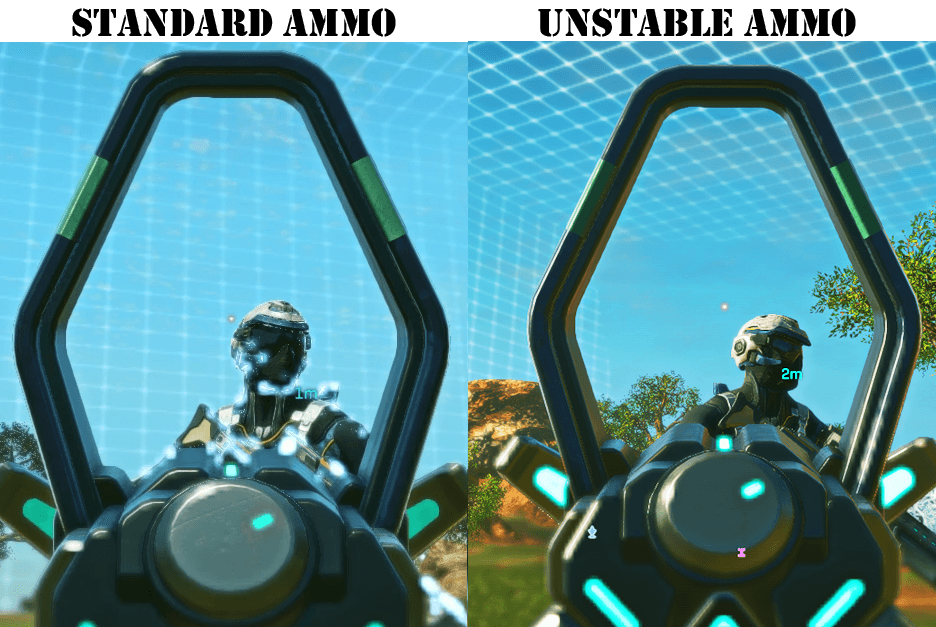
Both of these shots would hit
Share with:
Recent Comments