

Carbines are close to medium range automatic weapons. Overall, they are similar to Assault Rifles, but with a higher emphasis on hip firing and other CQC traits.
Carbines retain accurate hip fire while jumping or flying on a jet pack. This allows Light Assaults to effectively engage enemies while airborne, and Engineers to be a bit more mobile and jumpy. Unless specified otherwise, a carbine’s Flying CoF is equal to its Standing Moving Hip Fire CoF.
Most videos in this article were made before carbines could fire accurately mid-air, and are outdated.
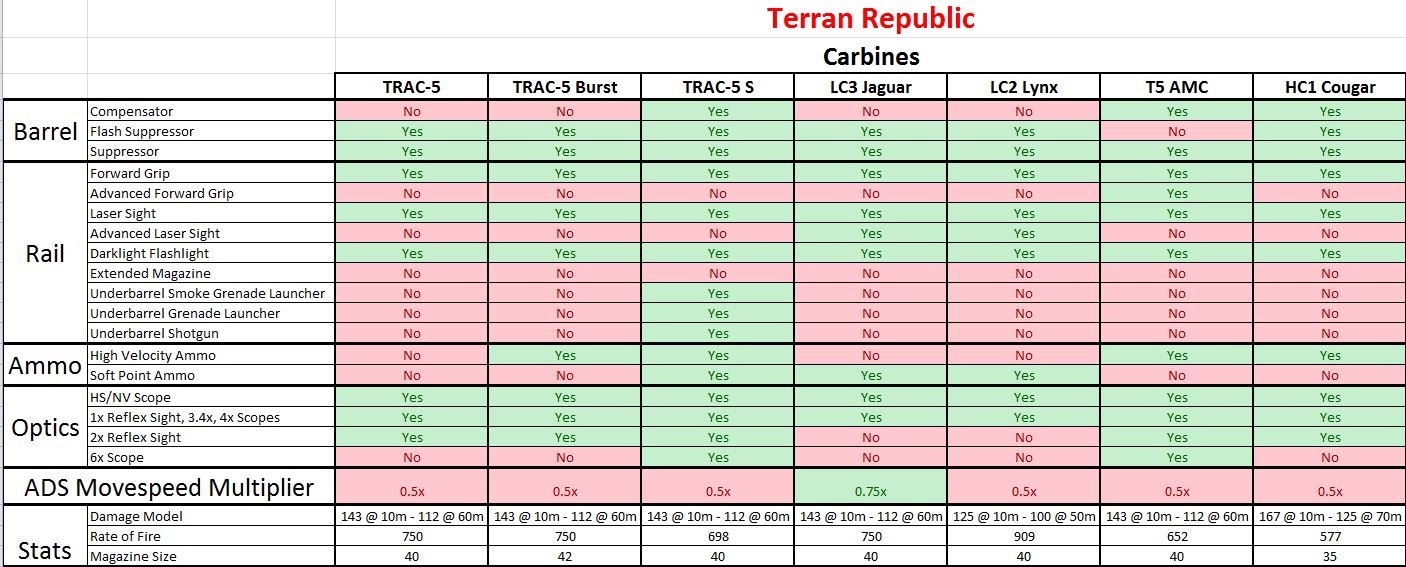
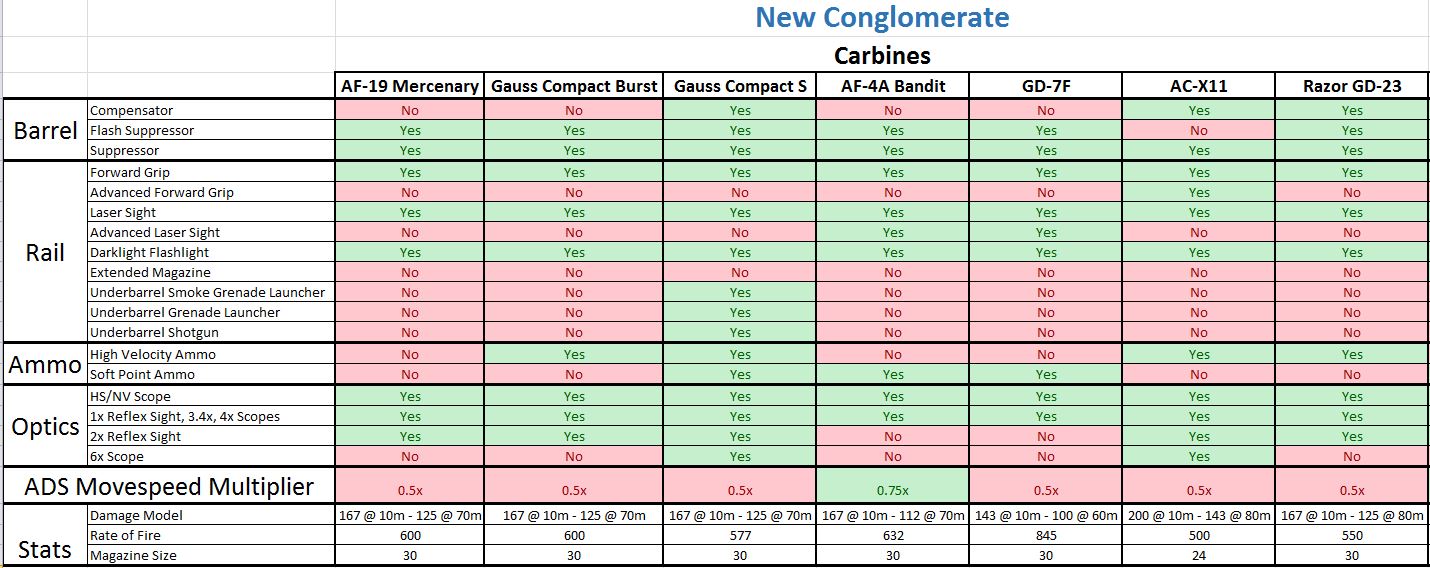
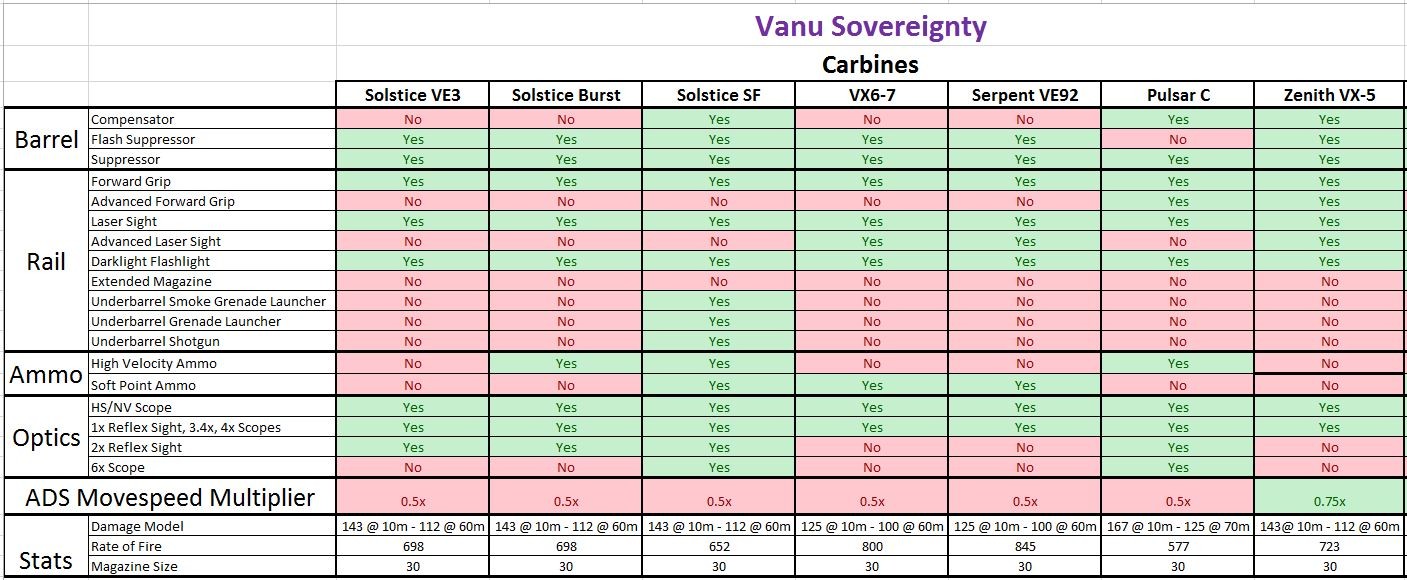
Basic stats and attachments
Click to enlarge.
Carbine Mechanics
For the most part, Carbines obey the same weapon mechanics as other weapons.
Through a combination of traits, most carbines have very effective hip fire. However, there are many different carbines, and they achieve that effective hip fire in different ways: some through reduced Hip CoF Bloom, some through high volume of fire, and some through superior Hip Fire CoFs.
Many carbines can be additionally specialized for CQC with SPA and Advanced Laser Sight attachments.
Accurate Hip Fire while Flying, Falling or Jumping
When you jump, fly or fall with most weapons, your Hip Fire CoF instantly increases to its maximum value of 7, making your fire extremely inaccurate.
This isn’t the case with carbines. Most of them retain Standing Moving Hip Fire CoF while jumping, flying or falling.
There are a few exceptions: carbines with high Rate of Fire AND high DPS have 0.25 larger CoF while flying. Largely, this is inconsequential.
The point is, carbines allow you to effectively hip fire while being very mobile and actively moving around.
Laser Sight can further increase flying Hip Fire accuracy, but there is a catch: Laser Sight only provides a benefit when you go up after a jump, or when you actively fly on a Jet Pack. Laser Sight benefit is lost during free fall.
Reduced Hip CoF Bloom for low RoF carbines
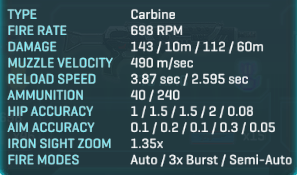
Historically, 652 and 698 RoF, 143 damage weapons have been underwhelming. They couldn’t really compete in close quarters with higher DPS weapons, and they are not as effective at range as 167 damage weapons, as those usually have less horizontal recoil, and higher damage in general is more effective at range.
Carbines have found a way to compensate for this: low RoF 143 damage carbines have reduced CoF Bloom when hip firing, meaning they can sustain accurate hip fire for much longer than higher DPS / higher RoF carbines.
Hip CoF Bloom for 143 damage, 652 RoF carbines: 0.06
Hip CoF Bloom for 143 damage, 698 RoF carbines: 0.08
For comparison:
Standard ADS CoF Bloom for 143 damage: 0.05
Standard Hip CoF Bloom for 143 damage: 0.1
This does not apply to burst carbines.
Default carbines
These are starter weapons for Light Assault and Engineer, available by default. Laser sight and 1x Reflex scope are unlocked for them by default.
They are often overlooked and underrated, people think “they can’t be any good since I get them for free”, but this isn’t true. Also people tend to blame starter weapons for their own failures during “learning the game” period, just to rediscover them later as powerful and reliable weapons, which are only held back by scarce attachment choice.
Starting carbines offer a great balance of stats, and keep most statistics at “high” or at least “average” without sacrificing anything in particular.
Their main disadvantage is lack of specialization. While they are great weapons in general, they lose to specialist weapons in their element.
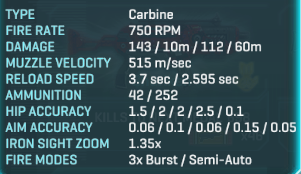
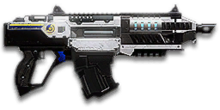
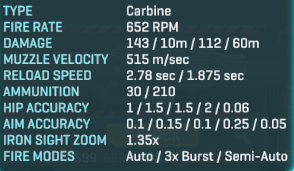
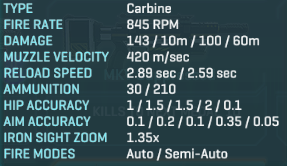
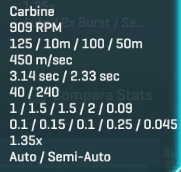
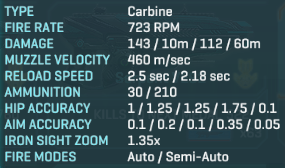
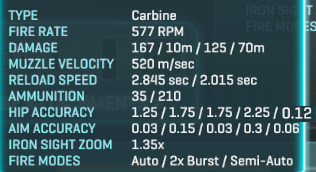
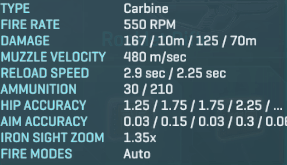
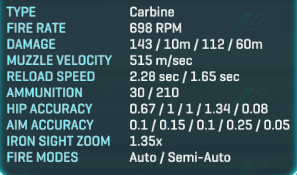
TRAC-5

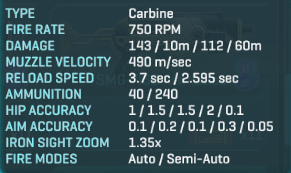 |
Vertical Recoil: 0.3 First Shot Recoil Multiplier: 2.35 Recoil Angle: 23 / 25 Horizontal Recoil: 0.225 / 0.225 Horizontal Recoil Tolerance: 0.55 Recoil Recovery Delay: 80 Recoil Recovery Rate: 18 |
Bullets to Kill Thresholds:
7: 0 – 10
8: 11 – 39
9: 40+
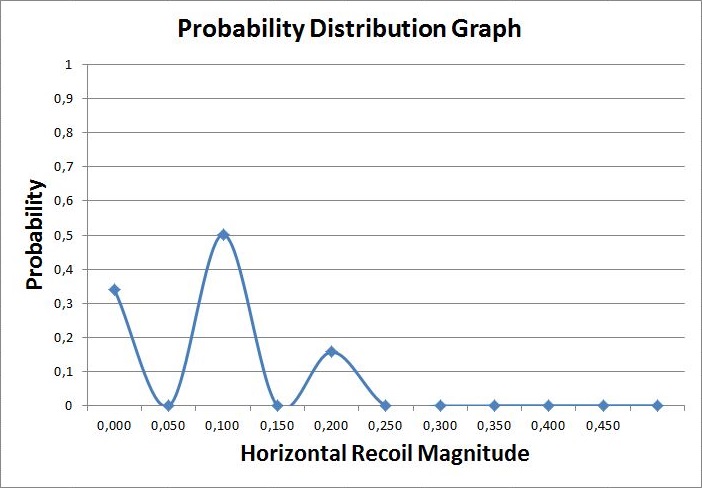
Calculated Recoil Statistics
Vertical Recoil per Second: 3.75
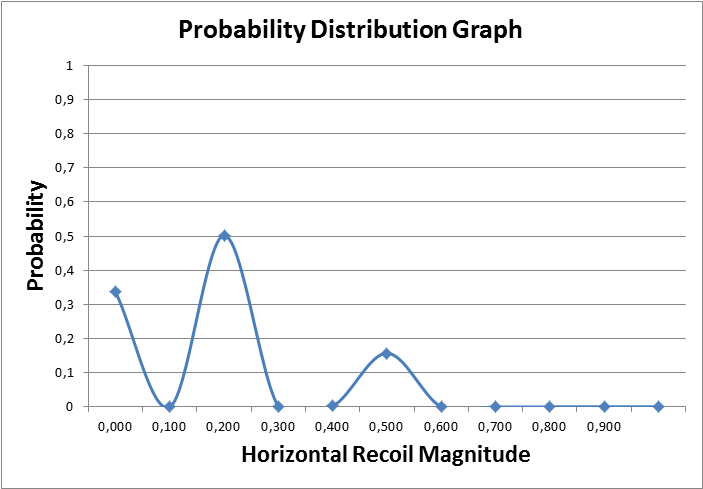
Average Horizontal Deviation: 0.1848
Maximum Horizontal Deviation: 0.45
Average Recoil Angle: 24
Recoil Angle Variance: 2
Average Horizontal Deviation due to Recoil Angle: 0.0053
Average Vertical Deviation due to Recoil Angle: 0.0039
True Recoil Recovery Delay: 160
Recoil Recovery Time per Shot: 0.0208
Misc. Stats
Headshot Damage Multiplier: 2
Minimap Detect Range: 40

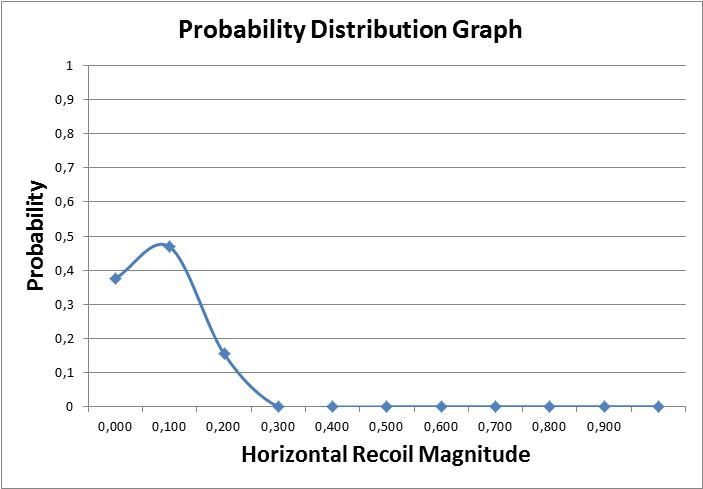
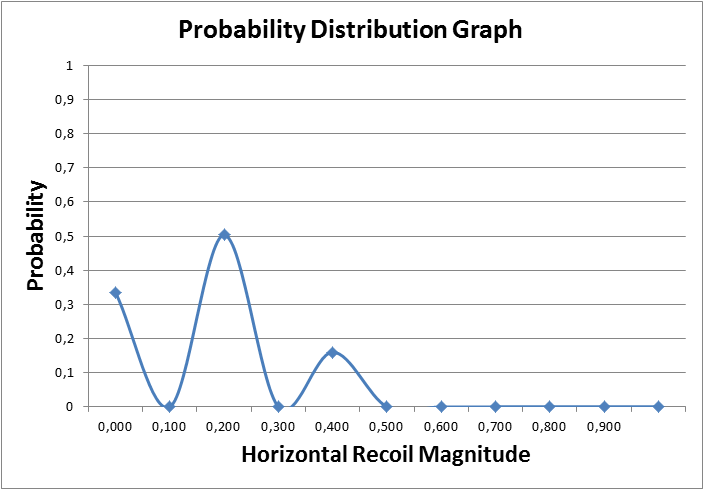
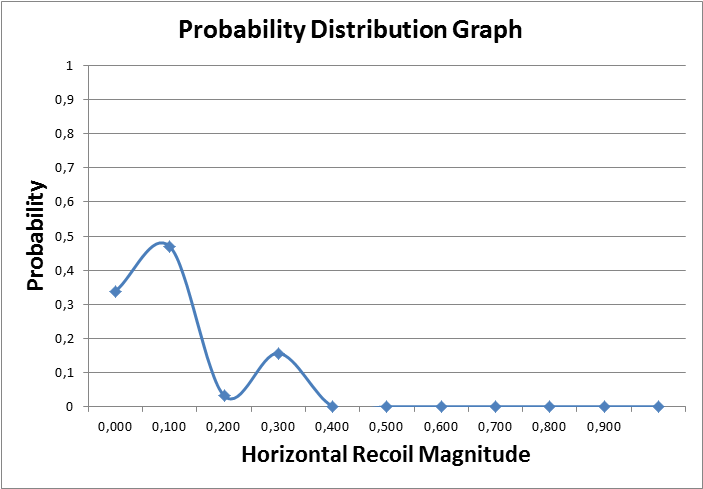
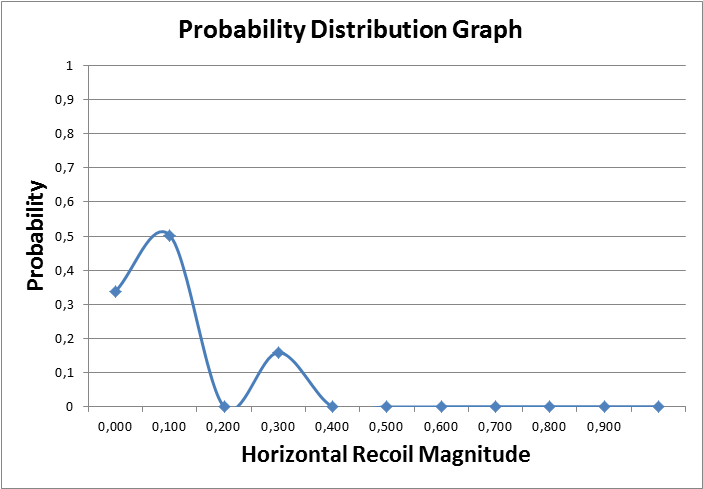
TRAC-5 Horizontal Recoil Pattern
TRAC 5 is a strong and easy to use close to medium range carbine. It’s a perfect middle ground between high DPS close range carbines, and high accuracy precision carbines.
For a weapon with such high potential DPS, TRAC 5 has surprisingly stable recoil and predictable recoil pattern. However, high Recoil Angle takes a bit of getting used to, and nearly 4 second Long Reload can be punishing,
Here’s some TRAC 5 gunplay by SirCeralBox (Connery NC):
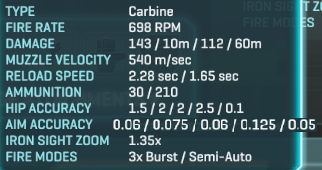
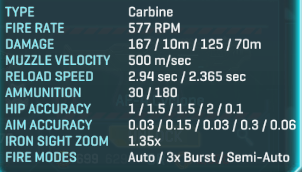
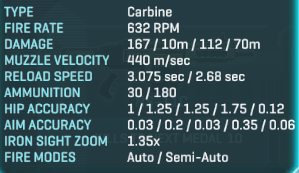
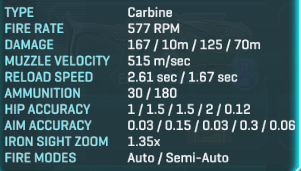
AF-19 Mercenary
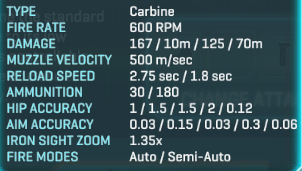 |
Vertical Recoil: 0.4 First Shot Recoil Multiplier: 1.75 Recoil Angle: 0 / 0 Horizontal Recoil: 0.175 / 0.175 Horizontal Recoil Tolerance: 0.45 Recoil Recovery Delay: 100 Recoil Recovery Rate: 18 |
Bullets to Kill Thresholds:
6: 0 – 10
7: 11 – 44
8: 45+
Calculated Recoil Statistics
Vertical Recoil per Second: 4
Average Horizontal Deviation: 0.1439
Maximum Horizontal Deviation: 0.35
Average Recoil Angle: 0
Recoil Angle Variance: 0
Average Horizontal Deviation due to Recoil Angle: 0
Average Vertical Deviation due to Recoil Angle: 0
True Recoil Recovery Delay: 200
Recoil Recovery Time per Shot: 0.0243
Misc. Stats
Headshot Damage Multiplier: 2
Minimap Detect Range: 40

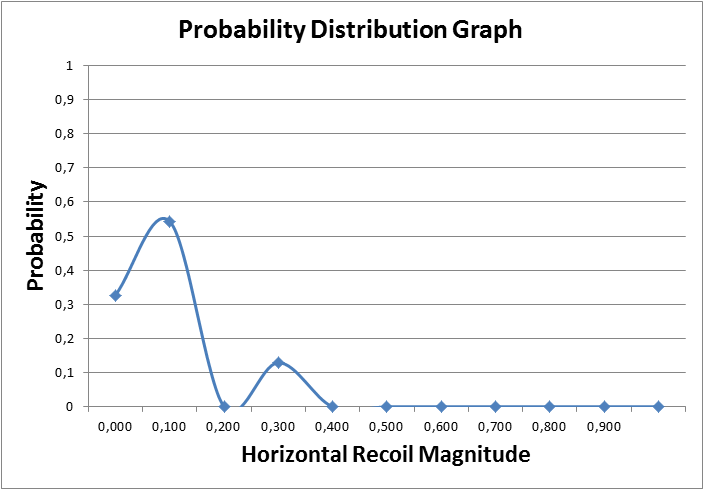
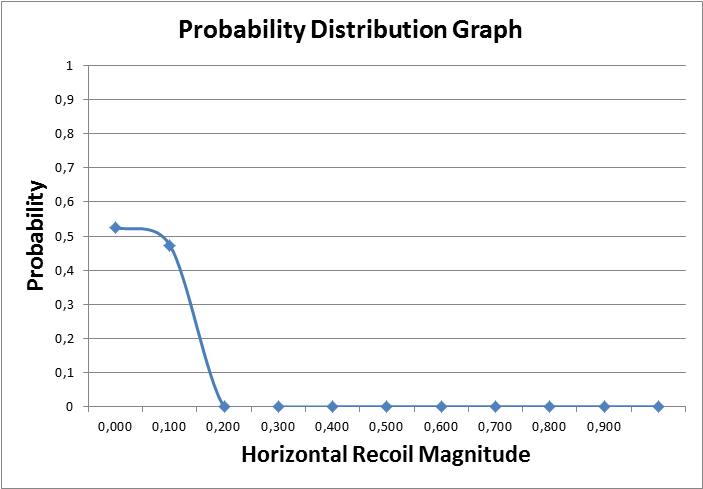
AF-19 Mercenary Horizontal Recoil Pattern
AF-19 Mercenary has comparatively low rate of fire, but does a lot of damage per shot, and reloads fast. It has predictable recoil pattern with strong vertical kick and minimal left and right shake. As long as you make an effort to compensate that vertical kick, Mercenary will perform with deadly precision.
Here’s some Mercenary gunplay by SirCeralBox (Connery NC):
Mercenary is featured in my Light Assault Montage:
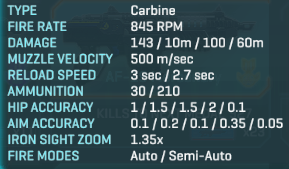
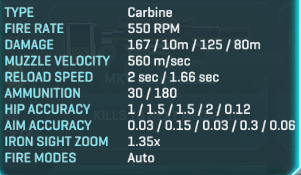
Solstice VE3

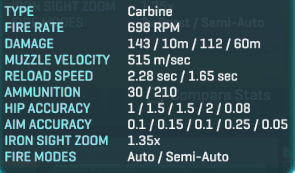 |
Vertical Recoil: 0.25 First Shot Recoil Multiplier: 2.8 Recoil Angle: 14 / 17 Horizontal Recoil: 0.2 / 0.2 Horizontal Recoil Tolerance: 0.5 Recoil Recovery Delay: 86 Recoil Recovery Rate: 18 |
Bullets to Kill Thresholds:
7: 0 – 10
8: 11 – 39
9: 40+
Calculated Recoil Statistics
Vertical Recoil per Second: 2.9
Average Horizontal Deviation: 0.1649
Maximum Horizontal Deviation: 0.4
Average Recoil Angle: 15.5
Recoil Angle Variance: 3
Average Horizontal Deviation due to Recoil Angle: 0.0066
Average Vertical Deviation due to Recoil Angle: 0.0051
True Recoil Recovery Delay: 172
Recoil Recovery Time per Shot: 0.0178
Misc. Stats
Headshot Damage Multiplier: 2
Minimap Detect Range: 40

Solstice VE3 Horizontal Recoil Pattern
Solstice VE3 is a versatile weapon and fares well in almost all situations. Due to comparatively mild recoil, it is easy to hold on target. Magazine capacity is a bit low, but generally enough to deal with at least one enemy. This is somewhat compensated by fastest reload speed among all primary weapons.
Solstice is featured in my LA montage:
Burst carbines
These are burst variants of the default carbines. As the name suggest, instead of fully automatic, they fire in short bursts of 2-3 rounds per click.
They are meant to be used at slightly longer ranges than their full auto brethren. They have worse hip fire CoFs, but better ADS CoFs, especially the “moving” ones, as well as lower horizontal recoil and access to High Velocity Ammunition.
They also have 25 m/s higher projectile velocity.
There’s no obligatory pause between bursts, so if you click at a very specific rate, it’s possible to reach the same rate of fire as if they were fully automatic.
Most importantly, burst weapons have very low first shot recoil multiplier of 0.75x, which means that first 2 rounds of a burst land very close to each other. But higher vertical recoil means that 2nd and 3rd shot will produce more recoil.
All of this boils down to: burst carbine have potential to be more precise, but a bit harder to use. Having to click for each burst while compensating for scattered recoil requires some getting used to.
TRAC-5 Burst
 |
Recoil Angle: 23 / 25 Horizontal Recoil: 0.17 / 0.17 Horizontal Recoil Tolerance: 0.4 Recoil Recovery Delay: 80 Recoil Recovery Rate: 18 |
Bullets to Kill Thresholds:
7: 0 – 10
8: 11 – 39
9: 40+
Calculated Recoil Statistics
Average Horizontal Deviation: 0.137
Maximum Horizontal Deviation: 0.34
Average Recoil Angle: 24
Recoil Angle Variance: 2
Average Horizontal Deviation due to Recoil Angle: 0.007
Average Vertical Deviation due to Recoil Angle: 0.0029
True Recoil Recovery Delay: 160
Recoil Recovery Time per Shot: 0.0241
Misc. Stats
Headshot Damage Multiplier: 2
Minimap Detect Range: 40

TRAC-5 Burst Horizontal Recoil Pattern
This is a straight upgrade to TRAC 5, because it has -25% horizontal shake while maintaining the same damage profile. With exception to the Solstice Burst, no other 143 dmg carbine has that tight of a horizontal recoil pattern.
Not even T5 AMC or NS-11C, which are supposed to be dedicated to longer range. This fills what I believe is the biggest shortcoming of TRAC 5 / Jaguar, and allows for headshots up to a much greater distance.
In CQC, the gun is still very viable, as it’s easy to abuse the mouse input queue to get the full 750rpm, and with its tight recoil, you have a headshot machine at range.
Yes, it loses to CQC carbines that have insane ROF and specialized in hipfire, but I find in general it beats the other all-rounders. In fact, I’d go as far as to say it gives the Jaguar a run for its money as the best all-rounder, with more focus on mid-range.
Gauss Compact Burst
|
Recoil Angle: -2 / 2 Horizontal Recoil: 0.14 / 0.14 Horizontal Recoil Tolerance: 0.28 Recoil Recovery Delay: 100 Recoil Recovery Rate: 18 |
Bullets to Kill Thresholds:
6: 0 – 10
7: 11 – 44
8: 45+
Calculated Recoil Statistics:
Average Horizontal Deviation: 0.109
Maximum Horizontal Deviation: 0.28
Average Recoil Angle: 0
Recoil Angle Variance: 4
Average Horizontal Deviation due to Recoil Angle: 0.0158
Average Vertical Deviation due to Recoil Angle: 0.0046
True Recoil Recovery Delay: 200
Recoil Recovery Time per Shot: 0.0262
Misc. Stats
Headshot Damage Multiplier: 2
Minimap Detect Range: 40
Gauss Compact Burst Horizontal Recoil Pattern
Holy crap this thing is a laser pointer. It has -20% horizontal shake compared to Mercenary, but its 2-shot burst mechanic benefits much more from x0.75 FSRM. The thing barely recoils at all, in any direction.
At the same time though, because 2-shot bursts are shorter, I find it harder to use the mouse input queue to maximize the fire rate. Mercenary is probably still the better all rounder, but the Burst is indisputably the king of long range.
Solstice Burst
 |
Recoil Angle: 14 / 16 Horizontal Recoil: 0.16 / 0.16 Horizontal Recoil Tolerance: 0.4 Recoil Recovery Delay: 86 Recoil Recovery Rate: 18 |
[spoiler title=”Weapon Toolbox Analysis”]DPS: 1664
Bullets to Kill Thresholds:
7: 0 – 10
8: 11 – 39
9: 40+
Calculated Recoil Statistics
Vertical Recoil per Second: 3.5
Average Horizontal Deviation: 0.128
Maximum Horizontal Deviation: 0.32
Average Recoil Angle: 15
Recoil Angle Variance: 2
Average Horizontal Deviation due to Recoil Angle: 0.0053
Average Vertical Deviation due to Recoil Angle: 0.0027
True Recoil Recovery Delay: 172
Recoil Recovery Time per Shot: 0.0189
Misc. Stats
Headshot Damage Multiplier: 2
Minimap Detect Range: 40
Solstice Burst Horizontal Recoil Pattern
I think the VS got the shaft here. Yes, the burst also has less horizontal recoil compared to Solstice.
But, unlike the TR, where the burst variant fixes the shortcoming of the default variant, or the NC burst carbine that made an already amazing weapon even more accurate, making a burst carbine out of the “meh” solstice just yields a “meh” burst carbine.
The recoil of the default Solstice was already very controllable, making a burst out of it doesn’t really add that much.
The damage per mag is still low, the ROF is still lower than other 143 weapons. Most importantly, the Solstice Burst STILL does nothing that the Pulsar C doesn’t do better.
Select Fire carbines
They are similar to default carbines, but a little worse in many aspects: lower rate of fire, longer reload times, sometimes – higher recoil.
They also have burst-fire mode, but it has the same FSRM as full auto mode, so it’s useless. You can press {B} key to switch fire modes.
Their main selling point is access to a wide array of attachments: HVA, SPA, Flash Suppressor, Compensator, as well as exclusive access to Underbarrel Attachments.
They can be a good choice for people who like the default carbines, but wish they could customize them to suit their playstyle more. However, usually it is better to simply pick a specialized carbine, so the only real reason to use an S series carbine is for the utility of their unique underbarrel attachments.
They also have reduced Hip CoF Bloom, making sustained hip fire a little bit more accurate.
TRAC-5 S

 |
Vertical Recoil: 0.34 First Shot Recoil Multiplier: 1.85 Recoil Angle: 23 / 25 Horizontal Recoil: 0.225 / 0.225 Horizontal Recoil Tolerance: 0.55 Recoil Recovery Delay: 86 Recoil Recovery Rate: 18 |
Bullets to Kill Thresholds:
7: 0 – 10
8: 11 – 39
9: 40+
Calculated Recoil Statistics
Vertical Recoil per Second: 4
Average Horizontal Deviation: 0.185
Maximum Horizontal Deviation: 0.45
Average Recoil Angle: 24
Recoil Angle Variance: 2
Average Horizontal Deviation due to Recoil Angle: 0.006
Average Vertical Deviation due to Recoil Angle: 0.0039
True Recoil Recovery Delay: 172
Recoil Recovery Time per Shot: 0.0227
Misc. Stats
Headshot Damage Multiplier: 2
Minimap Detect Range: 40
TRAC-5 S Horizontal Recoil Pattern
Gauss Compact S
 |
Vertical Recoil: 0.45 First Shot Recoil Multiplier: 1.4 Recoil Angle: 0 / 0 Horizontal Recoil: 0.175 / 0.2 Horizontal Recoil Tolerance: 0.45 Recoil Recovery Delay: 104 Recoil Recovery Rate: 18 |
[spoiler title=”Weapon Toolbox Analysis”]DPS: 1606
Bullets to Kill Thresholds:
6: 0 – 10
7: 11 – 44
8: 45+
Calculated Recoil Statistics
Vertical Recoil per Second: 4.3
Average Horizontal Deviation: 0.155
Maximum Horizontal Deviation: 0.418
Average Recoil Angle: 0
Recoil Angle Variance: 0
Average Horizontal Deviation due to Recoil Angle: 0
Average Vertical Deviation due to Recoil Angle: 0
True Recoil Recovery Delay: 208
Recoil Recovery Time per Shot: 0.0271
Misc. Stats
Headshot Damage Multiplier: 2
Minimap Detect Range: 40

Gauss Compact S Horizontal Recoil Pattern
Solstice SF

 |
Vertical Recoil: 0.28 First Shot Recoil Multiplier: 2.3 Recoil Angle: 14 / 17 Horizontal Recoil: 0.2 / 0.2 Horizontal Recoil Tolerance: 0.5 Recoil Recovery Delay: 92 Recoil Recovery Rate: 18 |
Bullets to Kill Thresholds:
7: 0 – 10
8: 11 – 39
9: 40+
Calculated Recoil Statistics
Vertical Recoil per Second: 3
Average Horizontal Deviation: 0.164
Maximum Horizontal Deviation: 0.4
Average Recoil Angle: 15.5
Recoil Angle Variance: 3
Average Horizontal Deviation due to Recoil Angle: 0.0074
Average Vertical Deviation due to Recoil Angle: 0.0051
True Recoil Recovery Delay: 184
Recoil Recovery Time per Shot: 0.0191
Misc. Stats
Headshot Damage Multiplier: 2
Minimap Detect Range: 40

Solstice SF Horizontal Recoil Pattern
DPS Carbines
These CQC carbines trade everything for raw firepower. Their high rate fire and high DPS, as well as access to advanced laser sight and soft point ammunition, ensure supremacy at close range. However, strong recoil, low bullet speed, and stronger damage degradation put severe limitations on effective range.
The main point of DPS carbines is to dominate 1 v 1 fights at close range, even against Heavy Assaults with overshields, while still being more versatile than a shotgun or an SMG. Unlike them, CQC carbine allows to be effective in range segment from 5 and up to 30 meters.
GD-7F
 |
Vertical Recoil: 0.31 First Shot Recoil Multiplier: 2 Recoil Angle: -19 / -17.5 Horizontal Recoil: 0.225 / 0.3 Horizontal Recoil Tolerance: 0.625 Recoil Recovery Delay: 71 Recoil Recovery Rate: 18 Flying CoF: 2.25 |
[spoiler title=”Weapon Toolbox Analysis”]DPS: 2014
Bullets to Kill Thresholds:
7: 0 – 10
8: 11 – 30
9: 31 – 46
10: 47+
Calculated Recoil Statistics
Vertical Recoil per Second: 4.4
Average Horizontal Deviation: 0.216
Maximum Horizontal Deviation: 0.611
Average Recoil Angle: -18.25
Recoil Angle Variance: 1.5
Average Horizontal Deviation due to Recoil Angle: 0.0041
Average Vertical Deviation due to Recoil Angle: 0.0034
True Recoil Recovery Delay: 142
Recoil Recovery Time per Shot: 0.0226
Misc. Stats
Headshot Damage Multiplier: 2
Minimap Detect Range: 40

GD-7F Horizontal Recoil Pattern
GD-7F is a carbine that has lower damage per bullet than other NC carbines, but high rate of fire. Some people hate GD-7F for that. “It’s like a TR gun”, they say. However, GD-7F still shares NC doctrine in a sense that it must be handled carefully, and if done so, it becomes a deadly weapon with highest DPS of all carbines, except for Serpent (tied with it).
GD-7F is featured in my Light Assault montage:
Wrel’s video review:
(there’s an error in the video: Horizontal Recoil is 0.225/0.3, not 0.225/0.25)
Here’s a User Guide to GD-7F by Redwave, originally posted here:
To be effective with this carbine it is recommended to engage targets only in close quarters distance: 30 meters or less. GD-7F is not as versatile as some other carbines, so you should engage targets at 30m+ only when target is unaware of you or if you’re operating from a safe position. That said, it’s still much better at range than any SMG.
GD-7F’s raw DPS can win fights for you even if you can’t effectively flank, or failed while trying to. But try to fight only one person at a time and retreat to reload as soon as possible. 30 round magazine means you can kill only 1 or 2 people before reloading.
The gun fires fast, and each shot has average vertical recoil and strong, inconsistent horizontal recoil. To compensate for the recoil, pull your mouse down and to the right, but there’s a limit to how much of the recoil you can compensate.
Unpredictable recoil pattern and strong damage degradation make this gun a bad competitor at mid-long ranges, so make sure to get close to the target before engaging.
GD-7F is a bullet hose: you aim at a target, and shower it with bullets. In long range fights that would probably mean burning through the magazine before you kill the enemy, at closer range this will guarantee that at least some of your bullets are hitting.
Pros:
- Shortest TTK of all NC Carbines
- High rate of fire (ROF). Whenever you need an extra bullet to kill, a high RoF weapon will fire that additional bullet fast.
- Good hip-fire with advanced laser sight.
Cons:
- Strong, hard to compensate recoil
- Strong damage degradation
- Burns through ammunition
- Low damage per magazine, which makes the gun overly sensitive to user accuracy. Aiming past the target even for a short amount of time may make you waste too much ammunition, and you will be unable to finish off the target. This is especially apparent when dealing with HAs.
- Long reload
- High cone of fire (COF) bloom due to high rate of fire.
Attachments:
Scope:
1x reflex is a recommended choice, but you can use HS/NV at your preference. It is not recommended to use a 2x reflex scope or stronger, because the weapon has short effective range, and you won’t need strong magnification, which would also make the recoil appear stronger.
Rail:
Because GD-7F has 0.5x ADS movespeed multiplier, it is recommended you use it with Advanced Laser Sight. It will give you an option to freely hip fire in close quarters and dodge enemy fire, as well as remain mobile, not slow yourself down with aiming down sights.
While Forward Grip would mitigate some of the horizontal recoil and make the weapon a bit easier to control, the gun will still be much less accurate than other weapons, and strong damage degradation will mean you will need a lot of hits to kill a target at range.
Ammo:
Soft Point Ammo should always be taken on GD-7F. Sacrificing only 25 m/s projectile speed is well worth gaining 5m to max damage range.
Barrel:
Flash Suppressor is viable. Removing muzzle flash will make you less noticeable in certain situations, and it will be harder to tell for enemies when you’re shooting them. But increasing minimap detection range by 15m will sometimes give away your position to enemies that you can’t even engage effectively, as 40m – normal detection range – is about the limit of GD-7F’s effective range.
Suppressor is viable on GD-7F, as it has higher projectile velocity than CQC carbines normally do. In terms of time to kill, within 25m distance, there is little to no difference between using GD-7F with or without a suppressor. However, hitting moving targets will become harder due to lower velocity, and your effective DPS outside of 25m will decrease significantly.
Serpent VE92
 |
Vertical Recoil: 0.255 |
[spoiler title=”Weapon Toolbox Analysis”]DPS: 2014
Bullets to Kill Thresholds:
7: 0 – 10
8: 11 – 30
9: 31 – 46
10: 47+
Calculated Recoil Statistics
Vertical Recoil per Second: 3.6
Average Horizontal Deviation: 0.217
Maximum Horizontal Deviation: 0.57
Average Recoil Angle: -23.5
Recoil Angle Variance: 7
Average Horizontal Deviation due to Recoil Angle: 0.0161
Average Vertical Deviation due to Recoil Angle: 0.0155
True Recoil Recovery Delay: 142
Recoil Recovery Time per Shot: 0.0203
Misc. Stats
Headshot Damage Multiplier: 2
Minimap Detect Range: 40
Serpent VE92 Horizontal Recoil Pattern
Similar to GD-7F, so everything in the GD-7F User Guide above applies to Serpent as well. Compared to GD-7F, Serpent has a bit less recoil, but more recoil angle variance, so it kinda averages out in the end. A bit faster reload, and noticeably lower projectile speed.
VX6-7

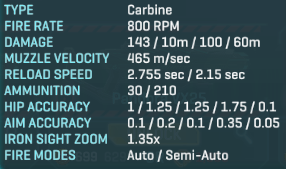 |
Vertical Recoil: 0.3 First Shot Recoil Multiplier: 3 Recoil Angle: 20 / 30 Horizontal Recoil: 0.25 / 0.25 Horizontal Recoil Tolerance: 0.7 Recoil Recovery Delay: 75 Recoil Recovery Rate: 18 Flying CoF: 2.0 |
Bullets to Kill Thresholds:
7: 0 – 10
8: 11 – 30
9: 31 – 46
10: 47+
Calculated Recoil Statistics
Vertical Recoil per Second: 4
Average Horizontal Deviation: 0.206
Maximum Horizontal Deviation: 0.5
Average Recoil Angle: 25
Recoil Angle Variance: 10
Average Horizontal Deviation due to Recoil Angle: 0.0271
Average Vertical Deviation due to Recoil Angle: 0.0206
True Recoil Recovery Delay: 150
Recoil Recovery Time per Shot: 0.0217
Misc. Stats
Headshot Damage Multiplier: 2
Minimap Detect Range: 40
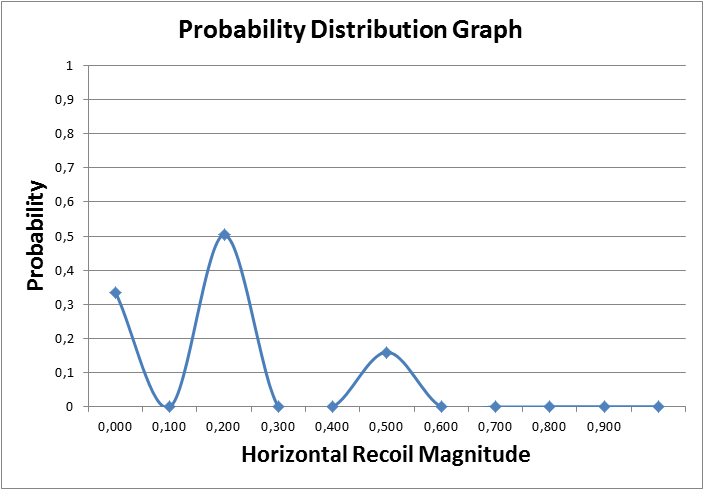
VX6-7 Horizontal Recoil Pattern
Also similar to Serpent. Has a bit lower rate of fire of “only” 800RPM, slightly different recoil pattern, faster reload, better velocity and better hipfire. It’s basically a Serpent, but more forgiving and better rounded.
Both of them are solid CQC carbines with only minor differences of effective engagement range versus raw firepower.
The differences in hip fire CoF values are subtle:
 Purple circle is VX6-7, orange circle is Serpent. VX6-7’s hip fire CoF advantage is 2.5 bullets.
Serpent has vertical recoil of 0.255, while VX6-7 has 0.3 vertical recoil, which amounts to 11% more vertical recoil per second.
LC2 Lynx

 |
Vertical Recoil: 0.34 First Shot Recoil Multiplier: 2 Recoil Angle: 8 / 10 Horizontal Recoil: 0.179 / 0.199 Horizontal Recoil Tolerance: 0.538 Recoil Recovery Delay: 66 Recoil Recovery Rate: 18 Flying CoF: 2.25 |
Bullets to Kill Thresholds:
8: 0 – 10
9: 11 – 30
10: 31+
Calculated Recoil Statistics
Vertical Recoil per Second: 5.151
Average Horizontal Deviation: 0.156
Maximum Horizontal Deviation: 0.412
Average Recoil Angle: 9
Recoil Angle Variance: 2
Average Horizontal Deviation due to Recoil Angle: 0.006
Average Vertical Deviation due to Recoil Angle: 0.0032
True Recoil Recovery Delay: 132
Recoil Recovery Time per Shot: 0.0216
Misc. Stats
Headshot Damage Multiplier: 2
Minimap Detect Range: 40
LC2 Lynx Horizontal Recoil Pattern
LC2 Lynx is a unique and somewhat contradictory weapon.
Damage
Lynx has the highest Rate of Fire among carbines, which makes it very consistent and effective in close quarters. However, lowest damage per shot can often make it feel lacking some extra oomph. Lynx’s DPS is only a few percent behind the GD-7F and Serpent, and when going for headshots within maximum damage range, Lynx can actually kill faster.
Recoil
Lynx has high Vertical Recoil per shot, higher than for TRAC-5 and Jaguar. Yet it shoots faster than both these guns, which results in one of the highest values of Vertical Recoil per Second in the game.
However, Lynx has unusually low Horizontal Recoil, so if you can get that strong vertical pull under control, Lynx will be considerably more accurate than CQC carbines.
Effective Range
Lynx’s Standing Moving ADS CoF is slightly better than average, and it has only 2 tiers of damage degradation. Provided you can properly control the recoil, Lynx can reach just as far as default carbines, while having much higher DPS. Lynx is especially effective in engaging exposed enemies outside of cover, showering them with bullets.
Lynx has comparatively low Projectile Velocity, and it will have a tough time engaging moving enemies, especially if they’re actively dodging.
Utility
Lynx has the same 40 round mag as the majority of TR carbines, but naturally it fits less damage-per-mag due to lower damage tier. However, it’s still quite a lot; more than GD-7F and Serpent get, and Lynx’s reload speed is better than average as well, which is unusual for its DPS.
Unlike other CQC carbines, Lynx is viable with both ALS and Forward Grip.
Conclusion
Lynx is a one-of-a-kind weapon. It is highly competitive in close quarters, and remains effective at longer ranges if handled properly. It has different dynamics than more conventional 143 damage weapons, and takes some getting used to. Personally, it took me about 500 kills to finally warm up to this weapon.
Here’s a review of LC2 Lynx by Wrel:
(Outdated, Lynx now has less CoF Bloom)
Light Carbines
These carbines have access to CQC attachments: ALS and SPA, but have a bit less raw firepower than DPS carbines due to lower rate of fire.
In terms of effectiveness at range and effectiveness in CQC, Light Carbines take middle ground between DPS carbines and default carbines, which makes them well-rounded weapons with inclination towards CQC.
Their main advantage is 0.75x ADS movespeed multiplier, which allows you to be 50% faster while aiming down sights with them. It is a huge boost to mobility, and allows to dodge enemy fire in close quarters while still being accurate yourself. These carbines also have increased hip fire accuracy by default.
LC3 Jaguar

 |
Vertical Recoil: 0.31 First Shot Recoil Multiplier: 2.1 Recoil Angle: 0 / 0 Horizontal Recoil: 0.243 / 0.273 Horizontal Recoil Tolerance: 0.735 Recoil Recovery Delay: 80 Recoil Recovery Rate: 18 Flying CoF: 2.0 |
[spoiler title=”Weapon Toolbox Analysis”]DPS: 1788
Bullets to Kill Thresholds:
7: 0 – 10
8: 11 – 39
9: 40+
Calculated Recoil Statistics
Vertical Recoil per Second: 3.9
Average Horizontal Deviation: 0.212
Maximum Horizontal Deviation: 0.567
Average Recoil Angle: 0
Recoil Angle Variance: 0
Average Horizontal Deviation due to Recoil Angle: 0
Average Vertical Deviation due to Recoil Angle: 0
True Recoil Recovery Delay: 160
Recoil Recovery Time per Shot: 0.0224
Misc. Stats
Headshot Damage Multiplier: 2
Minimap Detect Range: 40
LC3 Jaguar Horizontal Recoil Pattern
LC3 Jaguar is one of the best carbines, and one of the best CQC weapons in the game. It just has an excellent balance of stats, crucial in close quarters: high enough DPS, the best Hip Fire accuracy, excellent DPM. But wait, there’s more! It also has 0.75x ADS Speed multiplier and a straightforward recoil pattern without any kind of Recoil Angle.
Not over yet! For a such a potent CQC carbine, Jaguar doesn’t suffer in bullet damage at range. Indeed, it has the same damage model as “ranged” T5 AMC.
Jaguar is easy to use, and remains deadly effective, regardless of the user’s skill. Newbies can crutch on its DPM and good DPS, while skilled veterans can kill several enemies in a row, all the while barely taking a scratch.
Jaguar also makes an excellent weapon for aerial combat. Only two disadvantages the Jaguar has:
1) Long reload, which is only 0.2 seconds longer than TRAC 5’s, mind you.
2) Limited effective range due to strong horizontal recoil and low projectile velocity. This can be mitigated to some degree by using the Forward Grip.
TRAC 5 is already a godly gun. Jaguar is an improvement upon that, with more emphasis on CQC and surviving under fire.
Zenith VX-5

 |
Vertical Recoil: 0.295 First Shot Recoil Multiplier: 2.4 Recoil Angle: 4 / 5 Horizontal Recoil: 0.246 / 0.275 Horizontal Recoil Tolerance: 0.782 Recoil Recovery Delay: 83 Recoil Recovery Rate: 18 |
[spoiler title=”Weapon Toolbox Analysis”]DPS: 1723
Bullets to Kill Thresholds:
7: 0 – 10
8: 11 – 39
9: 40+
Calculated Recoil Statistics
Vertical Recoil per Second: 3.6
Average Horizontal Deviation: 0.215
Maximum Horizontal Deviation: 0.572
Average Recoil Angle: 4.5
Recoil Angle Variance: 1
Average Horizontal Deviation due to Recoil Angle: 0.0026
Average Vertical Deviation due to Recoil Angle: 0.0023
True Recoil Recovery Delay: 166
Recoil Recovery Time per Shot: 0.0219
Misc. Stats
Headshot Damage Multiplier: 2
Minimap Detect Range: 40

Zenith VX-5 Horizontal Recoil Pattern
Similar to Jaguar, but has 10 fewer rounds per mag, lower RoF and a bit different attachment options. It doesn’t have access to SPA, but has access to both ALS and Advanced Forward Grip, as well as Compensator.
Here’s a video review of this weapon by Wrel:
AF-4A Bandit

 |
Vertical Recoil: 0.437 First Shot Recoil Multiplier: 1.75 Recoil Angle: 0 / 0 Horizontal Recoil: 0.2 / 0.2 Horizontal Recoil Tolerance: 0.6 Recoil Recovery Delay: 95 Recoil Recovery Rate: 18 |
Bullets to Kill Thresholds:
6: 0 – 10
7: 11 – 36
8: 37 – 55
9: 56+
Calculated Recoil Statistics
Vertical Recoil per Second: 4.6
Average Horizontal Deviation: 0.164
Maximum Horizontal Deviation: 0.4
Average Recoil Angle: 0
Recoil Angle Variance: 0
Average Horizontal Deviation due to Recoil Angle: 0
Average Vertical Deviation due to Recoil Angle: 0
True Recoil Recovery Delay: 190
Recoil Recovery Time per Shot: 0.0267
Misc. Stats
Headshot Damage Multiplier: 2
Minimap Detect Range: 40

AF-4A Bandit Horizontal Recoil Pattern
AF-4A Bandit is similar to the default AF-19 Mercenary, so if you ever wanted a Mercenary with a bit more *oomph* at close to medium range – this is it.
Here’s Wrel’s video review that has some advice on using the Bandit:
(outdated, Bandit’s minimum damage range is 70m now)
Bandit feels like a carbine based on the AF-4 Cyclone, as it has a similar damage tier and RoF as the Cyclone but that’s where they start to differ, as the Cyclone only does it’s max dmg to 6m and the Bandit to 10m. The Bandit is geared towards 10-20m range with a manageable recoil pattern, along with what feels like a painfully slow reload speed. The Bandit has the accuracy of the NS-11C, but the damage of the Cyclone. Basically best of both worlds.
The disadvantages of the Bandit are low reload speed and low muzzle velocity, at range the muzzle velocity will force you to lead their targets by a tiny bit, not too much to bother, but enough to throw off aim if the target suddenly turns around. Slow reload forces you to judge and select your encounters – you don’t want to get stuck in a firefight having to reload, in contrast to the Cyclone, where you could quickly dash behind cover to reload.
Suggested Attachments:
- SPA is mandatory.
- Jaguar and Zenith can use either ALS or Forward Grip. Both attachments are viable, you will just have to adjust your playstyle accordingly: with ALS, you’ll have a shorter effective range, but you’ll be able to hip fire much more freely. With Forward Grip, you’ll have easier time engaging targets at range, also utilizing that 75% ADS speed, but you’ll be able to hip fire only when enemies are close.
- For Bandit, ALS is recommended over Forward Grip. Out of the three Light Carbines, Bandit has the least horizontal recoil, and its damage drops an additional tier. At close range, Bandit is accurate enough as it is, and at long range it it doesn’t do enough damage per bullet to be effective even with Forward Grip.
- Barrel attachment choice depends on situation and playstyle. It’s perfectly viable to just leave the clean barrel.
Precision carbines
These have fastest reload, higher bullet speed and lower recoil. In combination with forward grip and – possibly – compensator, this makes for controllable sustained fire. Have access to High Velocity Ammunition, which provides unusually high benefits to carbines.
Precision carbines are best weapons for ranged combat in Light Assault arsenal, but that doesn’t mean you can “snipe” with them. Compared to other weapon classes, precision carbines are closest to assault rifles. However, carbines have heavy damage drop off at range, and even if you can hit with all your bullets, you will still need more bullets to kill than if you’d have used an assault rifle or LMG.
All precision carbines have lower rate of fire than other carbines, so they have less raw DPS, which makes them weaker in CQC. At medium range, however, things change – low rate of fire makes the gun easier to control, and when you factor in precision the gun has, you’ll actually be able to do more damage, because more of your bullets will connect with the target.
Precision carbines can be split into two categories: 143 damage and 167 damage. They have similar DPS, but lower damage carbines have higher RoF and lower Hip CoF Bloom, which makes them more effective in close quarters, while higher bullet damage and lower horizontal recoil of 167 damage carbines makes them more effective at range.
There is no dedicated 143 damage New Conglomerate carbine, but the NC still has access to cross faction NS-11C, which can perform that task.
If you prefer to win your engagements by outmaneuvering your enemies and not by having more powered-up gun, then a precision carbine would be a good and versatile choice for you. They work good at range even with suppressor installed because of high base bullet velocity, and they have acceptable hip-fire for close quarters.
It’s much easier to keep an enemy at range and avoid CQC, rather than other way around.
Razor GD-23

 |
Vertical Recoil: 0.35 First Shot Recoil Multiplier: 1.5 Recoil Angle: 12 / 12 Horizontal Recoil: 0.188 / 0.188 Horizontal Recoil Tolerance: 0.45 Recoil Recovery Delay: 109 Recoil Recovery Rate: 18 |
Bullets to Kill Thresholds:
6: 0 – 10
7: 11 – 50
8: 51+
Calculated Recoil Statistics
Vertical Recoil per Second: 3.2
Average Horizontal Deviation: 0.154
Maximum Horizontal Deviation: 0.375
Average Recoil Angle: 12
Recoil Angle Variance: 0
Average Horizontal Deviation due to Recoil Angle: 0
Average Vertical Deviation due to Recoil Angle: 0
True Recoil Recovery Delay: 218
Recoil Recovery Time per Shot: 0.0221
Misc. Stats
Headshot Damage Multiplier: 2
Minimap Detect Range: 40

Razor GD-23 Horizontal Recoil Pattern
Razor GD-23 is a similar to Mercenary, but with marginal differences – slightly different recoil stats, access to compensator, HVA and higher projectile velocity out of the box.
AC-X11
 |
Vertical Recoil: 0.45 First Shot Recoil Multiplier: 1.5 Recoil Angle: 0 / 0 Horizontal Recoil: 0.175 / 0.2 Horizontal Recoil Tolerance: 0.4 Recoil Recovery Delay: 120 Recoil Recovery Rate: 15 |
Bullets to Kill Thresholds:
5: 0 – 10
6: 11 – 50
7: 51+
Calculated Recoil Statistics
Vertical Recoil per Second: 3.8 (3.2 with Compensator)
Average Horizontal Deviation: 0.152
Maximum Horizontal Deviation: 0.4
Average Recoil Angle: 0
Recoil Angle Variance: 0
Average Horizontal Deviation due to Recoil Angle: 0
Average Vertical Deviation due to Recoil Angle: 0
True Recoil Recovery Delay: 240
Recoil Recovery Time per Shot: 0.0325
Misc. Stats
Headshot Damage Multiplier: 2
Minimap Detect Range: 40
AC-X11 Horizontal Recoil Pattern
ACX-11 is a paragon of NC doctrine: it deals whopping 200 @ 10m per shot, but has strong vertical recoil, which somewhat limits its effectiveness at range. ACX-11 has comparatively high DPS of 1667, and its highest in class damage per shot gives it an advantage.
For versatility, it’s really tough to beat the AC-X11.
The gun feels a lot like a Reaper DMR assault rifle, and absolutely thrives with HVA.
The small magazine of 24 rounds is a bit deceptive, because it still has 4800 damage per mag and a rock solid reload speed. It means you’ve gotta land your shots, but the perfect ADS accuracy and impressive accuracy in general mean that doing so is relatively effortless.
– Epic High Five
Recommended attachments for AC-X11: Advanced Forward Grip, 1x Reflex Sight, Compensator and HVA.
Compensator reduces Vertical Recoil of AC-X11 by 20%, while most weapons receive only 15% reduction.
Reasoning: AC-X11 has strong vertical recoil, but if you use a low-magnification scope and a Compensator, the recoil will be barely noticeable.
This setup allows the weapon to be effective at very long ranges, however enemies at such ranges can be hard to see with just 1x scope, so this setup is recommended to experienced players, who can make out an enemy and land shots even if he’s so far away that looks just a pixel dot.
HVA is very strong on carbines, and essential on AC-X11.
AC-X11 with said attachments is featured in my LA montage “Redemption”:
Wrel’s review:
(outdated, AC-X11 has 520 m/s velocity now)
Razor vs. AC-X11
AC-X11 has higher potential in ranged combat due to:
- Higher bullet damage
- Better recoil pattern
- Better damage drop off ranges
It is harder to use due to stronger vertical recoil and lower bullet velocity, but both can be compensated for by the user.
But, AC-X11 is ineffective in CQC due to:
- Worse hip fire by default, which is made even worse by almost mandatory Compensator.
- Low RoF weapons are less effective in CQC in general.
- 200 bullet damage weapons are hard countered by nanoweave, which requires 2 additional bullets to kill in CQC (up from 5, +40% difference in BTK,+50% difference in TTK), and it takes 3 headshots to kill, same as 167 damage Razor.
Razor has angled recoil, while AC-X11 has no recoil angle, which is preferable. Forward Grip reduces the Razor’s angle a bit, but it still remains noticeable.
Due to better effectiveness in CQC, Razor is more versatile than AC-X11, and can be used as a general purpose carbine. Razor doesn’t *need* the Compensator, and has decent hip fire without it. Also, due to higher rate of fire, bullet velocity and lesser need for Compensator, Razor is much more suppressor-friendly than AC-X11.
To summarize, use Razor if you just want to roll with an accurate, easy to use carbine, or if you want an accurate suppressed weapon. Use AC-X11 for hardcore ranged work.
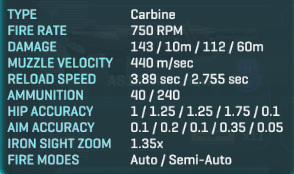
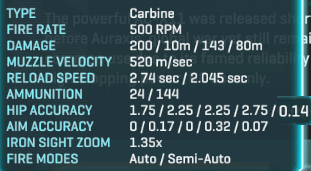
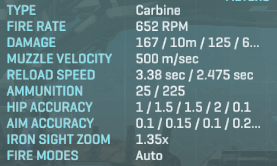
T5 AMC
 |
Vertical Recoil: 0.295 First Shot Recoil Multiplier: 1.5 Recoil Angle: 20 / 20 Horizontal Recoil: 0.2 / 0.2 Horizontal Recoil Tolerance: 0.45 Recoil Recovery Delay: 92 Recoil Recovery Rate: 18 |
Bullets to Kill Thresholds:
7: 0 – 10
8: 11 – 39
9: 40+
Calculated Recoil Statistics
Vertical Recoil per Second: 3.2
Average Horizontal Deviation: 0.164
Maximum Horizontal Deviation: 0.4
Average Recoil Angle: 20
Recoil Angle Variance: 0
Average Horizontal Deviation due to Recoil Angle: 0
Average Vertical Deviation due to Recoil Angle: 0
True Recoil Recovery Delay: 184
Recoil Recovery Time per Shot: 0.0198
Misc. Stats
Headshot Damage Multiplier: 2
Minimap Detect Range: 40

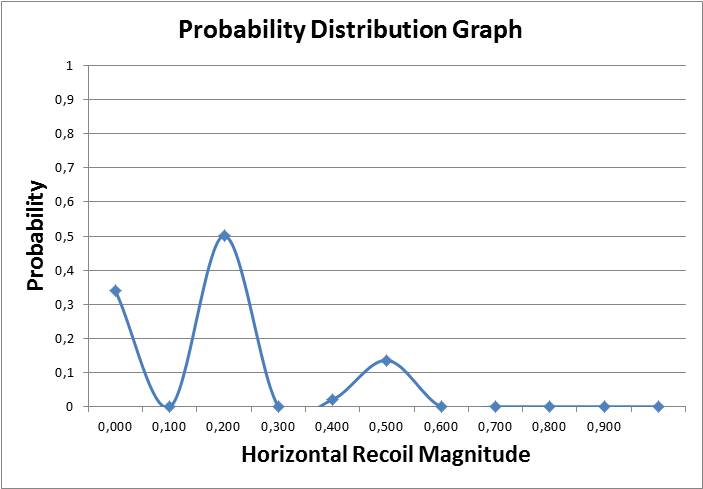
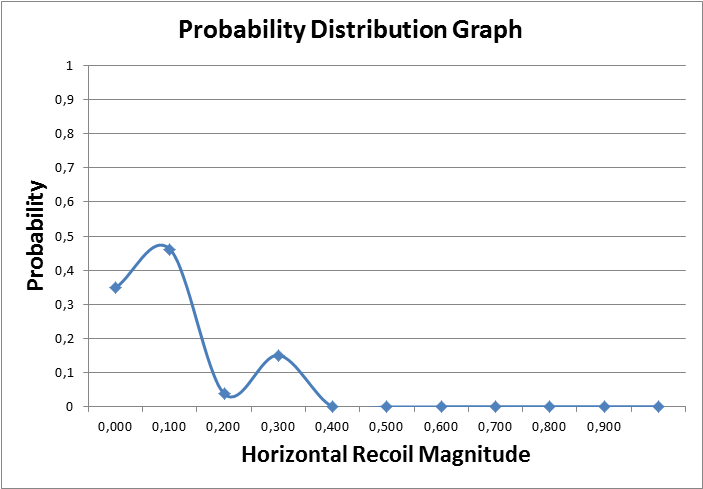
T5 AMC Horizontal Recoil Pattern
T5 AMC is a traditional TR gun, similar to TRAC 5, but more controllable and with best in class projectile velocity.
T5 AMC is one of the most underrated TR carbines. The main reason people dislike it is due to low damage output, which can make it feel like a pea-shooter. However, with its superior accuracy, T5 AMC can get hits at range much easier, this way boosting the actual damage output compared to more fast firing, but less accurate gun.
Another reason T5 AMC is out of favor is because at range it is directly inferior to HC1 Cougar’s higher damage model. And while it’s true, it doesn’t mean T5 AMC is left without a place to call “home”.
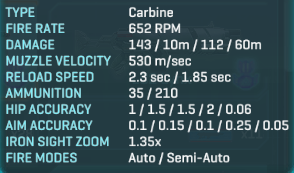
Stats and attachment comparison
| Attachments | Damage model | Velocity |
| Stock | 143 @ 10m – 112 @ 60m | 570 m/s |
| HVA | 143 @ 8m – 112 @ 80m | 627 m/s |
| HVA and suppressor | 143 @ 3m – 112 @ 58m | 540 m/s |
The first and obvious thing about T5 AMC is velocity. Even stock, T5 AMC has best in class velocity, rivaling 580 m/s of T1 Cycler.
Furthermore, HVA – which should always be used on T5 AMC – bumps velocity even further and increases minimum damage range by 20m. T5 AMC with HVA has almost the same performance damage-wise as stock NS-11A within 50m.
Thanks to high velocity and huge HVA benefit, T5 AMC is the closest thing to an Assault Rifle in carbine arsenal. Compared to ranged ARs like NS-11A, worst case scenario, T5 AMC is gonna need 1-2 extra bullets, which is not that bad for a gun that fires 11 shots per second.
Rate of Fire: 652 RPM (~11 shots per second)
T5 AMC’s RoF is in a weird place.
For a 143 damage weapon, it is a low rate of fire. Which means easier to control recoil, and slower ammunition expenditure rate. Even if you’re not a good shot, with T5 AMC you can afford to correct your aim while shooting, with lower risk of running out of ammo or growing Cone of Fire too much.
But that RoF is still higher than 550 RoF of the 167 damage Cougar, at the same DPS. While higher damage per bullet is more desirable in ranged combat, higher RoF and great hip fire accuracy mean that T5 AMC is very usable in close quarters combat, as long as you use it without Compensator.
Super low Hip CoF Bloom only solidifies that advantage.
Of course, face to face CQC fights with T5 AMC should be avoided as Light Assault or Engineer, but it still feels like a nimble and handy carbine, and not unwieldy heavy artillery like AC-X11. Surely, T5 AMC isn’t as good in CQC as dedicated CQC carbines, but still much better than most assault rifles and LMGs.
Since most PS2 objectives are located indoors, you will inevitably find yourself in close quarters combat, and T5 AMC won’t hold you back too much.
Higher RoF also reduces time-to-kill penalty when transitioning to next bullet threshold (e.g. from 7 bullets to kill to 8). Basically, higher RoF will make it less noticeable when you need an extra bullet to kill an enemy.
As a carbine, T5 AMC degrades 2 tiers of damage: 143 -> 125 -> 112. Having higher rate of fire allows for more consistent performance at different ranges.
High RoF, high velocity and access to HVA make T5 AMC the best carbine to use suppressor with. All these points ensure that even suppressed T5 AMC remains a great and very usable weapon.
| Attachments | Horizontal Recoil | Recoil Angle | Horizontal Recoil Tolerance |
| Stock | 0.2 – 0.2 | 20 / 20 | 0.45 |
| Advanced Forward Grip | 0.134 – 0.134 | 13.4 / 13.4 | 0.4 |
Horizontal recoil determines the width of the recoil pattern. Stock, T5 AMC’s recoil is nothing special, but it’s as good as it gets for traditional 143 damage weapons. Advanced Forward Grip really makes a difference, and it will also reduce recoil angle, making vertical recoil easier to compensate for.
| Attachments | Vertical Recoil | Vertical Recoil per second | Hip Fire Stand Still | Hip Fire Stand Move | Minimap Detection Range (no suppressor) |
| Stock | 0.29 | 3.15 | 1.5 | 2 | 40m |
| Compensator | 0.25 | 2.68 | 1.8 | 2.4 | 75m |
First Shot Recoil Modifier: 1.5x
T5 AMC has average vertical recoil per shot, but it’s trivial to compensate for due to comparatively low rate of fire. Very low FSRM makes burstfire very accurate, and generally T5 AMC can send round after round with good precision.
T5 AMC will never be able to truly compete with ranged monsters like AC-X11 or Reaper DMR, but it is compensated with advantages in other areas.
Reload: 2.3s / 3.1s
Magazine Size: 40 rounds (5720 to 4480 damage per magazine)
T5 AMC has great reload speed and damage per mag. So even though T5 AMC may struggle a bit at engaging targets outside effective range due to recoil/damage, it can compensate for it by having excessive amount of bullets to kill one target.
In general, T5 AMC’s combo of high DPM / fast reload / low RoF means that once you find a good position, you can sustain fire for a long time.
Having lots of ammo to spare once again affirms T5 AMC’s affinity for close quarters, where in hectic hip fire situations you can’t guarantee good accuracy.
Suggested loadout:
- x2 scope
- 1x isn’t enough at longer ranges, and 3.4x – 4x making aiming in CQC too inconvenient
- Advanced Forward Grip
- To further improve performance in T5 AMC’s main element.
- HVA
- HVA offers huge bonuses for carbines’ weakest statistics at a low cost, and should always be used on carbines that have access to it.
- No barrel attachment or suppressor
- Compensator has strong disadvantages just to reduce already easy to compensate vertical recoil. Simply not needed, unless you want super long effective range, in which case you should use Cougar.
Conclusion:
T5 AMC isn’t the best at close and long ranges, but still very usable, and great at medium ranges of 15-40m. It’s a very consistent and reliable weapon. With suggested loadout above, it is probably the most versatile carbine in the game.
It’s a perfect choice for LA’s classic Shadowflight playstyle or engineer supporting his allies from cover.
Here’s a video review of T5 AMC by Wrel:
(outdated, the MIN damage is 112 @ 60m now. At the time of that review Cougar didn’t exist. ACX-11 now has 24 rounds in magazine)
T5 AMC is featured in my Light Assault montage:
(keep in mind the video is quite old)
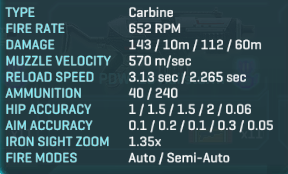
HC1 Cougar

 |
Vertical Recoil: 0.35 First Shot Recoil Multiplier: 1.5 Recoil Angle: -11 / -11 Horizontal Recoil: 0.188 / 0.188 Horizontal Recoil Tolerance: 0.45 Recoil Recovery Delay: 109 Recoil Recovery Rate: 18 |
Bullets to Kill Thresholds:
6: 0 – 10
7: 11 – 44
8: 45+
Calculated Recoil Statistics
Vertical Recoil per Second: 3.4
Average Horizontal Deviation: 0.154
Maximum Horizontal Deviation: 0.375
Average Recoil Angle: -11
Recoil Angle Variance: 0
Average Horizontal Deviation due to Recoil Angle: 0
Average Vertical Deviation due to Recoil Angle: 0
True Recoil Recovery Delay: 213
Recoil Recovery Time per Shot: 0.0221
Misc. Stats
Headshot Damage Multiplier: 2
Minimap Detect Range: 40
HC1 Cougar Horizontal Recoil Pattern
[/spoiler]HC1 Cougar is a clone of Razor with minor differences: 5 additional rounds in a magazine, longer reload, lower projectile velocity, worse hip fire.
Cougar is the only TR carbine to feature 167 @ 10m – 125 @ 70m damage model.
ZoranTheBear‘s video review of Cougar:
(outdated, Cougar has 577 Rate of Fire now)
T5 AMC vs HC1 Cougar
Situation here is similar to AC-X11 vs Razor.
T5 AMC is more versatile, fares better in CQC, and more suppressor-friendly, while Cougar is more effective at range due to higher bullet damage.
Even though T5 AMC has access to Advanced Forward Grip while HC1 Cougar doesn’t, Cougar has less horizontal by default, so T5 AMC with advanced forward grip and Cougar with basic forward grip have similar horizontal recoil properties.
Pulsar C

 |
Vertical Recoil: 0.4 First Shot Recoil Multiplier: 1.5 Recoil Angle: 0 / 0 Horizontal Recoil: 0.175 / 0.175 Horizontal Recoil Tolerance: 0.3 Recoil Recovery Delay: 104 Recoil Recovery Rate: 15 |
Bullets to Kill Thresholds:
6: 0 – 10
7: 11 – 44
8: 45+
Calculated Recoil Statistics
Vertical Recoil per Second: 3.8
Average Horizontal Deviation: 0.083
Maximum Horizontal Deviation: 0.175
Average Recoil Angle: 0
Recoil Angle Variance: 0
Average Horizontal Deviation due to Recoil Angle: 0
Average Vertical Deviation due to Recoil Angle: 0
True Recoil Recovery Delay: 208
Recoil Recovery Time per Shot: 0.0291
Misc. Stats
Headshot Damage Multiplier: 2
Minimap Detect Range: 40
Pulsar C Horizontal Recoil Pattern
Pulsar C has higher damage per shot than other VS carbines, which transitions into higher damage per magazine.
It also has a rather unusual for VS recoil pattern: a rather strong Vertical Recoil, but very weak and consistent Horizontal Recoil. Pulsar C is the only automatic weapon in the game that can bounce only one time in each direction, so it has a very narrow Horizontal Recoil Pattern. Access to Advanced Forward Grip only improves upon that.
However, average projectile velocity limits the effective range, and high vertical recoil can make burst fire challenging.
In other words, Pulsar C has shorter effective range, but high effectiveness within that range.
You can go here for analysis of HVA on Pulsar C.
A video, featuring LA gameplay using Pulsar C by freeze
Pulsar C is featured in my Light Assault montage:
Empire-Specific Carbines
This set of empire-specific carbines all come with their own set of quirks, and in some cases, attachments.
MG-H1 Kindred

The Kindred is almost the exact opposite of the Chaingun. Instead of spooling up, it instead spools down over 0.6 seconds. The following comparison is against NC weapons, as they have the most comparable 167dmg guns, but the Kindred acts as the following against standard 1000hp Planetmen:
3 shot kill (All headshots, no aux. shield): 0.18sec kill. Comparison: Cyclone: 0.184sec kill at 652rpm.
6 shot kill (All bodyshots, no nanoweave): 0.48sec kill. Comparison: Bandit: 0.47sec kill at 632rpm.
8 shot kill (All bodyshots, nanoweave): 0.69 sec kill. Comparison: Mercenary: 0.7sec kill at 600rpm.
Outside of damage profile, the gun has very little recoil, as well as access to most infantry sights, the standard barrel attachments of a Flashlight, Forward Grip and Laser Sight, and just a lone Flash Suppressor for the muzzle.
All of these features make the Kindred a very versatile weapon, being extremely effective in both close range when dealing with single targets and long range with its extremely low recoil.
This is an incredibly solid weapon, and if used correctly definitely lands itself as one of the best carbines in the game.
MGR-L1 Charger

 The Charger is similar to the Kindred in that it sports a best-in-class damage model for a brief period of time – in this case 167/652 , which is the same as the Cyclone – before lowering to an incredibly low one – 143/652 – on a weapon that handles like a long-range carbine. However, unlike the Kindred, the high DPS ammo is limited to the first 5 rounds in each clip, with the other 25 instead dealing 143 damage per round.
The Charger’s low recoil makes it most usable at longer ranges, where the 143/652 damage model isn’t as restrictive, but the reloading mechanic of the weapon provides it some utility in closer ranges, where – for a few shots – it can kill as quickly as a Cyclone.
The gun has access to most infantry sights, the standard barrel attachments of a Flashlight, Forward Grip and Laser Sight, and just a lone Flash Suppressor for the muzzle. The gun also has access to the Smart Feeder, which trades up reload speed for 5 extra rounds in the mag. Which makes no sense considering it’s gimmick.
With the Cyclone being available to all classes, the gun doesn’t appear to be an appealing choice at first glance, however the low recoil and excellent accuracy of the weapon make it similar to the Razor in terms of handling. The weapon tries to be a jack-of-all, but with only 7 shots of high DPS per magazine it requires completely accurate aim up close, and in long range can’t hold a candle to the ACX-11.
VE-C Horizon

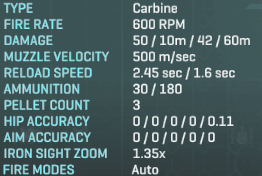
This weapon has changed very significantly from launch. Where orginally it shared the same damage model as the Tanto with worse accuracy and 0.5ADS movement speed, now the damage per pellet has changed from 50 to 56. This means that the effective damage model is now 168dmg/600rpm, making it an incredibly competent weapon up close.
The Horizon features absurdly low CoF and recoil, each of its bullets are split into 3. And not even like the Tengu splits them, but in a consistent vertical (when ADS-ing) or horizontal pattern (when hipfiring). This can be lowered to 2 via the Capsulate Ammunition attachment, which tightens the spread greatly and number of pellets to just 2 (keeping the max damage per round at 150), but lowers the ammo per mag by 4 to 26
With Capsulate Ammunition, the weapon is incredibly easy to land headshots whilst hipfiring at absurd ranges – it can easily be used up to 20-25 metres with good bursting. Due to the split pellet nature of the weapon, it can be slightly unreliable at longer ranges even when aiming down sights, but still handles itself incredibly well.
For attachments, there’s the standard array of 1-4x sights, and access to a Darklight as well as Fwd. Grip. Afterwards we have the aforementioned Capsulate Ammunition and Unstable Ammunition.
The former DPS issues the weapon had prevented me from ever suggesting Unstable Ammunition, and I think I’ll still make the same recommendation despite the improved DPS. The gun now features a good level of DPS, but due to the split nature of the pellets, equipping Unstable Ammunition over Capsulate Ammunition does lower your accuracy significantly due to the patter the bullets fire in. Past 20m, the gun will struggle to land 2 out of 3 pellets.
Capsulate Ammunition however certainly is recommended – it massively improves the accuracy of the gun at all ranges, making it useful past the 20-30m mark whilst hipfiring and makes the gun as relabile as a Pulsar C a bit further out.
Cross-faction carbines

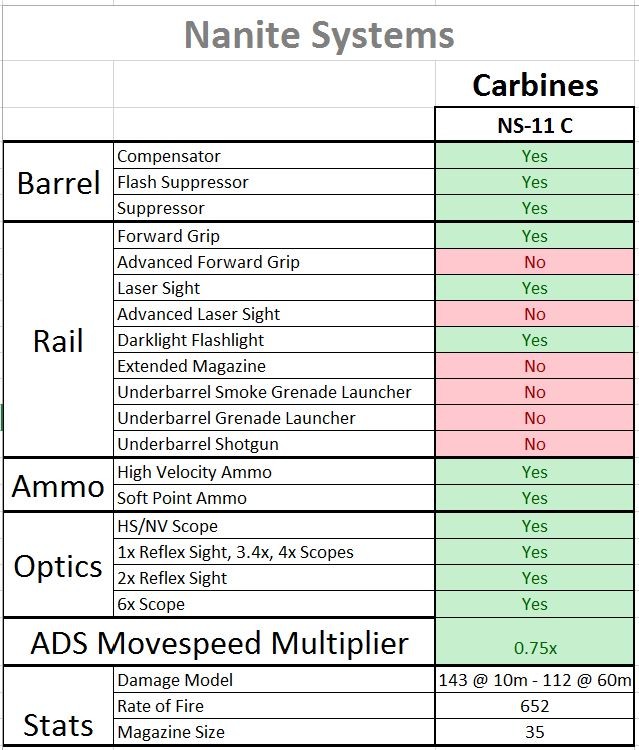
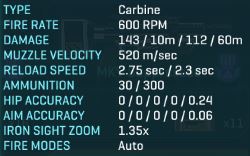
NS-11C
 |
Vertical Recoil: 0.22 First Shot Recoil Multiplier: 3 Recoil Angle: -20 / -17 Horizontal Recoil: 0.2 / 0.2 Horizontal Recoil Tolerance: 0.6 Recoil Recovery Delay: 92 Recoil Recovery Rate: 18 |
Bullets to Kill Thresholds:
7: 0 – 10
8: 11 – 39
9: 40+
Calculated Recoil Statistics
Vertical Recoil per Second: 2.4
Average Horizontal Deviation: 0.163
Maximum Horizontal Deviation: 0.4
Average Recoil Angle: -18.5
Recoil Angle Variance: 3
Average Horizontal Deviation due to Recoil Angle: 0.0058
Average Vertical Deviation due to Recoil Angle: 0.0052
True Recoil Recovery Delay: 184
Recoil Recovery Time per Shot: 0.0165
Misc. Stats
Headshot Damage Multiplier: 2
Minimap Detect Range: 40
ADS Movement Speed Mutiplier: 0.75x

NS-11C Horizontal Recoil Pattern
NS-11C is a cross-faction carbine that sacrifices raw firepower for ease of use, accuracy and mobility.
Pros:
- Easy to hold on target due to unusually low vertical recoil.
- Offers both good accuracy and 75% ADS speed
- Good magazine capacity / reload speed statistics.
- Available to all factions, so when people hear the distinctive sound of NS-11C, they don’t know for sure who is firing – enemy or ally. This will add precious milliseconds that will take the enemy to identify you as a threat.
- Low Hip CoF Bloom allows for accurate sustained hip fire.
Cons:
- Low damage output, coupled with unremarkable damage model.
- High First Shot Recoil Multiplier of 3x. This makes bursting inconvenient, reducing the potential of this weapon to go outside effective range.
NS-11C’s Cone of Fire, Recoil and Velocity statistics are not the best, but they are good enough to make it decent at range, and let the player compensate lack of raw firepower with aiming skills.
NS-11C’s recoil is less predictable than that of precision carbines, but mild and requires less effort to compensate. It also allows to move while aiming down sights faster, and remains slightly more accurate while doing so thanks to 0.25 Standing Moving CoF.
It’s often said that precision weapons reward headshots, but it’s not quite true. It’s more like “going for headshots” is the only way to survive while using this gun on an enemy at close range.
Keep in mind that NS-11C used to have quite projectile velocity, but it was buffed in 1st June 2016 patch. Any review made before that is outdated.
NSX Tanto
 Flying CoF: 1.0 |
Vertical Recoil: 0.4 First Shot Recoil Multiplier: 1.4x Recoil Angle: 5 / 7 Horizontal Recoil: 0.14 / 0.14 Horizontal Recoil Tolerance: 0.4 (2 bounces) Recoil Recovery Delay: 80 Recoil Recovery Rate: 18 |
[spoiler title=”Weapon Toolbox Analysis”]DPS: 1430
Bullets to Kill Thresholds:
| BTK | Stock | SPA | HVA |
| 7 | 0 – 10 | 0 – 15 | 0 – 8 |
| 8 | 11 – 39 | 15 – 41 | 9 – 49 |
| 9 | 40+ | 42+ | 50+ |
Calculated Recoil Statistics
Vertical Recoil per Second: 4
Average Horizontal Deviation: 0.115 (0.086 w/ FG)
Maximum Horizontal Deviation: 0.28 (0.21 w/ FG)
Average Recoil Angle: 4.5
Recoil Angle Variance: 1.5
Average Horizontal Deviation due to Recoil Angle: 0.0052
Average Vertical Deviation due to Recoil Angle: 0.0013
True Recoil Recovery Delay: 180
Recoil Recovery Time per Shot: 0.023
Misc. Stats
Headshot Damage Multiplier: 2x
Minimap Detect Range: 40m
ADS Movement Speed Mutiplier: 0.75x
With Forward Grip
NSX Tanto is a cross faction carbine with incredible accuracy of first few shots, but with harsh Vertical Recoil and rapid Cone of Fire bloom.
Pros:
- Zero starting CoF in all stances, even from the Hip
- Offers a combination of good accuracy and 75% ADS speed
- Tons of spare ammo
- Cross-faction firing sound and tracers
- Little horizontal recoil and recoil angle simplify the recoil pattern – just pull down.
Cons:
- Very low damage output
- High vertical recoil can make accurate fire challenging at longer ranges
- High CoF Bloom in ADS, extremely high from the hip
Zero CoF is more of an curious gimmick than an actual advantage. Due to low damage output, you are pretty much required to go for headshots to have a competitive time to kill, and extreme hip fire Bloom force you to burstfire.
Unless you’re one of the best shooters in the game AND have a PC that can sustain 80+ FPS at all time, you’re gonna have a lot of trouble killing anything with this weapon.
Zero CoF makes single shots super accurate, but low damage and velocity make the weapon ignorable at range, and the recoil and Bloom make it far from point-and-click.
NSX Tanto vs NS-11C
Both these carbines are featured in this Highly Technical guide, with an in-depth comparison and recommendations for gameplay and attachments.
Auraxium carbines
TRAC-Shot
 |
Vertical Recoil: 0.3 First Shot Recoil Multiplier: 2.35 Recoil Angle: 23 / 25 Horizontal Recoil: 0.225 / 0.225 Horizontal Recoil Tolerance: 0.55 Recoil Recovery Delay: 80 Recoil Recovery Rate: 18 |
Bullets to Kill Thresholds:
7: 0 – 15
8: 16 – 41
9: 42+
Calculated Recoil Statistics
Vertical Recoil per Second: 3.7
Average Horizontal Deviation: 0.185
Maximum Horizontal Deviation: 0.45
Average Recoil Angle: 24
Recoil Angle Variance: 2
Average Horizontal Deviation due to Recoil Angle: 0.0053
Average Vertical Deviation due to Recoil Angle: 0.0039
True Recoil Recovery Delay: 160
Recoil Recovery Time per Shot: 0.0208
Misc. Stats
Headshot Damage Multiplier: 2
Minimap Detect Range: 40

TRAC-Shot Horizontal Recoil Pattern
[/spoiler]19A Fortuna
 |
Vertical Recoil: 0.4 First Shot Recoil Multiplier: 1.75 Recoil Angle: 0 / 0 Horizontal Recoil: 0.175 / 0.175 Horizontal Recoil Tolerance: 0.45 Recoil Recovery Delay: 100 Recoil Recovery Rate: 18 |
Bullets to Kill Thresholds:
6: 0 – 15
7: 16 – 46
8: 47+
Calculated Recoil Statistics
Vertical Recoil per Second: 4
Average Horizontal Deviation: 0.144
Maximum Horizontal Deviation: 0.35
Average Recoil Angle: 0
Recoil Angle Variance: 0
Average Horizontal Deviation due to Recoil Angle: 0
Average Vertical Deviation due to Recoil Angle: 0
True Recoil Recovery Delay: 200
Recoil Recovery Time per Shot: 0.0243
Misc. Stats
Headshot Damage Multiplier: 2
Minimap Detect Range: 40

19A Fortuna Horizontal Recoil Pattern
Eclipse VE3A

 |
Vertical Recoil: 0.25 First Shot Recoil Multiplier: 2.8 Recoil Angle: 14 / 17 Horizontal Recoil: 0.2 / 0.2 Horizontal Recoil Tolerance: 0.5 Recoil Recovery Delay: 86 Recoil Recovery Rate: 18 |
Bullets to Kill Thresholds:
7: 0 – 10
8: 11 – 39
9: 40+
Calculated Recoil Statistics
Vertical Recoil per Second: 2.9
Average Horizontal Deviation: 0.165
Maximum Horizontal Deviation: 0.4
Average Recoil Angle: 15.5
Recoil Angle Variance: 3
Average Horizontal Deviation due to Recoil Angle: 0.0066
Average Vertical Deviation due to Recoil Angle: 0.0051
True Recoil Recovery Delay: 172
Recoil Recovery Time per Shot: 0.0178
Misc. Stats
Headshot Damage Multiplier: 2
Minimap Detect Range: 40

Eclipse VE3A Horizontal Recoil Pattern
These prestige carbines can’t be purchased with certs/station cash, and can only be acquired by completing the auraxium tier of carbine directives. They have a unique “alive” camouflage shader for showing off.
TRAC Shot and Fortuna are virtually identical in stats to the default carbines – TRAC 5 and Mercenary, but with unique combination of attachments: SPA, laser sight and underbarrel shotgun. You can’t change these attachments, and don’t need to purchase them.
Auraxium carbines are powerful. Default carbines are strong weapons as they are, and when outfitted with SPA and “free” underbarrel shotgun along with laser sights, they become beastly.
Eclipse VE3A doesn’t have SPA, but still has laser sight and underbarrel shotgun, and most importantly, uses heat mechanic instead of ammo: it accumulates “heat” while firing, and cools down when not firing. Eclipse can fire continuously up to 30 rounds, same as Solstice. It can also be manually reloaded to reset the heat, unlike other heat mechanic weapons.
Directive carbines also have an interesting feature. Since Laser Sight is “built in”, it retains its benefit even during free fall. Normally Laser Sight benefit is lost when you’re falling, as demonstrated in this video.
Share with:
Recent Comments