
PlanetSide 2 Performance
Now that you have a clean sparkly-fresh computer, it’s time to tune PlanetSide 2.
General information
The two most improtant files for customization of Planetside2 are:
- useroptions.ini = settings
- InputProfile_user.xml = keybindings
These files are located in the game main directory and can be copy-pasted to both backup and copy-paste settings (e.g. to the PTS client). You can DELETE these files in the games folder, in which case the game will download a NEW/DEFAULT version. This can be a good start when you’re creating your personalized version and copy/replace the respective settings in it.
It is a good practice to maintain a backup of the useroptions.ini and InputProfile_user.xml files
Read-only files
There can be an advantage to setting the ini file to read only. This used to allow completely disabling particles/smoke by preventing override of certain settings, but that is no longer possible. However, it can be useful to have your setting protected an ‘reset with every restart’. Some settings can be edited dynamically in game, e.g. render distance, FOV or particle quality. Starting with a read-only file will maintain your settings, e.g. optimized for infantry play with low particles and render distance by default, but you could choose to set particles to ultra and increase render distance in case you play vehicles when needed, and those will remain until the end of the session, but reset with a restart. This is a means of maintaining good default performance with the option to adjust if needed.
It should be noted that a read-only ini file will not save any changes, and this includes things like volume adjustments and/or muting and ignoring of players (accidental or intentional). If these are intended to be permanent, you could obtain the appended lines by running a different ini and append the setting in your read-only version.
ini-files (templates)
Below are some ini files. Note that these should be considered starting points and its worth investing the time to customize your settings to your system and needs. Especially the settings for the various sensitivities etc. are very individual, cf. mouse settings. Note that some “ini-files” only cover the [Display] section.
- “Potato.ini”: Settings optimized for pure performance, not necessarily visually pleasing.
- Cyrious Gaming’s ini file: Adjusted file and a good starting point for most.
- Complete, balanced ini: low particles intended for read-only and on-demand adjustments; you need to adjust the sensitivities and customize as you like
Most content creators will share information about their system and links to their respective ini settings
Halospud’s Infantry and settings guide
This is a highly-recommended guide, covering most of the settings and essential tips PS2 veterans would vouch for
What each setting does
An overview of the settings for the ini file can be found in this sheet. Below is another listing with explanations.
The [CPU] or [GPU] tag near setting’s name indicates whether the setting puts higher load on CPU or GPU respectively.
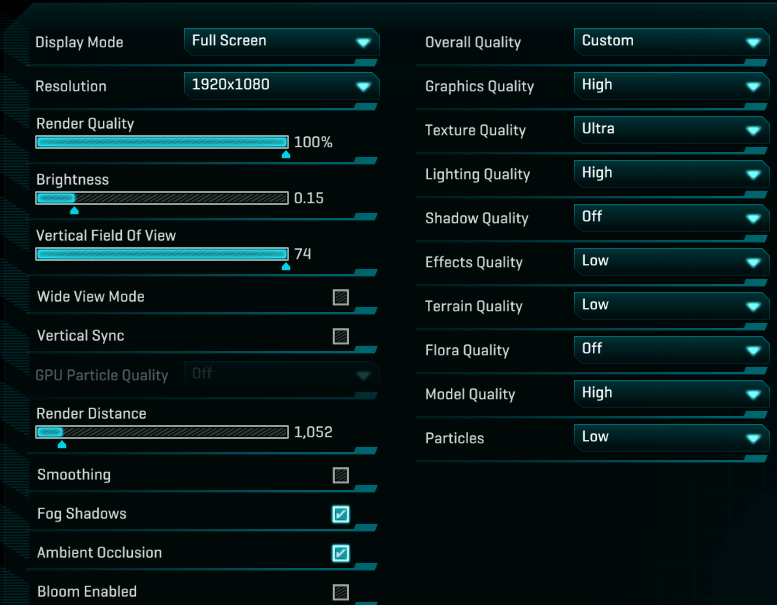
Display Mode: changes between Windowed, Full Screen and Fullscreen Windowed.
Full Screen is always better, as lets the game use your PC’s resources more efficiently. Windowed or Fullscreen Windowed will increase input lag.
Input lag is a delay between you pressing a button or moving the mouse, and it happening on screen. Naturally, you want to avoid input lag as much as possible.
Different Display Modes also put different requirements on video recording software or non-Direct X crosshair overlays, if you want to use any of that.
- [GPU] Resolution – click here if you don’t know what Resolution is.
Higher resolution results in higher details and a sharper picture. It’s best to use native resolution, which is usually, the highest resolution that your monitor and graphics card can support, unless that causes too much strain on your PC.
Reducing resolution often does nothing for your maximum FPS, but it makes a big differences for your minimum FPS, which you want to increase at all costs, because minimum FPS is usually what you will be getting when you need it the most – during intense shootouts.
The big downside to reducing resolution is that you will get a much, much blurrier picture, and PS2 is already known for poor visual clarity.
- [GPU] Render Quality sets the ratio between rendered resolution / displayed resolution.
Changing the Render Quality makes the game render at a different resolution, and then scale it to your current display resolution. In essence, Render Quality slider gives you the option of playing at a different resolution without affecting the size of HUD elements, such as crosshairs, menus, minimap, etc. Unless HUD size is an issue, it is preferable to change resolution itself.
If you already have great performance, and you’re looking to improve visual quality, you can increase render quality past 100% to gain Supersample Anti Aliasing. In that case you can set this value to 1.41 or 2.0, but it will strain your performance.
Conversely, if you have a weak PC you can set this below 1, e.g. yo 0.85, but it will look ugly/blurry very fast.
- Brightness. PlanetSide 2 doesn’t give you access to Contrast settings, and increasing Brightness without changing Contrast will just make everything whiter.
If the game looks too dark to you, it’s better to keep game’s Brightness at 0, and change your Display or Graphics Card brightness and contrast parameters instead (thanks to st0mpeh for this info).
Generally, how bright you want your game to, be depends on your display, personal preference and how much outside light do you have in your room.
- [All] Vertical Field of View determines your field of vision. Check the Vertical Field of View section for more detailed information.
- Wide View Mode – enable this for multi-monitor setups or if you want to increase Vertical FoV past its maximum of 74 degrees.
It’s hard to play PS2 on multiple monitors, as even with “Centralized HUD” enabled, the minimap and chat will remain in furthest left corners of your left monitor.
- Vertical Sync synchronizes FPS to monitor’s refresh rate to prevent tearing, but introduces some input lag. This video does a great job at explaining it.
PlanetSide 2 uses built-in Triple Buffering (source) – when VSync is enabled, it improves performance when FPS falls below refresh rate. You can read more about it here.
As an alternative to VSync, most nVidia GPUs have Adaptive VSync and AMD have Dynamic VSync, which can be enabled via GPU control panel. It automatically enables VSync if framerate exceeds display refresh rate, and disables it otherwise.
- GPU Particle Quality is a remnant of old days, when PS2 had beautiful Physx particles.
Unfortunately, due to outstanding performance and stability issues, these particles had to be permanently disabled. Changing this setting will not affect anything.
- [GPU] Render Distance sets the render distance for terrain.
Note that Render Distance has a hidden cap, depending on a continent, roughly ~2000-2500m. Setting render distance higher than that won’t affect anything.
Generally, for infantry players there’s no reason to have Render Distance higher than 1000m, and 1500-2000m for frequent vehicle pilots. In both case you might want to reduce Render Distance to improve performance.
Render distance for players and vehicles cannot be set manually. It’s dynamic and adjusts automatically depending on PC and server load – basically, the number of people in a battle. Players with long-range loadouts are rendered from longer ranges.
In order to maximize FPS you can consider to set Render Distance very low, e.g. to 300 or lower in a read-only ini file if you elusively play infantry, but its not a real planetside experience if you’re “stuck in the fog”.
Most people know that disabling particles is good for both visibility and performance, but some people question the impact of Render Distance, especially on machines with dedicated GPUs.
Reducing Render Distance may not improve performance when you are CPU-bottlenecked, though it should, at least because there is CPU overhead for rendering, and there is less stuff to render.
But there is some concrete proof that it helps when GPU-bottlenecked. In this video I switch my Render Distance from 100m to 500m, and as you can see, that reduced framerate from ~90 to ~75. This difference is bound to become even bigger when there’s more action on the screen. So unless you have a GPU that’s totally overkill for PlanetSide 2, like GTX 1080 at 1080p, you will benefit from lowering your render distance. Now, how much you want to lower it depends on your playstyle. 600m is max distance for long range snipers and AV MAXes, around 300m is max render distance for non-sniper infantry and 50m is about the lowest people would go, purely because there are a lot of engagements up to that range.
- Smoothing – a built-in way of capping FPS. By default, the cap is equal to your monitor’s maximum refresh rate. Enabling this setting will result in input lag. You can learn more about ways of capping FPS here.
- [GPU] Fog Shadows increase visibility on Hossin and Esamir, and when using a HS/NV scope.
- [GPU] Ambient Occlusion – increases visual quality by adding shadows and contrast, even when shadows are disabled.
- [GPU] Bloom (+video example) – adds contrast to bright light sources, mostly noticeable at night. It adds a lot to the “cinematic” feeling, but can make things harder to see, often almost blinding the player.
- [All] Overall Quality – changes all other settings at once. As you can see, depending on settings, PlanetSide 2 can look very different.
- [GPU] Graphics Quality – a rather big setting that affects a lot of different things at once, like Quality of cloaking shaders and smoke puff particles.
This setting progressively increases input lag as you turn it up. Medium is a good compromise IMO.
- [VRAM] Texture Quality makes stuff prettier. Higher quality textures require more video memory. 2 GB VRAM should be enough for ultra textures, and it doesn’t have a straight performance impact. Some people have noted stuttering caused by Ultra Textures however, but as these are often isolated cases its worth testing to see what works best on your device.
- [GPU] Lighting Quality will help find people by Muzzle Flashes and make stuff prettier. High setting looks notably better than low or medium.
- [GPU] Shadows are controversial.
Seeing shadows can help you detect enemies, but they are one of the most performance-costing options, and they make everything look much darker, especially at night. There seems to be little to no difference between shadow quality at different settings, so I don’t recommend trying to get a compromise. Either disable them completely, or set on high/ultra. Disabling shadows also fixes a long-standing bug when players at long range warp all over the place.
- [CPU] Particle Quality and [CPU] Effects Quality – should affect things like smoke puffs and bullet impact effects, making stuff prettier, but potentially negatively impacting visibility.
Side to side comparison video (all other settings ultra).
It is currently unclear what exactly both these settings do. It is possible that actual particle quality is governed by the Graphics Quality setting, while the Particle Quality setting only affects particle render distance.
In my tests of throwing a Smoke Grenade about 40m away, I was not able to find any difference between Low and Ultra Particle Quality. However, setting ParticleDistanceScale to 0 did not seem to have any effect with Ultra particles, while with Low particles it made particles only render to a distance of about 10m.
- [CPU] Terrain Quality is supposed to affect the quality of terrain geometry, but there’s no noticeable difference in performance / visuals. Up to you.
- [GPU] Flora Quality enables or disables 3D grass on the ground. It doesn’t seem to matter which setting to choose, it’s either on or off. Makes the ground game much prettier and immersive, but can negatively affect visibility of objects on the ground or behind a hill. Grass only renders at a short range of ~50m around the character.
- [GPU] Model Quality – it is unclear whether this setting actually affects anything.
Speculation on model quality function: The logical assumption would be that Model Quality affects Level of Detail settings. Basically, each object in PlanetSide 2 world has several models of different quality. Lower quality models are rendered at long range, where it’s not likely you would notice a difference anyway. You would think that changing Model Quality would affect the distance at which a model will switch to a lower quality version. But it doesn’t seem to be the case (watch at the Prowler’s Basilisk Turret):
-

- Low Model Quality – Low LoD

-

- Low Model Quality – High LoD

-

- High Model Quality – Low LoD

-

- High Model Quality – High LoD

- [GPU] Motion Blur blurs out transitions between frames, making action more fluid and pleasant to the eye. However, Motion Blur in PS2 is known to increase input lag, and generally has a high performance cost. Using Motion Blur is not recommended if you care about being competitive.
- [CPU] Maximum Voice Channels – located on the “Audio” tab of the Settings menu. Affects the number of sounds that can be played simultaneously. You may want to reduce this setting if you have a weak CPU, but it may cost you in game, as you may not hear certain key sounds, like enemy shooting you in the back 🙂
- Anti-Aliasing – PlanetSide 2 has a form of built-in anti-aliasing. It works great at close range, but can make distant objects blurry and harder to see. Unfortunately, there is no way to turn it off at this time.
Specializing
PlanetSide 2 gives lets you play ground vehicles, aircraft and infantry. Naturally, you want to have great performance at all times. However, one concept that needs to be understood is that you don’t want to be GPU-bottlenecked in any scenario in PS2. Not only it impacts your FPS and Input Lag, it makes your guns shoot slower. You really don’t want that.
So when playing infantry, you want to push the most out of your hardware, and reduce Render Distance and Particles.
However, to play vehicles, especially aircraft, you need good Render Distance and Particles.
So if you have bad hardware, you will either have to dedicate entire sessions to playing infantry OR vehicles, or accept that you’re not going to perform as well as you could at infantry play.
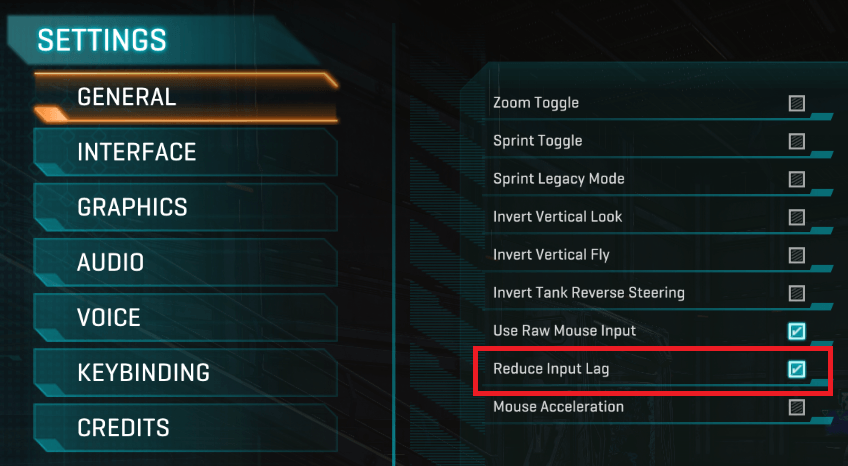
“Reduce Input Lag” Setting
The issue of input lag is a pretty complex in this game. Reducing the size of the flip queue in the graphics driver is a definitely input lag win (on single GPU setups, with or without VSync engaged), while the in-game option for ‘Reduce Input lag’ actually increases it, and can also lower performance slightly.
Furthermore, certain graphics settings, most notably Graphics Quality on its High setting, also increase the input delay, even if the frame rate or GPU-bounded-ness are not affected.
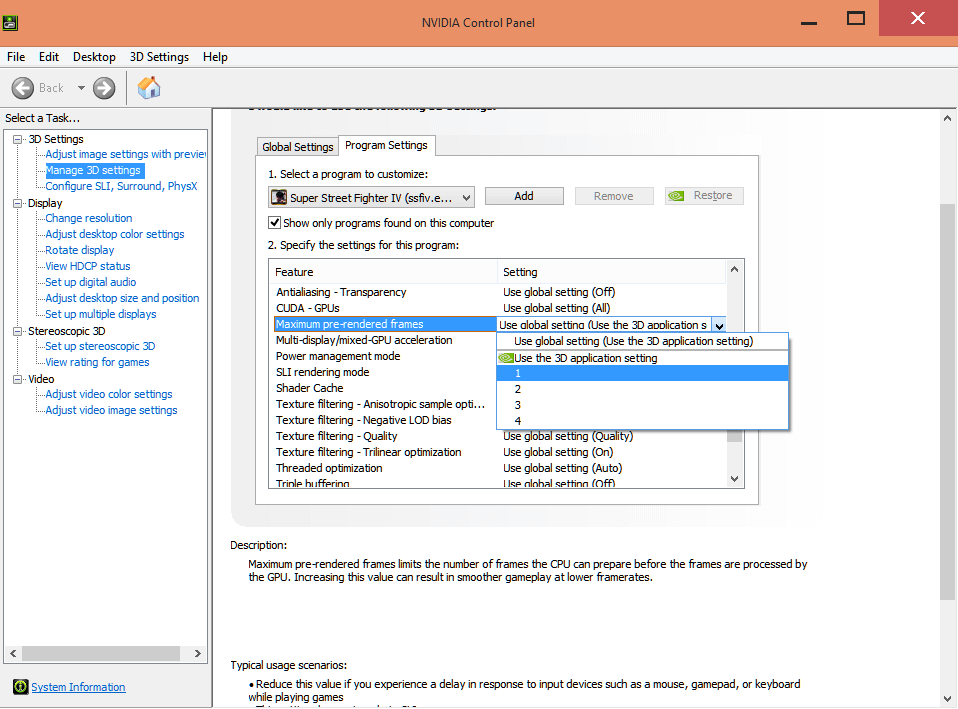
This setting is tightly related to the maximum amount of pre-rendered frames for DirectX games:
Maximum Pre-Rendered Frames (Flip Queue for AMD): this option controls the number of frames the CPU prepares in advance of being rendered by the GPU. Higher values should result in smoother framerate with more input lag, while lower values can help reduce mouse and keyboard lag, but cause stuttering.
In practice, exact results are often unpredictable and you should experiment to find the best value for your situation.
You can change maximum amount of pre-rendered frames in nVidia Control Panel.
AMD Graphics Cards use a dynamic flip queue size, and you can’t adjust it through conventional means.
Contradicting a Daybreak official, /u/Octiceps says that in-game option Reduce Input Lag can actually increase it, as well as reduce performance slightly, and it should disabled at all times.
More info: technical discussion of what frame lag is all about with diagrams.
Performance cost
Unfortunately, there is no up to date information on performance impact of each individual setting.
“PlanetSide 2 Tweak Guide” by nVidia is horribly outdated, as since its release in 2012, PlanetSide 2 underwent massive internal changes and performance optimizations.
It’s safe to say that Graphics Quality, Shadows and Resolution are the most demanding options, but to find out which setting does what to your framerate on your PC, you will just have to experiment.
In general, if you have a weak CPU, decrease CPU-dependent settings to increase performance.
Or if you have a powerful GPU, you can increase GPU-dependent settings at no performance cost.
There are multiple testimonies that putting certain settings on “low” gives little to no performance, and sometimes can even reduce it, so pay attention to what you’re changing and what results you’re getting.
Advanced Tuning – What is allowed and what isn’t
In addition to tuning PlanetSide 2 performance, there are other, smaller things you can change to further customize the game for your own needs.
Here is the latest official stance regarding game client file modification.
It is expressly allowed to:
- Modify InputProfile_User.xml (this is your key/mouse/pad configuration)
- Modify UserOptions.ini (this is your saved graphics and game settings)
- Replace .ttf font files with other fonts.
- Use graphical overlays, such as Recursion Stat Tracker and Overwolf for TeamSpeak 3
All other game file modification is strictly forbidden, and may and will result in a permanent ban.
- Using ReShade, SweetFX or other programs that act as injectors is a bannable offense (source).
- Here is the latest official stance regarding keyboard, mouse and AutoHotkey Macros.
- You are allowed to use a VPN.
Capping FPS
There are several reasons to cap FPS:
- To reduce the likelihood of tearing, when your current framerate exceeds your display Refresh Rate. This is mostly noticeable when using 60 Hz monitors. It’s nearly impossible to notice screen tearing at 120+ Hz.
- To make your gameplay more consistent. Having the game jump between high and low FPS may feel annoying, like the game is speeding up or slowing down. Capping FPS will reduce the magnitude of these jumps, though you will have lower FPS on average.
- To make it so your hardware doesn’t have to work at maximum power at all times. Capping FPS will reduce heat and noise emissions, as well as energy consumption. This can be especially important for laptops. You don’t really need 200+ FPS while AFKing in a warpgate.
- To avoid spikes of input lag when GPU-bound at low FPS. Note that being GPU Bound means the GPU often works at 99%-100% capacity. It does not mean you often see [GPU] near in-game FPS counter.
- To avoid the negative impact of framerate on Rate of Fire. PlanetSide 2 weapons will actually fire slower when your PC struggles to keep up with the game.
Capping FPS always introduces a bit of input lag. The lower the cap – the more noticeable it is.
There are several ways of capping FPS:
- Using in-game Smoothing setting.
- Changing MaximumFPS value in UserOptions.ini.
- Through Graphics Card drivers, for example nVidia Inspector.
- Using a third-party application, such as Riva Tuner Statistics Server (RTSS).
An in-game limiter is usually most ideal in terms of latency, but not in the case of Forgelight, where it adds a good deal of input lag.
The nVidia FPS limiter adds 2+ frames of input lag, as tests by Battlenonsense and Blur Busters have shown. It’s clearly not ready for prime time yet, hence being hidden and only accessible via nVidia Inspector.
RTSS’ FPS limiter operates at CPU-level, which is the closest an external method can get to the engine-level of an in-game limiter. The Nvidia limiter is driver-level, which is one further step removed from engine-level.
RTSS would be the best option, but according to my tests, it does nothing to solve the Framerate vs Rate of Fire issue, and actually makes it worse.
If your framerate is usually higher than your display’s Refresh Rate, then simply enable Smoothing. Otherwise, you can set the Smoothing’s FPS cap by adding:
SmoothingMaxFramerate=X
There’s also the
SmoothingMinFramerate=X
command, but it’s currently unclear whether there’s any reason to bother with it.
To the [Rendering] part of your UserOptions.ini. Just after Smoothing=1 is fine. It’s currently unclear whether this way is any different from just using MaximumFPS instead.
If you never want to deal with RoF vs Framerate issues, the FPS cap should be slightly below your absolute minimum framerate.
Vertical Field of View
PlanetSide 2 lets you change your Vertical Field of View, which is different from some of the other FPS games that let you change Horizontal FoV instead.
Vertical and Horizontal FoVs are linked through your Resolution’s Aspect Ratio. You can use this FoV Calculator for specific numbers.
Higher FoV means more “stuff” fits on your screen, so it’s often recommended to keep Vertical FoV at the default value of 74 degrees, which is the maximum. However, it’s not that simple.
While there will be more “stuff” on your screen, that “stuff” will be smaller. High FoV can make it hard to acquire targets. This becomes even more of a problem if you have a small monitor.
Another consequence of high FoV is reduced performance.
Other less obvious side effects:
- Field of View affects how much zoom you’re getting when Aiming Down Sights with different optics.
- Abnormally high FoV will create a “fish eyes” or “fish bowl” effect, which can feel uncomfortable, and abnormally low FoV can cause motion sickness.
To avoid motion sickness, FPS games should be played at a minimum of 90 Horizontal FOV. To get that 90 Horizontal FoV, set your Vertical FoV not lower than:
1024×768 (4:3) – Horizontal 90 = Vertical 74
1920×1080 (16:9) – Horizontal 90 = Vertical 59
1680×1050 (16:10) – Horizontal 90 = Vertical 65Here is the comparison for visibility and target size at different FoVs and Aspect Ratios:
If you do have a small monitor and/or weak hardware, it can be necessary to reduce FoV or use a squarer Aspect Ratio.
There are pros and cons to both of these methods.
Playing at a stretched Aspect Ratio only reduces your Horizontal field of view, while lowering your Vertical FoV will also reduce your vertical field of view. This is a fairly important difference for PlanetSide 2, as it does have some vertical gameplay.
Lowered vertical FoV definitely feels a lot more claustrophobic than playing stretched. It also increases visual vertical recoil, flinch and screen shake.
On top of that, a squarer aspect ratio will provide better framerates (less pixels to render horizontally, given the same amount of vertical pixels).

![often see [GPU] near in-game FPS counter](http://cmdrcyrious.com/wp-content/uploads/2017/11/7Pa3K6z.png)
Going above maximum FoV
PlanetSide 2 settings menu will not let you set Vertical FoV higher than 74 degrees. However, if you enable Wide View Mode, you can set Vertical FoV all the way up to ~150 degrees in UserOptions.ini. Check this video by ZoranTheBear for more info.
UserOptions.ini
UserOptions.ini located in PlanetSide 2 folder contains all of the graphical and performance settings that you can possibly customize, as well as the list of people that you muted (ignored) in game and mouse sensitivity settings, but not keybinds.
According to PlanetSide 2 development team, players can make any changes to UserOptions.ini without fearing a ban.
Here’s how this file typically looks:

A few noteworthy fields:
RenderQuality
You can set this value to 1.414214 or 2.000000 to get 2x or 4x Supersample Anti-Aliasing respectively.
This will have a serious impact on your performance, but will make the game look a bit smoother. Not recommended unless you have a very powerful GPU.
Also, if you’re a proud owner of GTX 970 or GTX 980 (or any other nVidia GPU with Maxwell architecture) you can enable DSR in your nVidia Control Panel, which is basically the same thing as SSAA.
It’s possible that DSR can provide better visuals/performance than editing Render Quality, but as a side effect, DSR will scale down your HUD.
MaximumFPS
Provides a way to cap FPS on the game’s engine level. Functions independently from Smoothing, through probably has the same principle. This value is set to 250 by default.
ParticleDistanceScale
Credit: EddieCarbone.
ParticleDistanceScale=0.650000
This value sets the render distance for particles, like tracers and explosions.
Lowering it to something like “0.000010” will make particles render only at close ranges and increase performance, but make it harder for you to play, because you won’t see things like weapon fire tracers and smoke puffs from damage vehicles.
This value can also be increased to increase the range where you can see particles, which can be important for aerial combat.
Generally there’s no reason to touch this setting for an average player, and it can be performance intensive.
If you want to see tracers at long distance, set particle quality to ultra instead. This can be adjusted while in game, and can be session-based or on-demand in case your ini file is read only.
UseLod0a
UseLod0a=0
Does “something” related to extremely weak hardware and how the game handles Level of Detail based on distance to an object.
Generally it’s better to disable this setting, unless you run extremely old and weak hardware (c) Billbacca the developer.
Disable automatic decloak
By default, infiltrators can decloak by pressing “fire” button. This wasn’t always this way, and oldschool players, who are used to decloaking manually, may find this annoying. We do recommend keeping it on, though, as it is great for sniping out of cloak etc.
To disable automatic decloak, find or add this line in UserOptions.ini under [General]:
DecloakOnFire=0
Disable ability queue
If your character is unable to perform a certain action, but becomes able to perform that action within a specified time frame, that action will be automatically performed later.
This is easier to explain on an example.
Let’s say you decloak, and try to throw a grenade while decloaking. The decloaking animation will prevent you from throwing the grenade.
If Ability Queue is set, for example, to 0.5 seconds, the game will remember that you were unable to throw the grenade, and if you will become able to throw the grenade in 0.5 seconds, your character will do that automatically when the decloaking animation completes.
However, this creates more problems than it solves.
The common occurrence is that you’d double tap the cloak key (or use the DecloakOnFire, but also hit the ability key) and uncloak, but have the AbilityQueue kick in and you’d wind up recloaked.
It basically plays out like you have lag anytime you’re decloaking and is a good way to cloak trap yourself or find yourself using an ability at a time it’s only going to get you killed.
When it was first added and enabled by default, it caused a lot of very frustrating moments and a lot of angry infils.
I’d strongly advise keeping Ability Queue at 0.0 because it ultimately will screw you over.
To disable ability queuing, find or add this line in UserOptions.ini under [General]:
AbilityQueueSeconds=0.000000
Custom reflex reticle color an other UI elements
The ini file allows you to customize the colors of various UI elements, including crosshairs, squad colors, no-deploy zones, orbital strikes etc.
Check this link to obtain the decimal color codes.
Example:
[UI]
TintModeReticuleStyle=1
TintModeReticuleColor=16711680
PlatoonSquadColor0=65280
PlatoonSquadColor1=15885602
PlatoonSquadColor2=5866791
PlatoonSquadColor3=8210688
TintModeNoDeploy=15539236
TintModeOrbitalStrike=16225309
NoDeployZoneColor=13369344
OrbitalStrikeColor=13421568
OrbitalStrikeAlpha=0.100000
Reticule sytle
Credit: originally posted on reddit by MrRube.
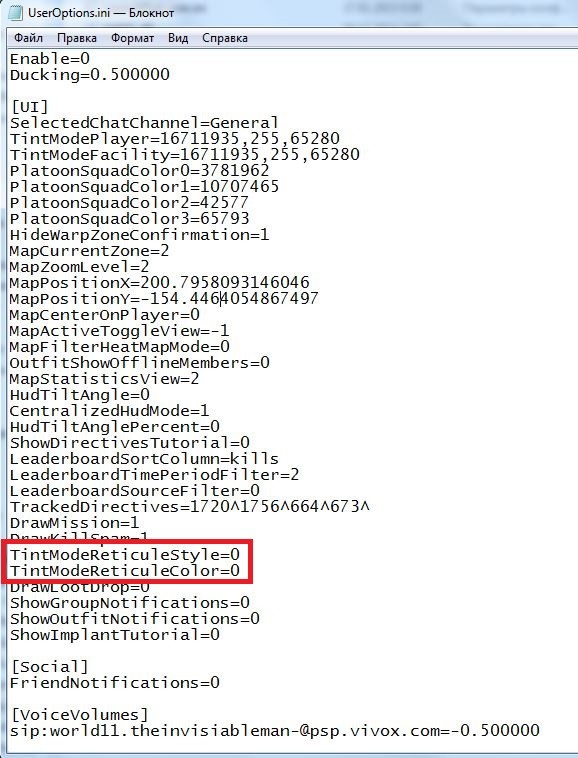
UserOptions.ini has two lines you can use to change your reticule color.
The first is “TintModeReticuleStyle”. By default this is set to “0”. Changing it to “1” will allow you to use the second line to change the color of all your reticules.
The second line is “TintModeReticuleColor”. When “TintModeReticuleStyle” is set to “1”, you can set “TintModeReticuleColor” to a decimal color value.
For example, if you wanted all your reticules to be neon green, you would set it to “65280”.
Use this site to find out the decimal value for any color you want (thanks LordMcze).
So if you want all of your reticules to be neon green, put these values in [UI] section of your UserOptions:
TintModeReticuleStyle=1
TintModeReticuleColor=65280
Custom crosshair overlay
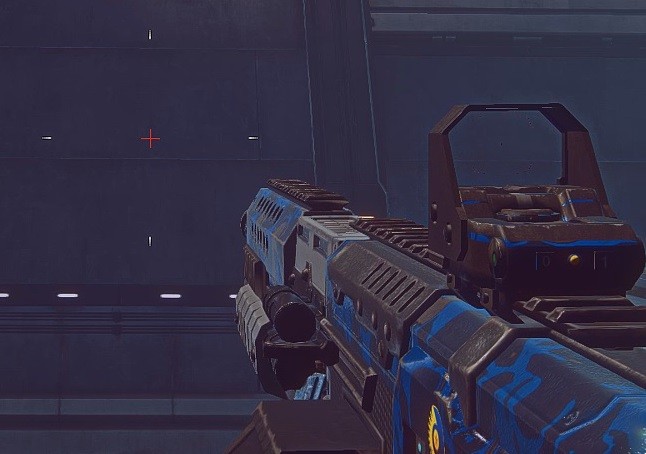
A custom crosshair overlay will add a secondary crosshair in the exact center of your screen. This will help you aim with hip fire better, spot enemies while being a passenger in a vehicle, fire your tank cannon in 3rd person view, and to be more precise while using a weapon with iron sights, which tend to wobble all over the place, even though the weapon itself always fires in the exact middle of the screen.
There are two common ways of creating your own custom crosshair overlay in PS2:
- Using Overwolf, which is customizable overlay for TeamSpeak. Install Teamspeak and Overwolf from the web, and download crosshair overlay from here.
- Using Recursion Stat Tracker, which is a community-created tool for creating in-game overlay.
Download Recursion Stat Tracker from here and a crosshair of your choice from here. You can preview the crosshairs here.
Changing the game’s font
Credit: originally posted on reddit by B4rr. Brought to my attention by quickbeam2.
Changing game’s font is explicitly allowed by PS2 developers.
The standard in-game font is called Geo-Md.tff.
To change it you have to copy another font into: […\PlanetSide 2\UI\Resource\Fonts\Geo-Md.ttf] after the launch pad updates the game.
It is a chore to do manually every time, so you can create a *.bat file in your game folder to do this for you. It can also run Recursion Stat Tracker (RTST) and TeamSpeak (TS), unless they are running already.
You can create the .bat file you need using the code from pastebin:
| What to launch | PasteBin link |
|---|---|
| PS2 | http://pastebin.com/aJTXzEC3 |
| PS2 (steam client) | http://pastebin.com/tAh2JZyw |
| PS2+RTST+TS | http://pastebin.com/VfKQ56qu |
| PS2 (steam)+RTST+TS | http://pastebin.com/E6pCEGYc |
How to:
- Go to the “…\PlanetSide 2\UI\Resource\Fonts” folder.
- Copy a font that you would like to use in the game into this folder.
- Create a new text file and paste the code from the links above.
- In that code, change “verdana.ttf” to the name of your new font.
- If necessary, change the paths of the *.exe files. (Especially steam users: Make sure that if you make a shortcut to PS2 on your desktop, that it has the same ID. I don’t know if they will coincide.)
- Save the text file as Planetside2.bat
- Create a shortcut to your desktop or start menu.
- [OPTIONAL] Right click the shortcut, properties, change icon, browse to the installation folder and select LaunchPad.ico or select another *.ico file on your PC.
- Double click the shortcut. Wait for the Launcher to be done with updating. Press any key twice in the command line window.
- Enjoy PS2 (and have Recursion and TS started automatically) in Verdana, Comic Sans, or Windings.
Improving Image Quality
You can improve image quality at a negligible performance cost through GPU Control Panel in these two ways:
- Set Anisotropic Filtering to 16x.
- Allow Negative LoD Bias and set it somewhere between -0.3750 and -0.7500.
You can find more details in this reddit post by sixoo.