

Attention! This tool is based on the wrong research and should not be used.
[spoiler title=”Useless wrong tool”]This Excel sheet will calculate ideal burst length at different ranges from 5m to 70m for any PlanetSide 2 weapon.
Download links
>> Main download link <<
How to use
1)Pick a weapon and find its stats in game or at PlanetStats. You will need:
- Maximum Damage
- Maximum Damage Range
- Minimum Damage
- Minimum Damage Range
- Standing Still Cone of Fire
- Standing Moving Cone of Fire
- Cone of Fire Bloom (also known as Cone of Fire Recoil)
- Rate of Fire (optional)
2)Download and open the Burst Length Calculator.
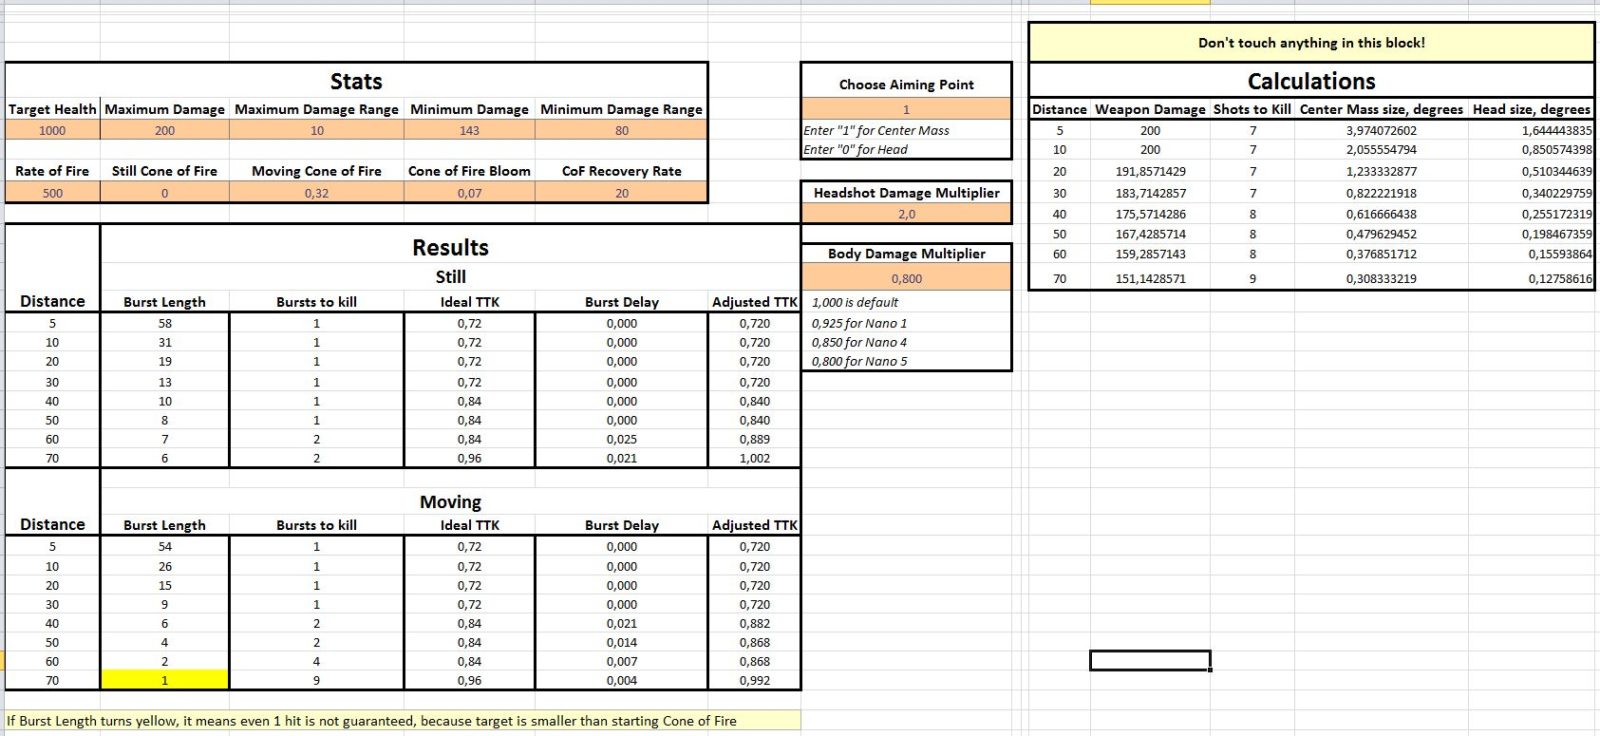
3)Input weapon’s stats into orange boxes in Stats block:

CoF Recovery Rate is “20” for all known weapons, you don’t have to touch it.
Rate of Fire is optional, you will only need it if you want Time-to-Kill calculations.
Target Health – 1000 is default, 900 for Infiltrators, up to 1450 for NMG / Adrenaline Shield Heavy Assault.
3)Additional configuration
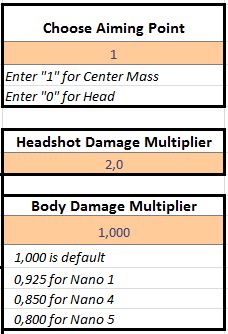
By default, calculations are done for Center Mass. Enter “0” into orange box in Choose Aiming Point block to calculate for headshots instead.
Headshot Damage Multiplier field is there “just in case”, since only shotguns use semi-auto or auto fire modes with 1.5x headshot multiplier. There’s also T7 MCG, but it has static ADS CoF.
Heavy Assault with active Resist Shield takes 1.2x headshot damage.
Body Damage Multiplier allows you to add Nanoweave into calculations. Naturally, this field is ignored if you calculate for headshots.
Heavy Assault with active Resist Shield takes 0.6x body shot damage (does not stack with Nanoweave).
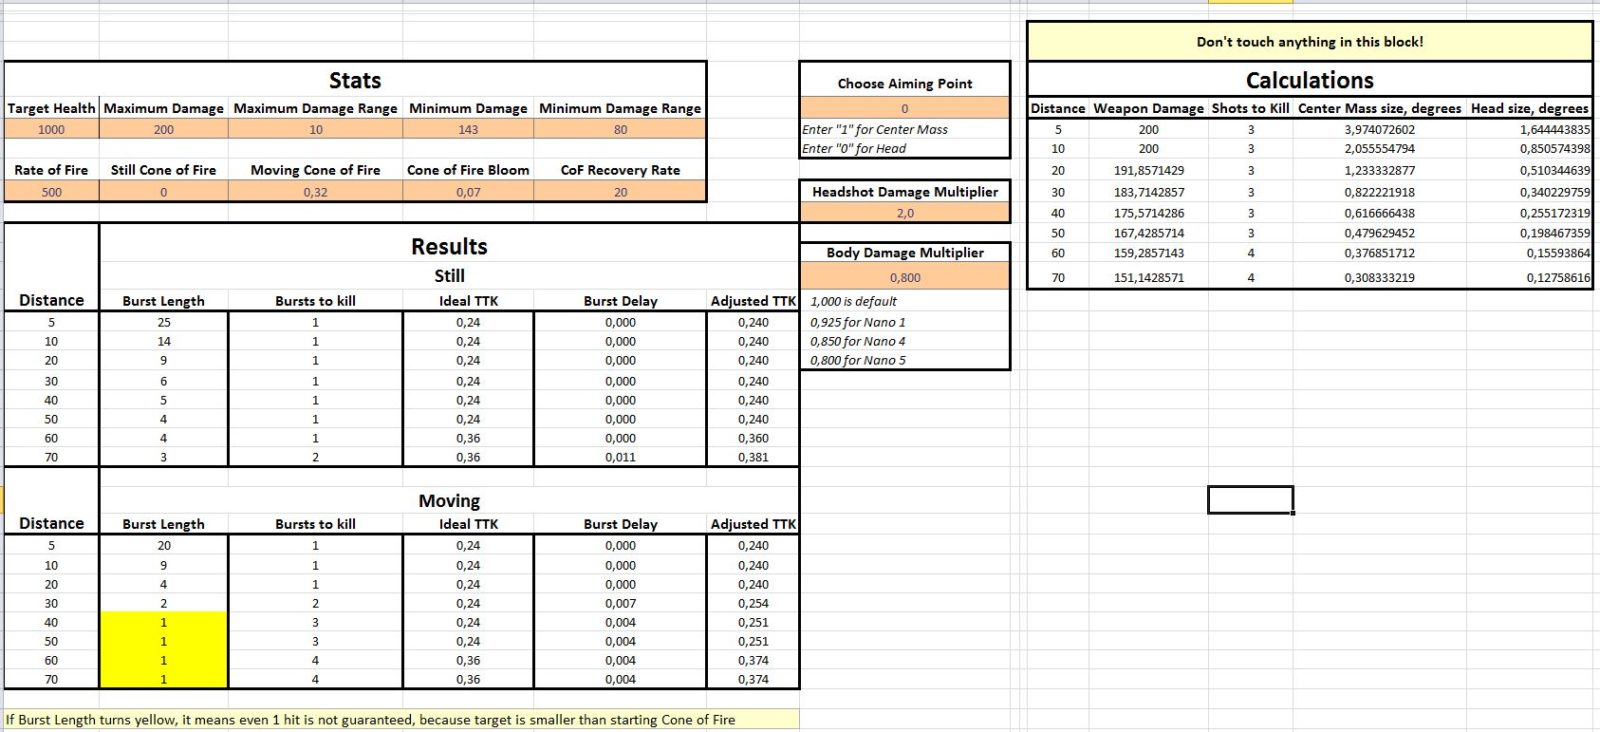
5)Analyze results.
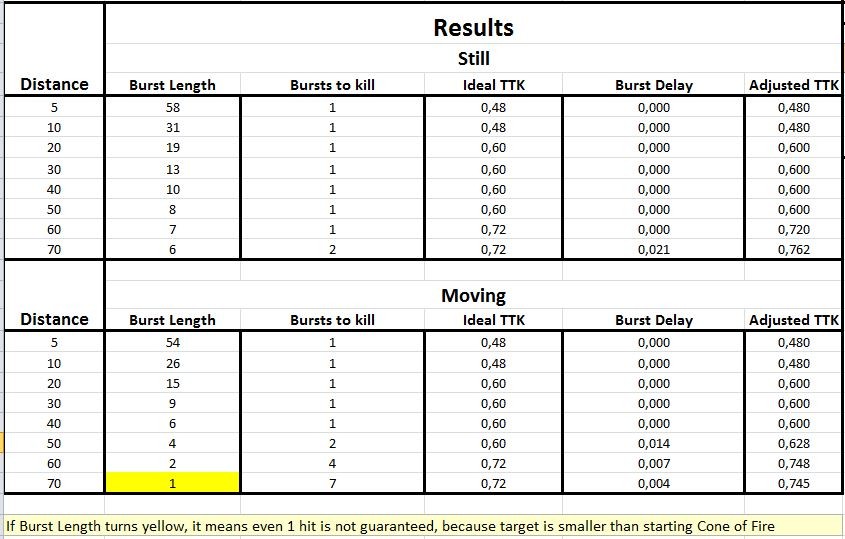
Burst Length will tell you the maximum amount of rounds in one burst that are guaranteed* to land on target at a certain Distance.
* – In order to keep calculations pure and simple, this calculator ignores recoil completely and assumes the player keeps his aim exactly at target’s center.
No Human Element whatsoever, only Cone of Fire mechanics participate in calculations.
If a Burst Length value of 1 turns yellow, it means that even 1 hit is not guaranteed, because target is smaller than starting Cone of Fire. This will be especially noticeable with headshots at longer ranges.
Bursts to Kill will tell you the amount of bursts necessary to kill an enemy with Target Health with a certain Burst Length.
Ideal TTK column will show you time-to-kill with full auto fire.
Burst Delay will tell you the amount of time necessary for CoF to reset between bursts.
Adjusted TTK will tell you the amount of time it will take to fire off Bursts to Kill with Burst Delay between them.
Considerations
While the resulting Burst Length is a very specific number, you should treat it for what it is – an idealized model. If a robot was playing PlanetSide 2, he would shoot this way. For a human it is impossible to disregard recoil, nor to keep aim exactly at the center of a target.
Calculator itself is not perfect, as Target Sizes are hard to measure precisely. My way of measuring gives an error of ~1 pixel, which can be a huge deal at longer ranges, where that pixel constitutes ~25% of the target.
If I had access to 4k video or screenshots, that would quadruple Calculator’s precision.
How to benefit
The Calculator will tell you what is the best theoretical performance your weapon can give you.
It’s not about your personal performance, it’s about what your gear is capable of.
Write down or print your calculated results and go to VR training. Equip Sweeper HUD implant, and learn to judge distance to the enemy in ballpark of tenths of meters. You can use crosshair notches or Red Dot as reference.
Or use these screenshots.
Now, with weapon’s capabilities in mind, you can establish rough engagement guidelines for yourself.
Example of Analysis
Let’s use AC-X11 as an example:
EDIT: I forgot to account for mandatory HVA in this example, but since it’s slated to receive some changes, I’m gonna hold off on updating this example.
AC-X11 bodyshots
First, let’s find a cutoff point where an enemy can be realistically killed in one burst while standing moving.
At 30m, AC-X11 takes 7 hits to kill a full nano target, while its CoF can support only a 9 shot burst. So margin of missing is only 2 shots, which is a bit too close for comfort. AC-X11 has rather harsh recoil and unimpressive bullet velocity, so misses are very probable.
This is also the point where you consider your personal skill as a shooter. Accuracy grades from your character stats at FISU should give you an idea of where you stand among other players. If your accuracy is below average, consider giving yourself a higher margin for error.
At 20m AC-X11 can sustain a 15 shot burst, which is way more than enough.
So I would call 25m the cutoff range for realistic 1-burst kill in the heat of combat.
If there is an opportunity to stand still and aim carefully, it’s probably possible to 1-burst enemies 35m away.
Naturally, these values will go up or down depending on enemy. An AFK infiltrator can be 1-bursted from greater ranges than shielded HA, actively dodging incoming fire.
Between 25m and 60m we want to fire in bursts of 10 to 5 rounds depending on distance, expecting a 2-3-burst kill most of the time.
We can also see that it’s nearly pointless to fire at enemies >60m away while moving.
Now let’s take a look at headshots.
AC-X11 headshots
It’s immediately apparent that AC-X11 struggles at getting headshots at ranges greater than 25m while moving.
So we can set 25m as the cutoff range for 1-bursting an enemy with headshots. And if we want to go for headshots at greater ranges, we need to remain stationary for the whole burst.
Let’s recap on our guidelines:
While moving, enemies can be 1-bursted with either headshots or bodyshots within 25 meters.
While moving, enemies can be 2 or 3 bursted with burst length of 10 to 5 rounds, depending on range.
While standing, enemies can be 1-bursted with either headshots or bodyshots between 25m and 60m.
Given a choice, enemies further than 60m should not be engaged while moving.
After you formulate these guidelines for yourself, all that remains is to learn to put them into practice. Training and mental discipline!

Have fun theorycrafting your way to victory. Please inform me of any issues with the Calculator.
[/spoiler]Note: for calculating bullet damage at different ranges and finding out Bullet Damage Thresholds, use Bullet Damage Calculator.
Share with: